
The information you provide about a product affects how the checkout page is displayed to customers and how associated integrations are triggered.
In the product information, you define the code, name, image, and add offers with their respective price, discount, payment methods, among other settings.
To get Checkout Guru links, you need to add at least one offer to the product.
Some product sections are optional, while others are displayed only if there is related data or a corresponding active integration, such as billing.
You enter or update product information by creating, duplicating, or editing a product.
To customize your product with complementary information, access Other Product Settings.
On this page:
-
Code and Name
-
Image
-
Offers
-
Event
-
Sales
-
Subscriptions
-
E-commerce
-
Accounting
-
Audit
Before you start, you need…
-
Be an administrator user or have permission to perform the following actions;
-
Have one or more products created.
Code and Name
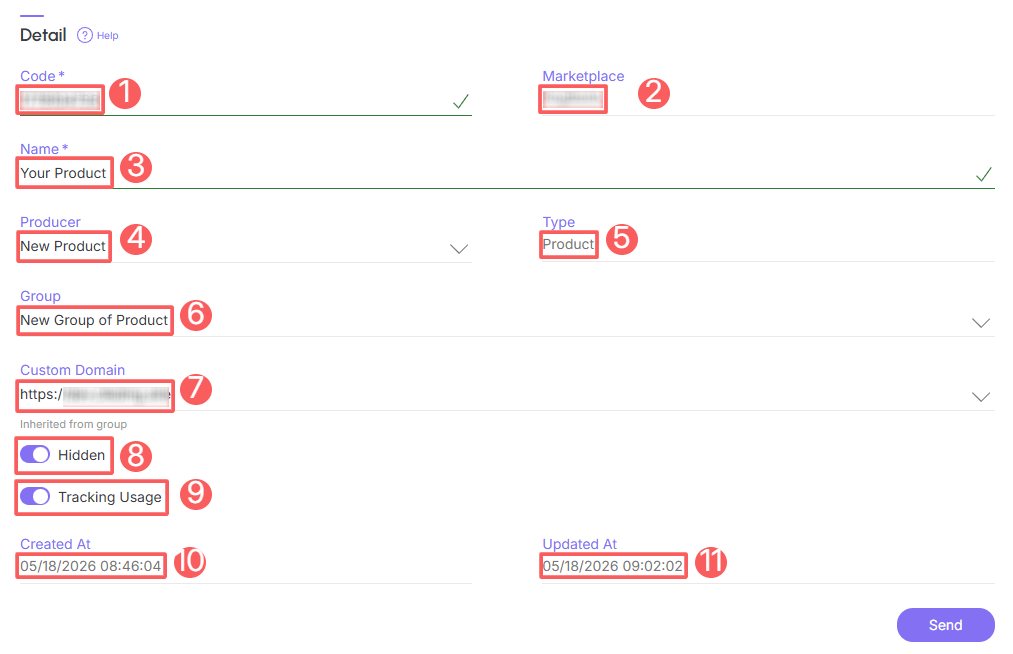
In the Detail section, you can edit basic information such as identification code, product name, producer (manufacturer), and other options.
Once the product is created, it is not possible to change the type or the linked payment processor (marketplace).
Steps:
1 - Duplicate or edit an existing product - an editing window will be displayed.
2 - Click on Detail.
3 - The following fields are available for completion:
-
Code: product identifier - you can change it if you wish;
-
Marketplace: name of the linked processor to transact the payment;
-
Name: the name/title of the product you want to show to customers;
-
Producer: select the content producer or manufacturer/supplier name - the list of producers registered;
-
Type: icon that indicates if it is Product (one-time charge), Subscription (recurring charge) or E-ticket (one-time charge) - if desired, hover over the icon to view the label;
-
Custom Domain: select the custom domain you want to associate with the product - you will be able to see the active configuration level indication;
-
Product group: select the group of products you want to associate;
-
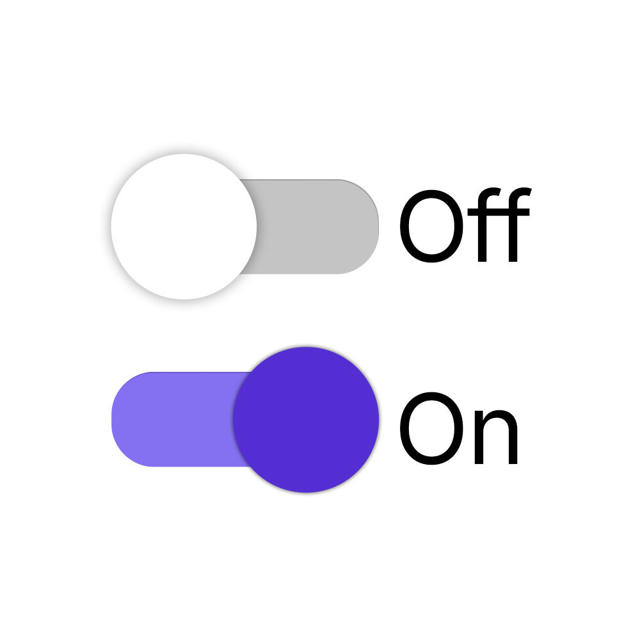
Hidden: when active, hides the product from the standard product list - we recommend leaving this option off;
-
Tracking Usage: when active, lists the product to link to tracking - we recommend leaving this option off;
-
Created At: product creation date;
-
Updated At: date of the product's last update.
4 - Upon completing the edit, click the Send.
Image
You can add an image to the product. When you use Checkout Guru, the linked image will be automatically associated with the offers. If desired, you can change the image in each of the offers. In addition, you can remove the image if you wish to change it.
Steps:
1 - Create, duplicate or edit a product - an editing window will be displayed.
2 - Click on Detail.
3 - In Image, click on Select Image.
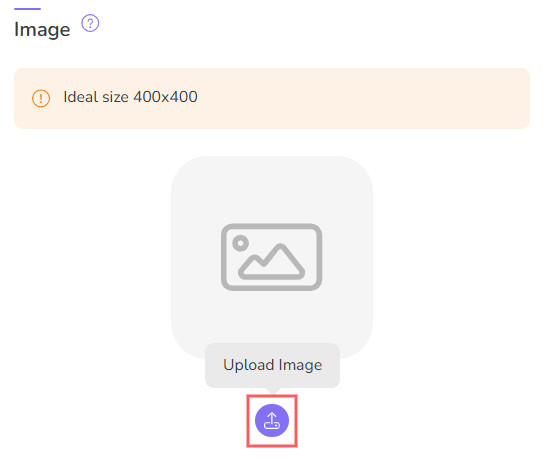
4 - Select the image you want to display for the offer.
Recommended image size: 400x400 pixels resolution.
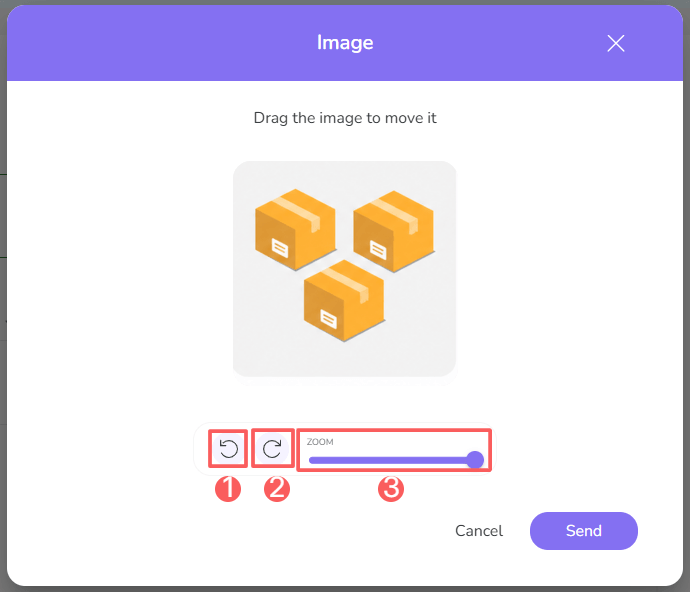
5 - If desired, use the control buttons to adjust the image. as you make changes, you can check the final result in the displayed image.
-
Rotate left: click to rotate the image to the left;
-
Rotate right: click to rotate the image to the right;
-
Adjust Zoom: drag the selector right/left to adjust the zoom.
6 - When you finish the changes, click on Send.
Remove Image
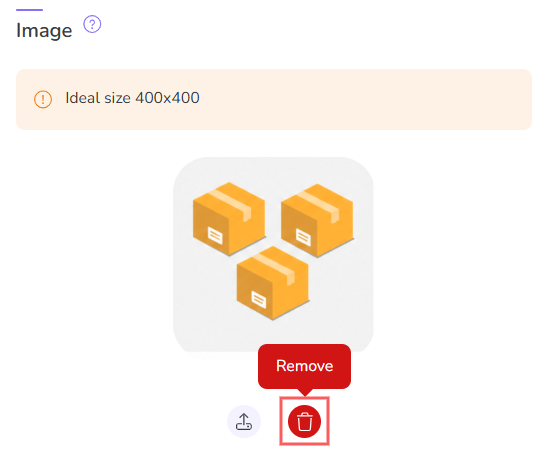
You can remove an image at any time. This feature is useful when you want to replace the image of a specific product.
Steps:
1 - Create, duplicate or edit a product - an editing window will be displayed.
2 - Click on Detail.
3 - In Image, click on Remove.
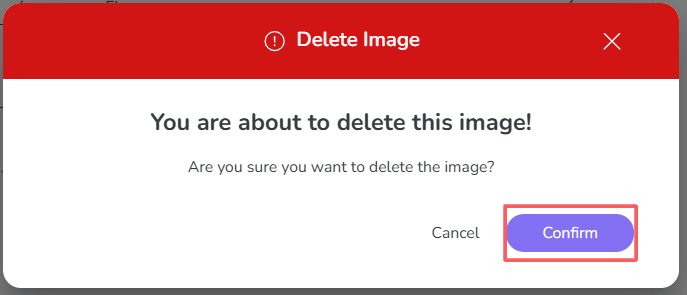
4 - A confirmation window is displayed. If you wish to proceed with the image removal, click on Confirm.
Offers
You can add one or more offers for the product according to your sales strategy.
It is through the offer that you generate checkout links and define pricing, payment methods, shipping charges, and configure order bump or options for plan changes (upgrade/downgrade).
The Offers section only appears available when the linked payment processor (marketplace) is compatible with Checkout Guru.
To create and manage offers, see:
Event
The section Event displays the list of tickets associated with the product in question. It is possible to fill in event information, such as country, time zone, start and end date and time, event location, and event website. In addition, you can select the event type, whether it is in-person (by filling in address details) or online.
In Settings, it will be possible to automatically assign tickets to the buyer and/or assign indifferent tickets to the same participant's email. You can configure the sending of transactional emails for each ticket status. This option is useful for easily configuring the product's most recent tickets.
It is possible to filter the tickets of the consulted product. For more details consult this link.
Steps
1 - Access the product detail - the product registration will be displayed.
2 - Click on Event.
3 - The following fields are available for completion:
-
Country: inform the event's country of origin;
-
Time zone: inform the event's time zone;
-
Start Date and Time: inform the event's start date and time;
-
End Date and Time: inform the event's end date and time;
-
Location: inform the event's location;
-
Website: inform the event's URL.

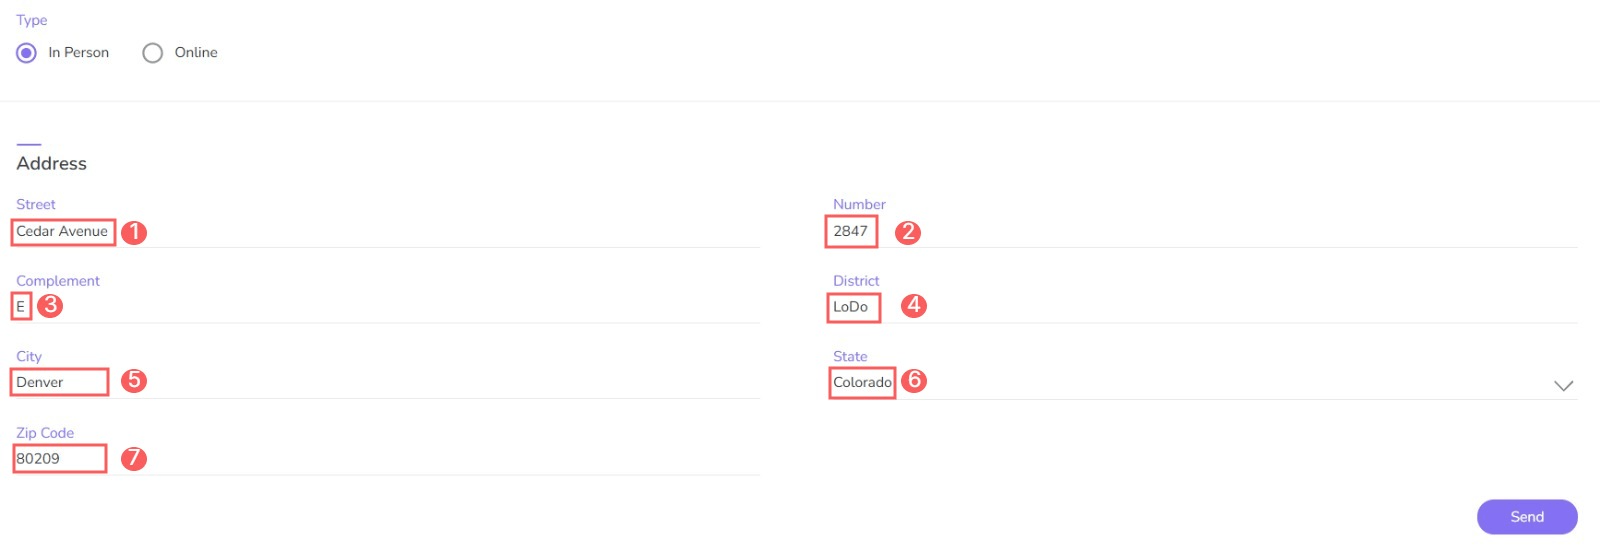
4 - In Type, select In-person or Online according to the event's modality.
In-person
-
Street: inform the street where the event will be held;
-
Number: inform the event's street number;
-
Complement: inform the event's location complement;
-
District: inform the event's location neighborhood;
-
City: inform the city where the event will take place;
-
State: inform the state where the event will take place;
-
ZIP code: inform the ZIP code of the event address.
5 - Click on Send.
Online

5 - Click on Send.
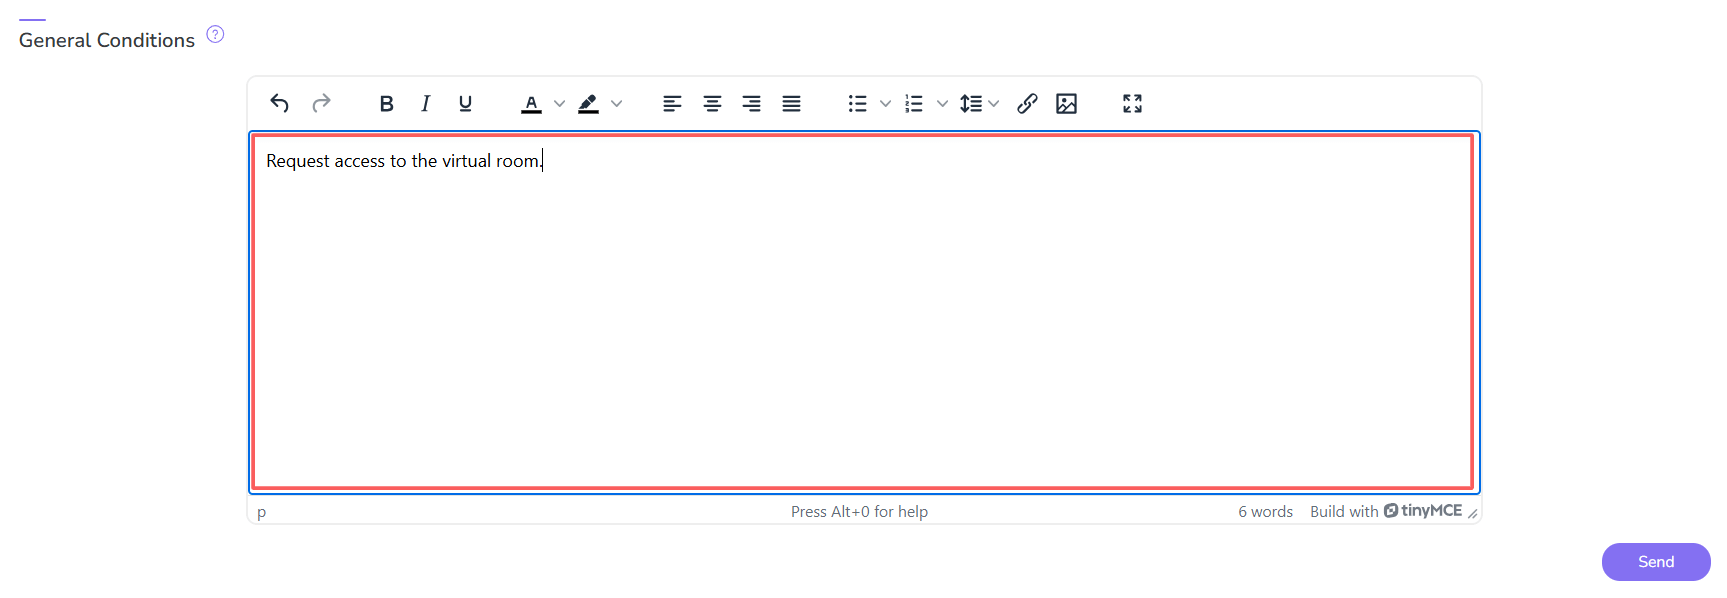
6 - In General Conditions, enter the instructions you want to include for the event.
7 - Click on Send.
8 - In Settings:
-
Assign a ticket to the buyer automatically: when activated, automatically assigns a ticket to the buyer;
-
Assign multiple e-tickets for the same email: when activated, allows assigning different tickets for the same participant's email;
-
Send transactional emails: when activated, allows sending personalized transactional emails;
-
E-ticket Created: when activated, sends an email that the ticket has been created;
-
Invited: when activated, sends an email informing that the ticket has been granted to the guest;
-
Assigned: when activated, sends an email to the guest/participant that the ticket has been assigned;
-
Checked-in: when activated, sends a Check-in (participation) email for the event -guest/participant;
-
Canceled: when activated, sends an email that the ticket has been canceled;
-
Warnings/Reminders: when activated, allows sending notice/reminder emails;
-
Buyer - Tickets Unassigned: when activated, sends an email to the buyer informing that there are tickets to assign;
-
Invited - Tickets Unvalidate: when activated, sends an email to the guest informing that there are tickets to validate;
-
Event Start Reminder: when activated, sends an email to the guest/participant reminding them of the event start.
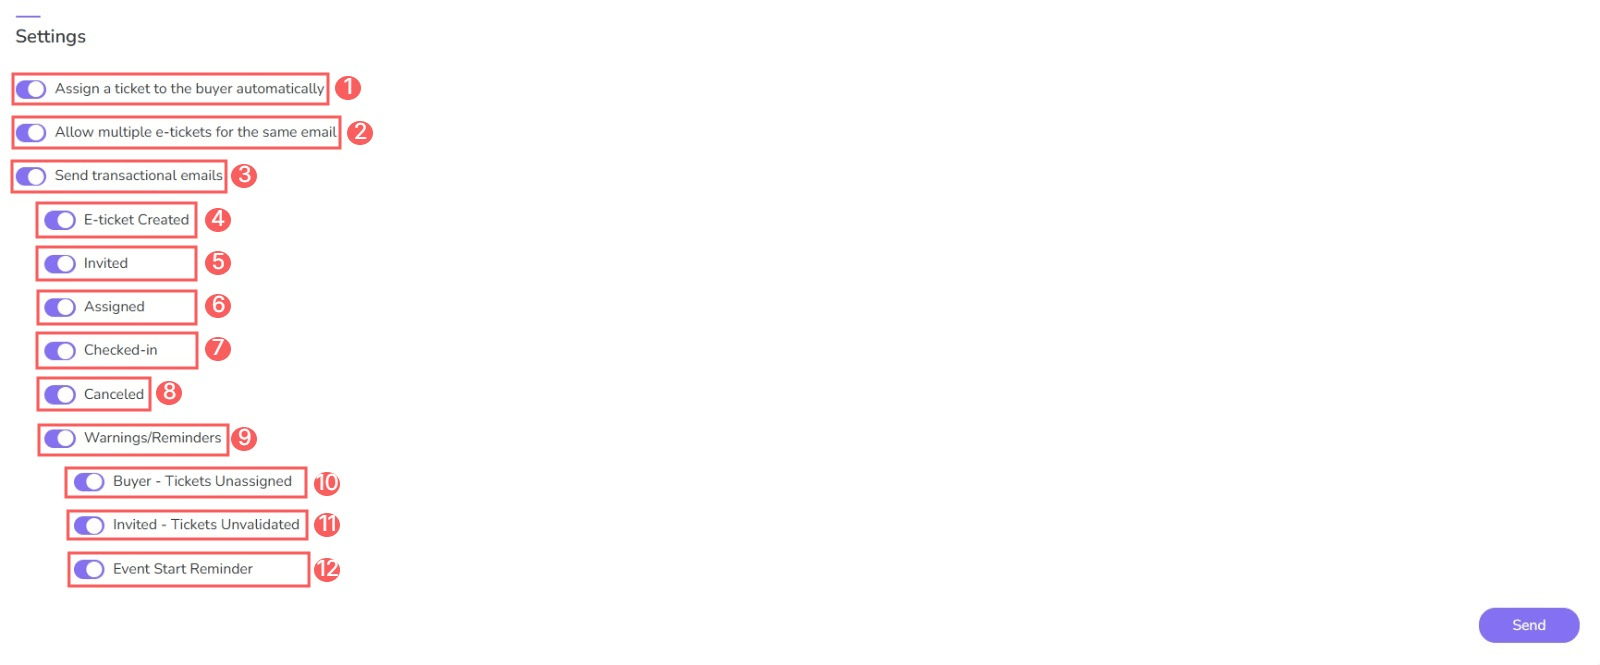
When activated, transactional emails will be sent, even if there are no personalized emails, and when personalizing an email and activating it, this email will replace the default email.
9 - Click on Send.
Update Event
After creating the event, you can edit information such as the country, time zone/time, start date and time, end date and time, location, website, and type. In addition, you can update the general conditions and settings of your event. This feature is useful if you want to configure the information for an event that has not yet had e-tickets generated.
Attention: When changing event data, all e-tickets already issued will be automatically updated.
Steps:
1 - Access the product detail - the product registration will be displayed.
2 - Click on Event.
3 - Fill in the event information.
Update Event with E-tickets already issued
If you already have an event created, and it already has e-tickets generated, information will appear stating that when changing the event data, the e-tickets already issued will be automatically updated; that is, this change will impact the e-tickets already generated.
In this case, when accessing the product to edit the event information, a warning box will appear as follows.
Steps
1 - Access the product detail - the product registration will be displayed.
2 - Click on Event.
3 - Then, the event will appear with the information box1.
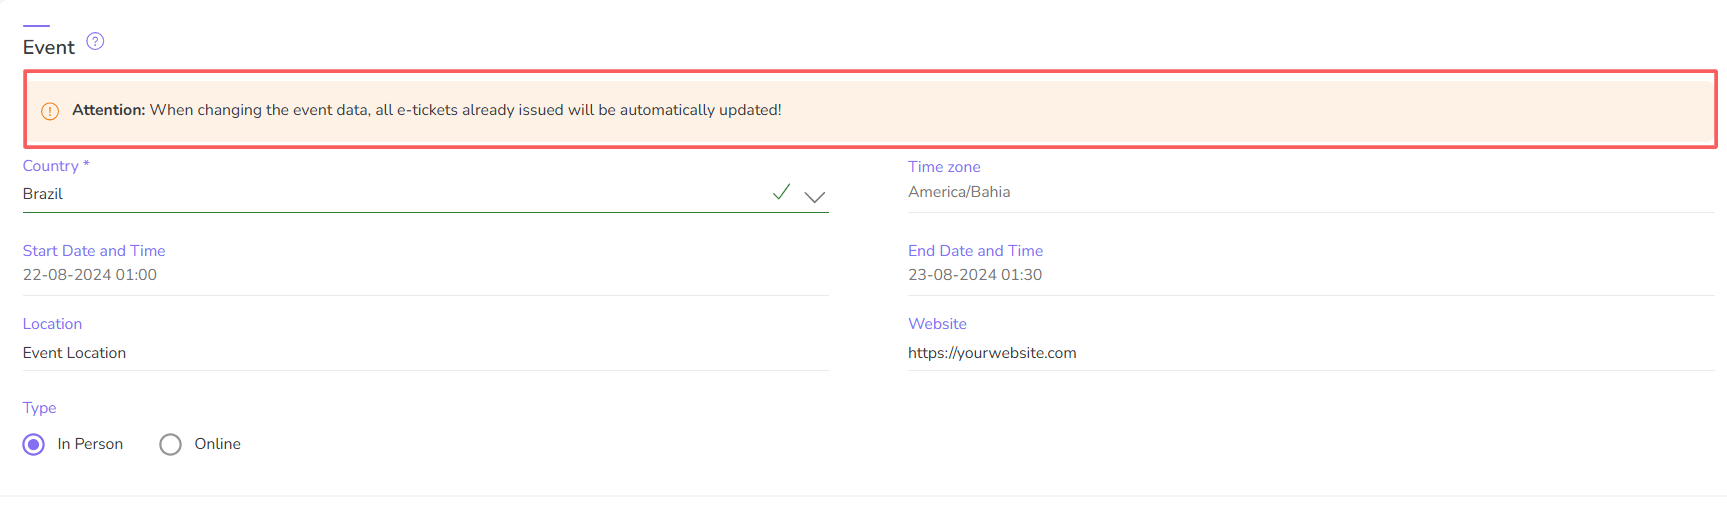
(1) The warning will only appear for events that have generated e-tickets.
4 - If you change the event information, a confirmation window is displayed. If you wish to proceed with the changes to the event data, click on I'm Sure.
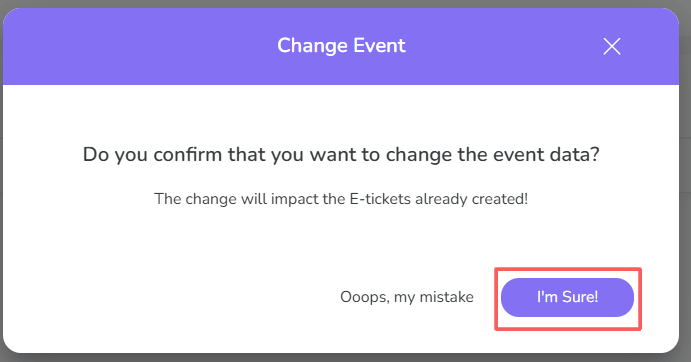
The change will impact the E-tickets already generated!
E-tickets
The E-ticket section displays the list of tickets. This option is useful for easily viewing the product's most recent tickets.
Steps
1 - Access the product details - the product registration will be displayed.
2 - Click on E-tickets.
3 - The list displays the following information:
-
Status: ticket status - Open, Assigned, Canceled, Checked-in or Guest;
-
Code: identification code of the ticket;
-
Date: ticket creation date in the system;
-
Product: name of the event created;
-
Attendee: name of the participant associated with the ticket;
-
Email: email of the participant associated with the ticket;
-
Phone: contact number of the participant associated with the ticket;
-
Send Invitation or Copy URL Icon: icon to send invitation/copy URL to a participant/guest - the icons may differ depending on the ticket status.

You can access the ticket details by clicking on the desired item.
Export E-tickets from a Product
You can export the e-ticket information in an XLS spreadsheet.
Steps:
1 - Access the product details - the product registration will be displayed.
2 - Click on E-tickets.
3 - In E-tickets, click on XLS.
4 - After a few minutes, you receive a notification in the Guru admin with the download link. Click on the notification icon1 to view the list of notifications.
1 It may be necessary to reload the page in your browser (press CTRL+F5) for the notification icon to change color.
5 – Locate the corresponding notification and click on Download.
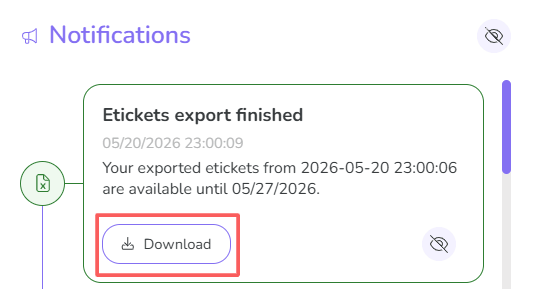
The download link is also sent by email.
Filter E-tickets for a Product
You can filter the information of an e-ticket.
Steps
1 - Access the product details - the product registration will be displayed.
2 - Click on E-ticket.
3 - In E-tickets, click on Filters.
4 - The list displays the following information:
-
Period: searches for tickets with start and end dates - if desired, use the predefined time range buttons;
-
Code: searches for the ticket with the informed identification code;
-
Email: searches for tickets where the participant's email (product) is associated;
-
Status: searches for tickets with statuses corresponding to those selected (Open, Assigned, Canceled, Checked-in, or Invited) - if you want to filter all tickets regardless of status, just select all.
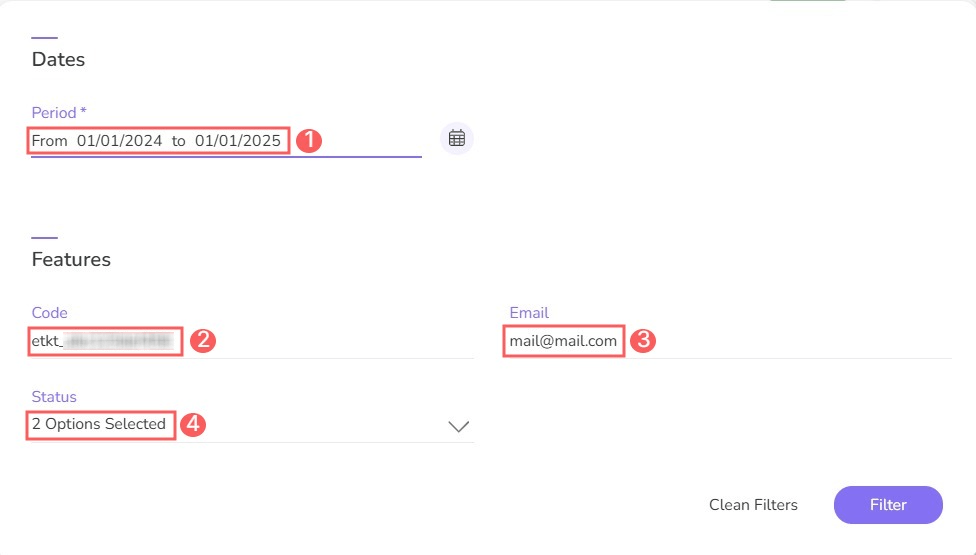
5 - Click on Filter.
To remove the applied filters, simply click on Clear Filters.
Sales
The Sales section displays the list of sales associated with the product in question. This option is useful for easily viewing the product's most recent sales.
It is possible to filter the sales of the consulted product. For more details, consult this link.
The Sales section only appears visible when there is at least one sale associated with the product in question.
Steps
1 - Access the product detail - the product registration will be displayed.
2 - Click on Sales.
3 - The list displays the following information:
-
Status: payment status of the sale;
-
Code: identification code of the sale;
-
Contact: buyer's name (customer);
-
Product: identification of the producer or manufacturer of the product;
-
Ordered At: date/time of sale creation in the system;
-
Value: total order value paid by the customer;
-
Payment method: icon corresponding to the payment method used - hover over the icon to view the description.

You can access the sale detail by clicking on the desired item.
Subscriptions
The Subscriptions section displays the list of subscriptions associated with the product in question. This option is useful for easily viewing the most recent subscriptions for the product.
It is not possible to filter the list displayed in this section. If you want to apply filters, access the Subscriptions menu in the Guru admin.
The Subscriptions section only appears visible when the associated product is of the “subscription” type and has at least one linked subscription.
Steps
1 - Access the product detail - the product registration will be displayed.
2 - Click on Subscriptions.
3 - The list displays the following information:
-
Status: subscription status;
-
Code: subscription identification code;
-
Contact: buyer's name (customer);
-
Started at: subscription start date (activation date);
-
# of Charges: number of charges made;
-
Updated At: date of the last subscription update;
-
Charged Every: subscription billing interval;
-
Payment Method: icon corresponding to the subscription payment method - hover over the icon to view the description.

You can access the subscription detail by clicking on the desired item.
E-commerces
In the E-commerces section, you can define how Guru should behave and what actions should be triggered on the integrated e-commerce platform.
This feature is useful for activating the automatic sending of product sales to your e-commerce platform where you intend to manage stock and process the order as usual.
1 Consult the integration features available for each integrated e-commerce platform.
To view and configure this section, you need to activate the integration with an e-commerce platform.
Steps:
1 - Create, duplicate or edit a product - an editing window will be displayed.
2 - Access the E-commerces tab.
3 - According to the e-commerce you will use, follow the steps below:
Kapsula
Inform:
-
Product in Kapsula: select the corresponding product in Kapsula - the products registered in your Kapsula account will be listed.
-
Shipping Type: select the shipping type you will use (PAC or SEDEX);
-
Do not process sales with status Pending Payment1: when activated, it does not process sales with pending payment status.
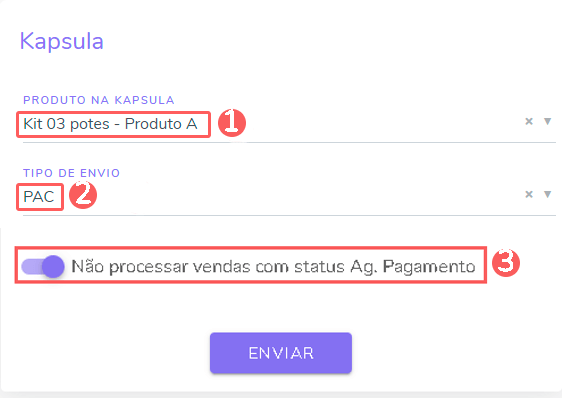
(1) By default, the option is off.
Once you have completed the changes, click on Send.
Magento
Inform:
-
SKU: enter the SKU (product identification code) to search for the product in Magento;
-
Product in Magento: select the product in Magento that you want to link - the products corresponding to the SKU entered in the search will be listed.
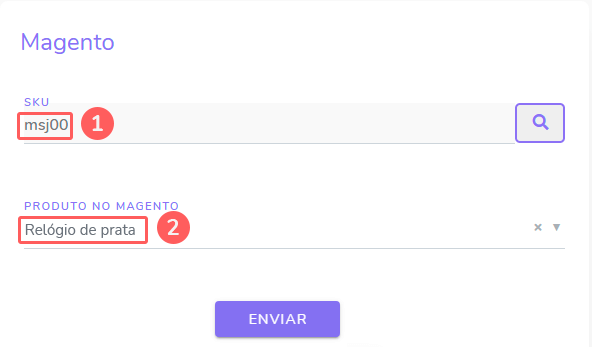
Once you have completed the changes, click on Send.
NuvemShop
Inform:
-
Product in Nuvemshop: select the corresponding product in Nuvem: Shop - the products registered in your NuvemShop account will be listed;
-
Not process sales on waiting payment status1: when activated, it does not process sales with payment pending status.
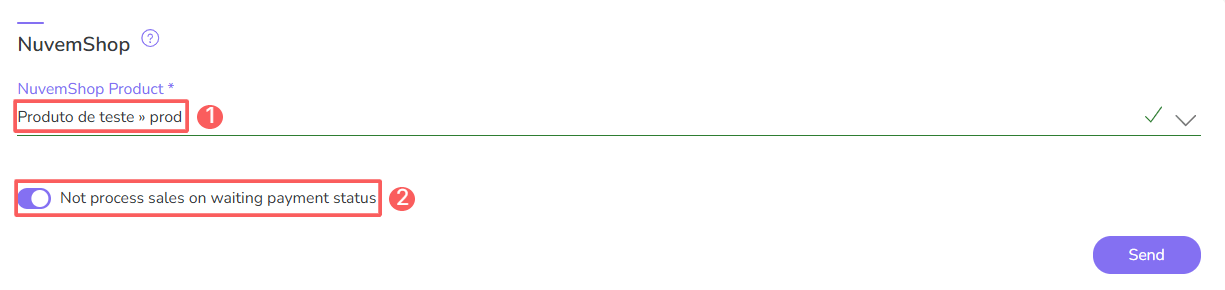
(1) By default, the option is off.
Once you have completed the changes, click on Send.
Shopify
Inform:
-
Product in Shopify: select the corresponding product in Shopify - the products registered in your Shopify account will be listed;
-
Send Order Shipped Email: when activated, it triggers the sending of the “Order Shipped” email in Shopify;
-
Send Order Email: when activated, it triggers the sending of the “Order Confirmation” email in Shopify;
-
Do not process sales with Payment Pending status1: when activated, it does not process sales with payment pending status.
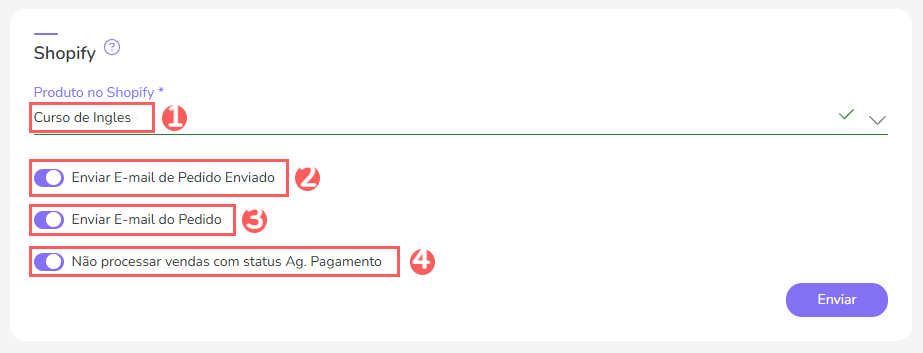
(1) By default, the option is off.
Once you have completed the changes, click on Send.
Wix
Inform:
-
Product in Wix: select the corresponding product in Wix - the products registered in your Wix account will be listed;
-
Do not process sales with Pending Payment status1: when activated, it does not process sales with pending payment status;
-
Mark order as fulfilled2: when activated, it marks the order as fulfilled (shipped and completed) in Wix.
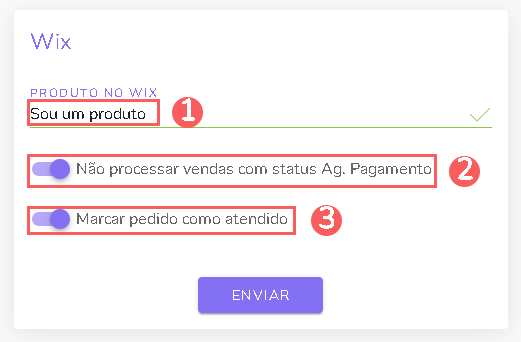
(1) By default, the option is turned off.
(2) Access and learn how to manage orders in the Wix app.
When you finish the changes, click Send.
WooCommerce
Enter:
-
Name: enter the name (or parts of the name) of the product to search in Woo: Commerce;
-
Register users as customers on the platform: when activated, it registers users as customers on the Woo: Commerce platform;
-
Not process sales on waiting payment status1: when activated, it does not process sales with pending payment status.
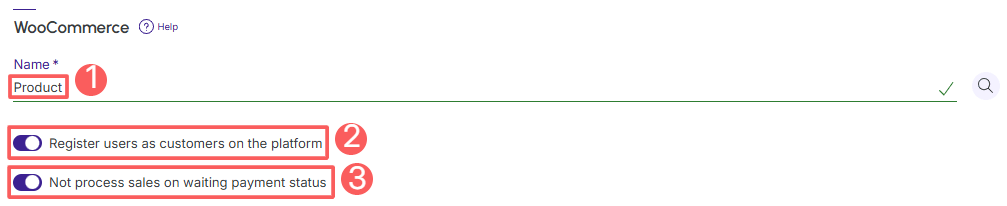
(1) By default, the option is turned off.
When you finish the changes, click Send.
Accounting
In the Accounting section, you can define how Guru should behave and what actions should be triggered in the integrated billing tool.
This feature is useful for activating the automatic sending of product sales to your billing platform or ERP where you intend to manage inventory, issue invoices (bills), or perform financial control.
1 Consult the integration resources available for each integrated billing tool.
To view and configure this section, you need to activate the integration with a billing tool.
Steps:
1 - Create, duplicate or edit a product - an editing window will be displayed.
2 - Access the Accounting tab.
3 - According to the billing tool you will use, follow the steps below:
Bling
Enter:
-
Bling product: select the corresponding product in Bling - the products registered in your Bling account will be listed;
-
Logistics Services: select the logistics service registered in Bling;
-
Store: select the store registered in Bling;
-
Sync installments: switch to the "on" position if you want to send the installments to the customer;
-
Sync only approved transactions: switch to the "on" position if you want to send only approved sales to the customer;
-
Create sale with interest: switch to the "on" position if you want to add interest to the sale;
-
Issue invoice: switch to the "on" position if you want to issue the invoice - by activating this option it will be possible to issue the product and/ or service1;
-
Active: switch to the "on" position to activate actions with Bling. When on, each order received for the product is sent to Bling.
(1) Be sure to make the correct settings on the Bling side to create the service invoice. Access Bling's documentation and learn how to configure the Service Invoice (NFS-e).
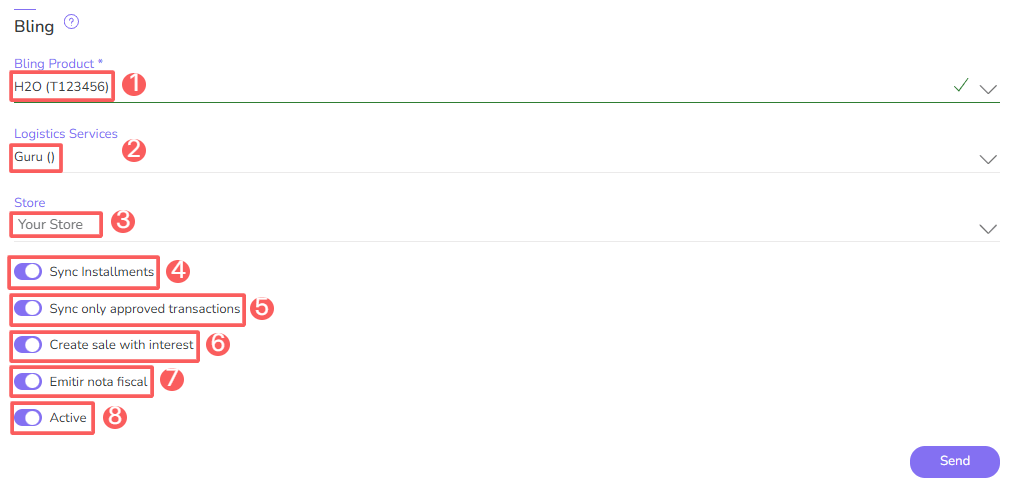
When you finish the changes, click Send.
Conta Azul
Enter:
-
Bank Account: inform which bank account is used;
-
Product/Service type: inform the type of product or service for issuing the corresponding invoice;
-
Conta Azul Product/Service: select the corresponding product/service in Conta Azul - the products/services registered in your Conta Azul will be listed ;
-
Cost Center: select the corresponding cost center in Conta Azul - the cost centers registered in your Conta Azul will be listed;
-
Sync Installments: switch to the "on" position if you want to send the installments to the customer;
-
Create sale with interest: switch to the "on" position if you want to add interest to the sale;
-
Sync only approved sales: switch the button to the “Active” position if you want to send only approved sales (optional);
-
Active: switch to the "on" position to activate actions with Conta Azul. When on, each order received for the product is sent to Conta Azul.
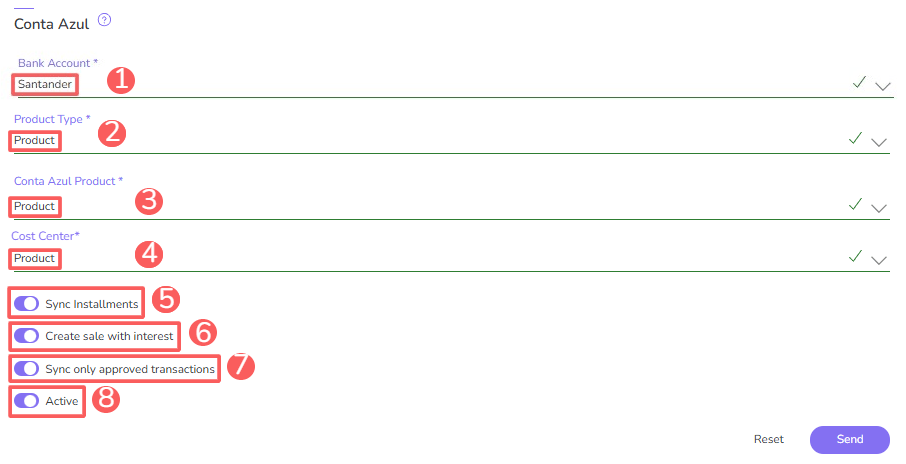
When you finish the changes, click Send.
Enotas
Enter:
-
Product: select the corresponding product in eNotas - the products registered in your eNotas account will be listed;
-
When to issue the invoice1: inform when the invoice should be issued. You can choose: on sale (after payment confirmation); after warranty (after the warranty period informed in eNotas expires) or do not issue (do not issue the invoice automatically);
-
Emission delay (days): inform the number of days of delay for issuing the invoice. Ex.: if you inform 2 days; the invoice will be issued 2 days after payment confirmation;
-
Withholding tax: switch to the "on" position to include withholding tax for the invoice;
-
Send invoice to customer: switch to the "on" position if you want to activate automatic invoice sending to the customer in eNotas;
-
Active: switch to the "on" position to activate actions with eNotas - when on, each order received for the product is sent to eNotas.
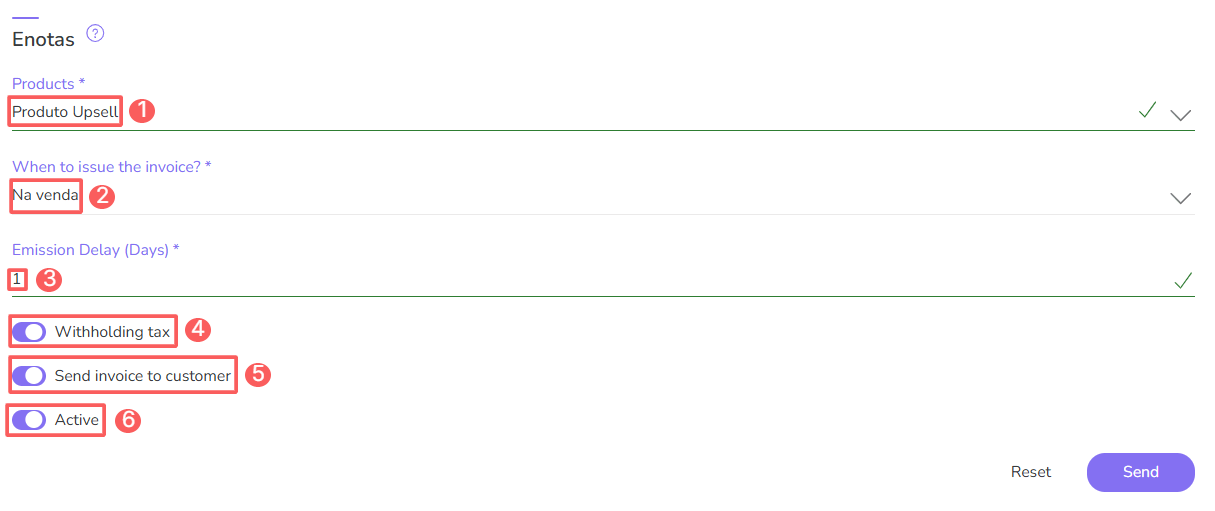
(1) The warranty period must be configured in enotas
When you finish the changes, click Send.
Invoicexpress
Available only for companies in Portugal.
Enter:
-
Series1: select the series you want to automatically configure billing for;
-
Tax exemption outside the EU: select the type of exemption2 for sales outside the EU.
-
Tax exemption within the EU: select the type of exemption2 for sales within the EU.
-
Product description: provide a description of the product;
-
Active: switch to the "on" position to activate actions with Invoice. Xpress. When on, each order received for the product is sent to Invoice. Xpress.
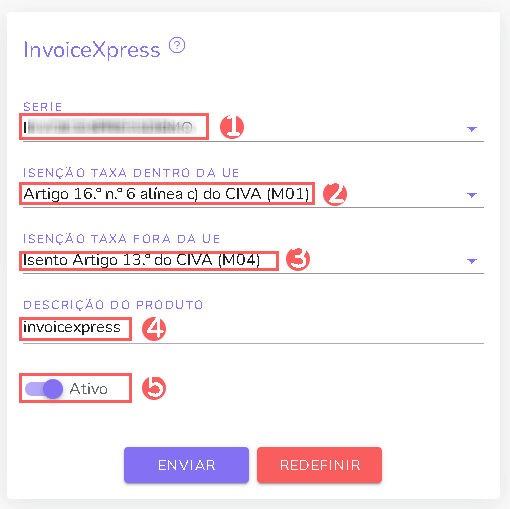
(1) See how to configure the series for billing in InvoiceXpress.
(2) To know which one to choose, consult your accountant or access this link. it is possible to select that both fields are null.
When you finish the changes, click Send.
iziBizi
Available only for companies in Portugal.
Enter:
-
Product in iziBizi: select the corresponding product in iziBizi - the products registered in your iziBizi account will be listed;
-
Series: select the series (order) you want to associate in iziBizi;
-
Tax exemption outside the EU: select the type of exemption2 for sales outside the EU;
-
Tax exemption within the EU: select the type of exemption2 for sales within the EU;
-
Active: switch to the "on" position to activate actions with iziBizi - when on, each order received for the product is sent to iziBizi.
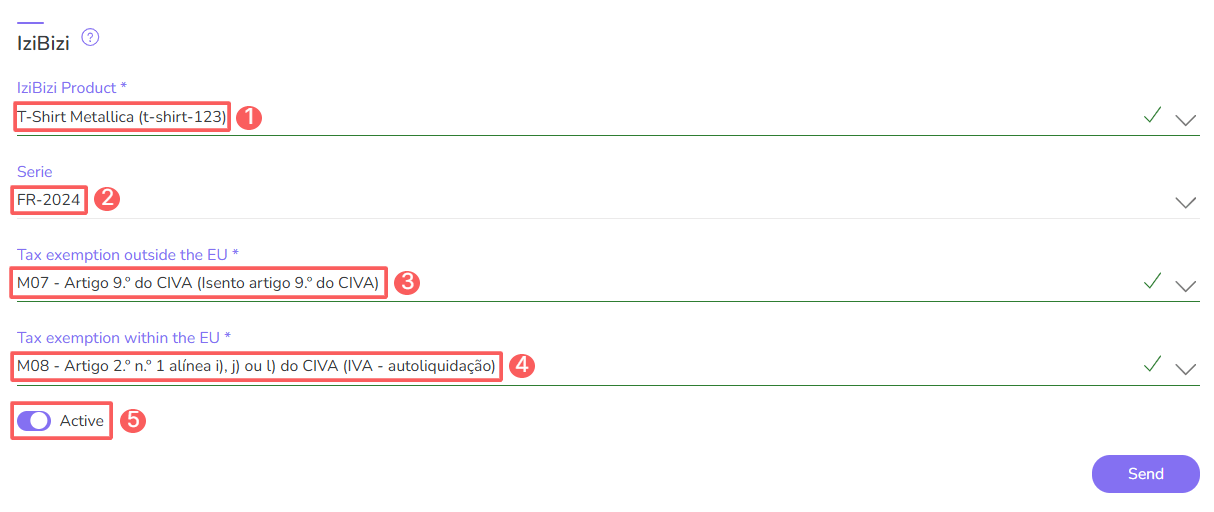
(1) See how to configure the series for billing in iziBizi.
(2) If you need help knowing which one to choose, consult this link or select the option that both fields are null.
When you finish the changes, click Send.
Moloni
Available only for companies in Portugal.
Enter:
-
Companies1: select the partner you want to associate in Moloni;
-
Series: select the series (order) you want to associate in Moloni;
-
Product in Moloni: select the corresponding product in Moloni - the products registered in your Moloni account will be listed.
-
Tax exemption outside the EU: select the type of exemption2 for sales outside the EU.
-
Tax exemption within the EU: select the type of exemption2 for sales within the EU.
-
Active: switch to the "on" position to activate actions with Moloni. When on, each order received for the product is sent to Moloni.
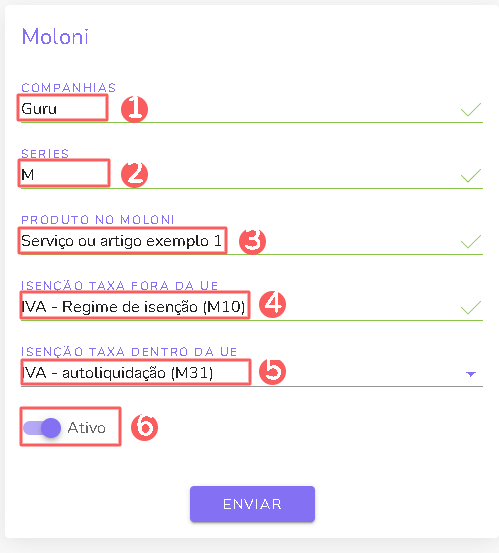
(1) it is necessary to link the products to the company created in Moloni.
(2) To know which one to choose, consult your accountant or access this link. it is possible to select that both fields are null.
When you finish the changes, click Send.
Omie
-
Bank Account: select the bank account you want to associate in Omie;
-
Category: select the category for the billing process;
-
Product Type (product or service): select the type of product or service;
-
Omie Product/Service: select the product or service in Omie;
-
Omie Project: select the project you want to associate in Omie;
-
Sync Installments: switch the button to the “Active” position if you want to send the sale installment information to Omie (optional);
-
Create sale with interest: switch the button to the “Active” position if you want to create sales with interest (optional);
-
Send only approved sales: switch the button to the “Active” position if you want to send only approved sales (optional);
-
Generate accounts receivable: switch the button to the “Active” position if you want to generate an accounts receivable (optional);
-
Active: switch the button to the "on" position.
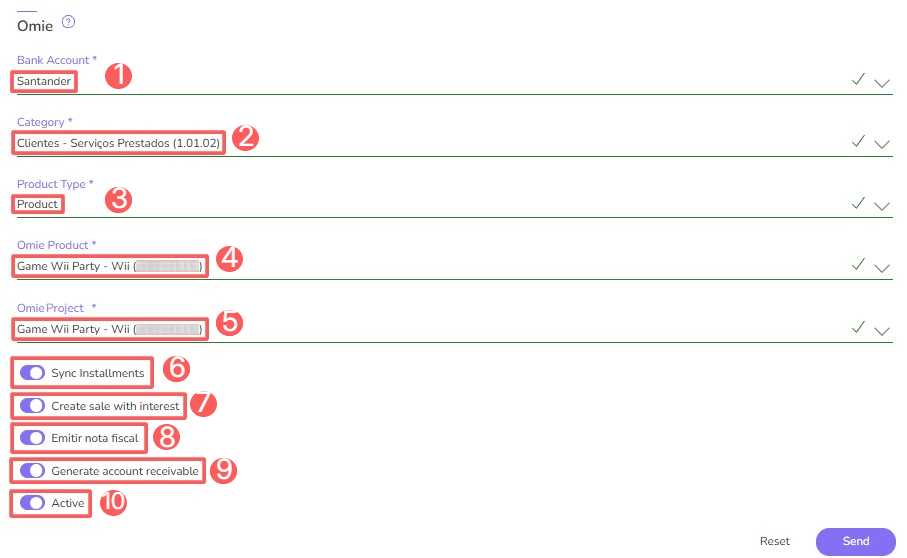
When you finish the changes, click Send.
Olist
Enter:
-
Olist Product: select the corresponding product in Olist - the products registered in your Olist account will be listed;
-
Carrier: inform the carrier;
-
Shipping Type1: select the shipping type - Ex: Standard Shipping;
-
Sync installments: switch to the "on" position if you want to send the installments to the customer;
-
Sync only approved transactions: switch to the "on" position if you want to send only approved sales to the customer;
-
Create sale with interest: switch to the "on" position if you want to add interest to the sale;
-
Active: switch to the "on" position to activate actions with Olist. When on, each order received for the product is sent to Olist.
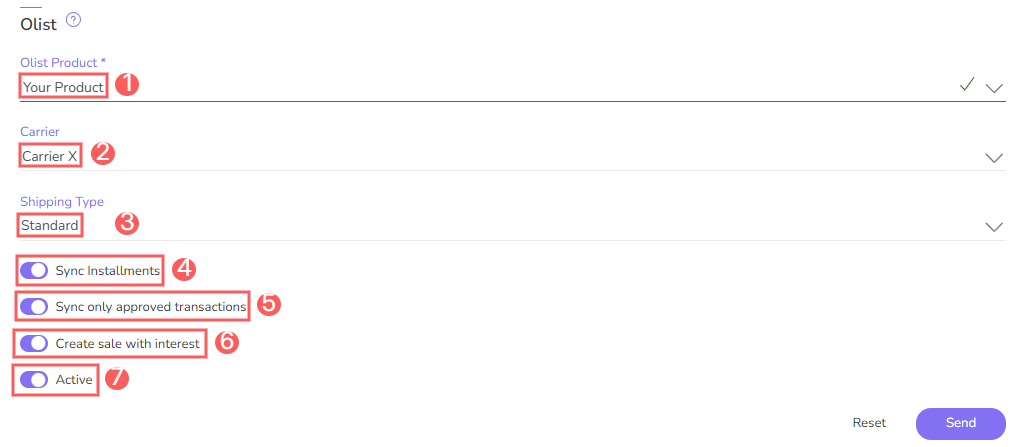
(1) To register a shipping method, contact Olist support.
If dynamic shipping is active, the detailed carrier information will be sent directly to Olist; upon receipt of this data, Guru, in Olist, will dynamically create a new shipping method and a shipping type equivalent to what was configured in the carrier.
When you finish the changes, click Send.
Vhsys
Enter:
-
Vhsys Product: select the corresponding product in Vhsys - the products registered in your Vhsys account will be listed.
-
Sync installments: switch to the "on" position if you want to send the installments to the customer.
-
Create sale with interest: switch to the "on" position if you want to add interest to the sale.
-
Active: switch to the "on" position to activate actions with Vhsys. When on, each order received for the product is sent to Vhsys.
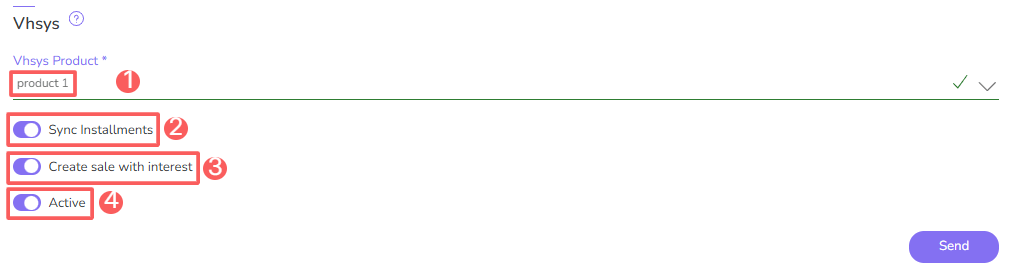
When you finish the changes, click Send.
Audit
As a security measure, Guru stores a history of all operations performed in the product registration, identifying user, date/time of operation, and other details.
Steps:
1 - Access the desired product - a screen with the data will be displayed.
2 - Click on the Audit tab.
3 - Activities are displayed in a timeline (from most recent to oldest).

4 - If desired, you can view the activity detail by clicking on its title.

5 - Click on one of the available sections to view the data:
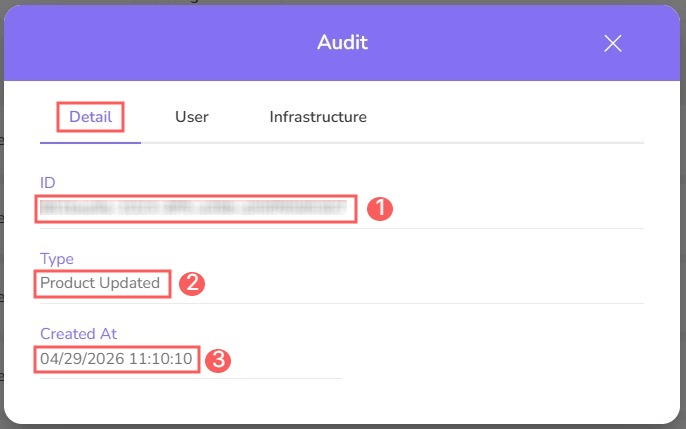
Detail
Displays detailed information about the activity in question.
-
ID: identification number (ID) of the update;
-
Type of change made;
-
Created on: date of activity registration.
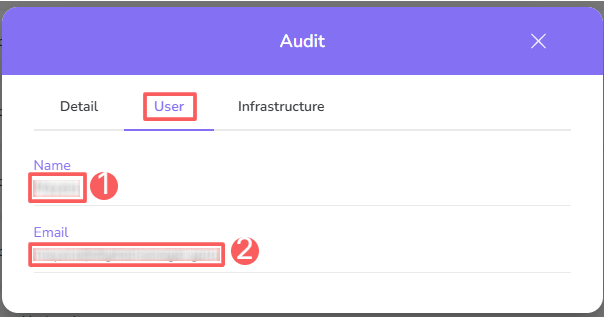
User
Displays information about the user who performed the action.
-
Name: name of the user who performed the operation;
-
Email: email of the user who performed the operation.
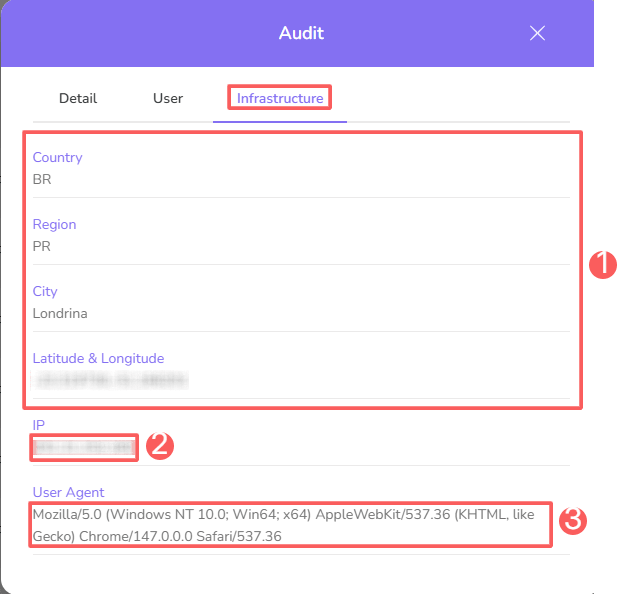
Infrastructure
Displays infrastructure information (country, IP, user agent…) related to the activity.
-
Country, Region, City, Latitude & Longitude: location of the device that performed the activity.
-
IP: device IP address.
-
User Agent: identification of the user agent that performed the operation.
How to filter the Audit list
You can use the filters to view a smaller subset of existing audits. This feature is useful for finding specific audits you want to view.
By default, only records from the last 28 days will be shown, but the period can be changed in the filters, in the Period.field.
Steps:
1 - Access the desired product - a screen with the data will be displayed.
2 - Click on the Audit tab.
3 - Under Audit, click on Filters.
4 - Fill in one or more filter options:
-
Period: searches for audits registered in the selected period - you can use the predefined time interval buttons or select the date you want to view;
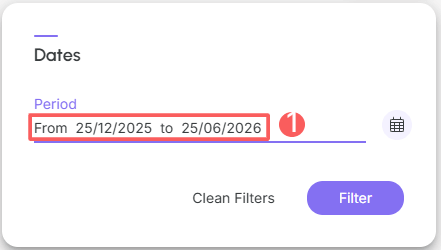
5 - Click on Filter.
You can view the number of applied filters, and when using them, you will be able to clear them without accessing the Filters icon again, making it easier to remove the selection.
Protect your data. Increase your business security.
Create and manage users determining what each collaborator can see and do within the organization.
More Resources