
The sales information section displays details such as sale date (order), status, payment method, total amount, net amount, as well as information about the product, buyer, order bump (which are now displayed in the sale detail), tracking, subscription, among other information.
On this page:
-
Basic Sales Information
-
Buyer
-
Shipping
-
E-tickets
-
Order Bump
-
Affiliations
-
Tracking
-
Subscription
-
Extras
-
Contracts
-
Comments
-
Audit
-
How to filter the Audit list
-
Before you start, you need…
-
To be an administrator user or have permission to perform the following actions.
-
To have one or more sales registered.
Basic sales information
In the Detail section, you can view basic sales information such as current status, sale date, payment approval date, total amount, and product information.
If necessary, you can access the actions menu to change sales data.
Steps:
1 - Select the desired sale - a screen with the data will be displayed.
2 - Click on Detail.
The following information blocks are available:
Detail
-
Status: label of the current sale status - one of the possible sale statuses will be displayed;
-
Code: sale identification number;
-
Currency: payment currency;
-
Sale URL: Sale URL - product sale link;
-
Payment URL: payment URL - sale payment link;
-
Created At: date the sale was made;
-
Confirmed At: date payment was approved;
-
Canceled At: date the sale was canceled - applies only to a sale
canceled.

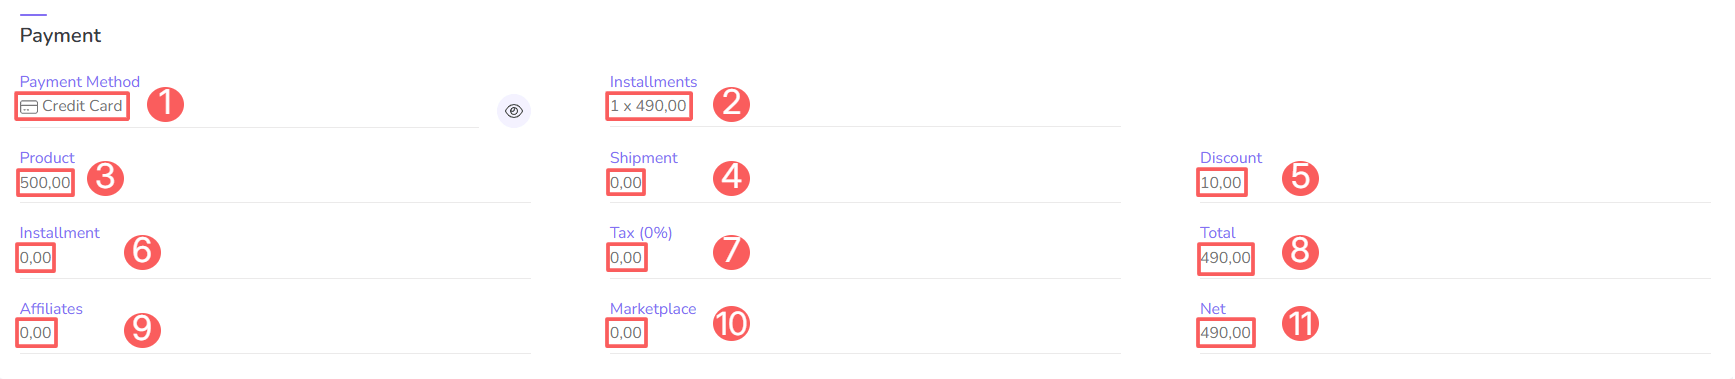
Payment
-
Payment Method: payment method used by the buyer - e.g., credit card;
-
Installments: details about installments, when applicable;
-
Product: amount charged for the product;
-
Shipment: shipment cost;
-
Discount: discount amount applied to the charge, when applicable;
-
Installments: quantity and value of installments - e.g.: 2 x 64.90;
-
Tax: tax amount;
-
Total: total value of the sale (total paid by the customer);
-
Affiliates: amount allocated for affiliate payments;
-
Marketplace: marketplace fee (payment processor), when applicable;
-
NET: net value of the sale (what is to be received).
Product
-
Unit: unit price of the product;
-
Quantity: quantity of items to be delivered;
-
Total: total value of the products;
-
Name: name of the product sold;
-
Marketplace: payment processor;
-
Marketplace ID: id number of the payment processor;
-
Offer: name of the offer that originated the sale.
-
Producer: identification of the product producer or manufacturer.

Buyer
In the Buyer section, you can view the information the customer provided at the time of purchase.
If necessary, you can edit the buyer's data.
Steps:
1 - Select the desired sale - a screen with the data will be displayed.
2 - Access the Buyer tab.
The following information blocks are available:
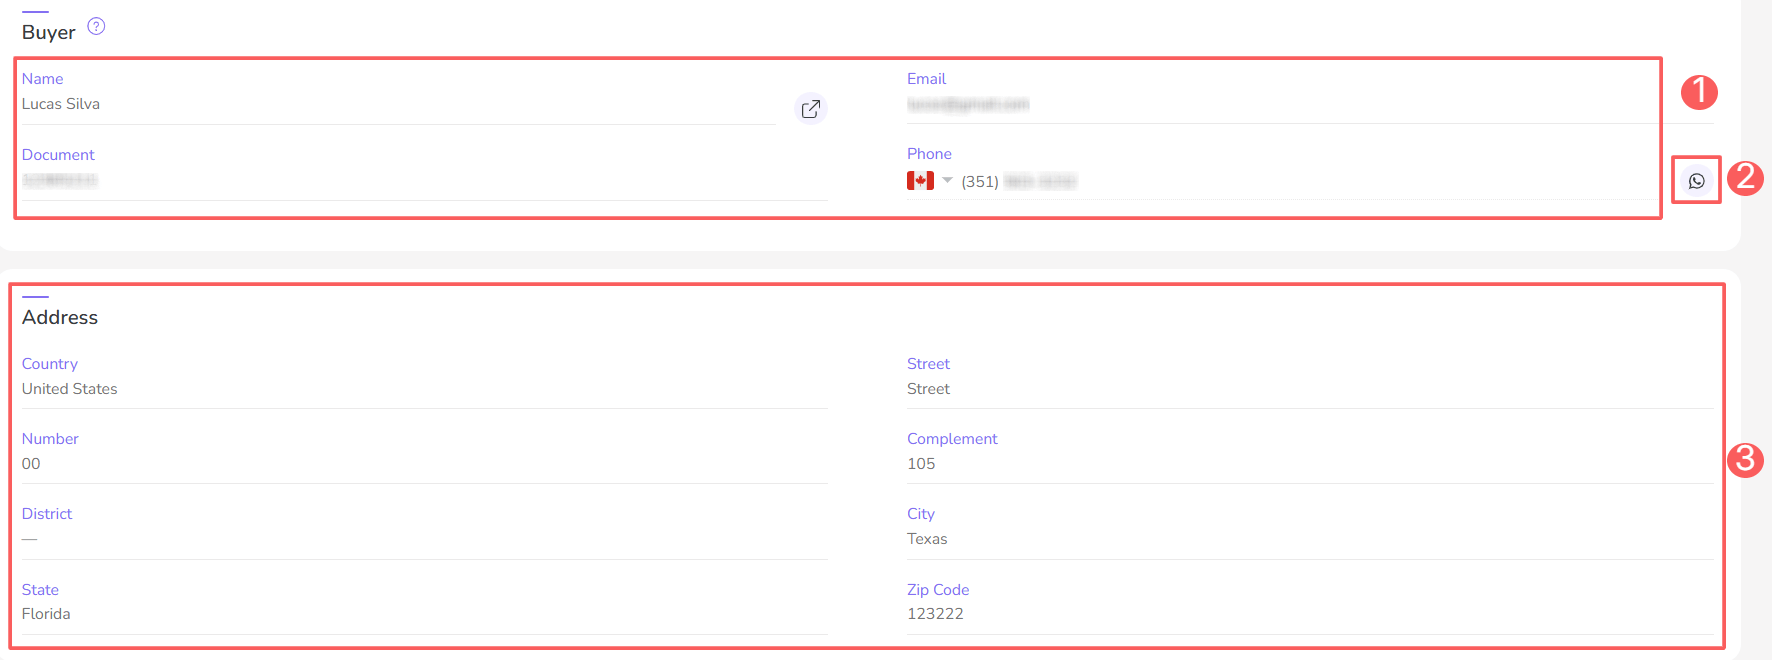
Buyer and Address
-
Buyer: name, email, document, and phone number;
-
WhatsApp Link: link to start a conversation with the customer on WhatsApp;
-
Address: address provided by the buyer (when applicable).
Each buyer is automatically registered as a contact. Click on the name to view the contact's registration.
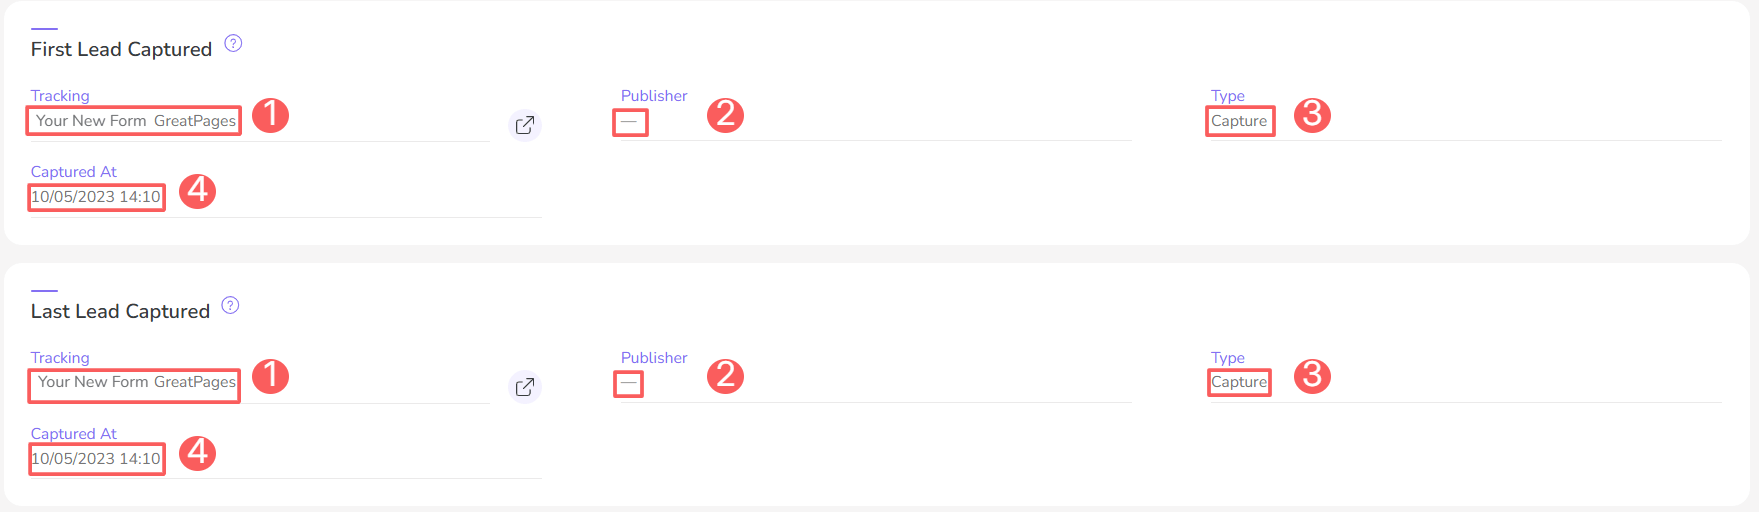
Lead Origin
When applicable, displays lead tracking information (first and last capture).
-
Tracking: name and link of the associated P.P.C.T.;
-
Publisher: name of the advertiser linked to the tracking, when applicable;
-
Type: type of associated P.P.C.T. (leads or capture);
-
Captured on: date and time of lead capture.
Infrastructure
This section provides information on the hardware, software, and network components used by the user at the time of purchase.
-
Location: country, region, city, latitude, and longitude.
-
IP: ip address of the device used by the buyer.
-
User Agent: information about the buyer's device (PC/mobile/tablet).

Shipping
In the Shipping section, you can view the shipping details associated with the product sold, such as the carrier, delivery time (days), service, tracking, and email associated with the sale.
Steps:
1 - Select the desired sale - a screen with the data will be displayed.
2 - Access the Shipping tab.
The following information blocks are available:
-
Carrier: the name of the carrier associated with the sale;
-
Service: the carrier service selected by the buyer;
-
Delivery time (days): delivery time in days for the shipping service;
-
Tracking: name of the sale tracking (if any);
-
Email: buyer's email associated with the sale.

E-tickets
In the E-tickets section, you can view and consult ticket information.
If necessary, you can access the actions menu to modify tickets.
Steps:
1 - Select the desired sale - a screen with the data will be displayed.
2 - Access the E-tickets tab.
The following information blocks are available:
-
Status: current ticket status - one of the ticket statuses will be displayed, such as Open, Assigned, Invited, Checked-in, Canceled;
-
Code: ticket identification code;
-
Date: ticket creation date;
-
Product: name of the event linked to the ticket;
-
Attendee: name of the participant who received the ticket invitation;
-
Email: email of the participant who received the ticket invitation;
-
Phone: contact number of the participant who received the ticket invitation.

Tip: click on an item in the list to view the Ticket Information.
Order Bump
In the Order Bump section, you can view the associated Order Bump sale, the product sold, the date, and the value.
Steps:
1 - Select the desired sale - a screen with the data will be displayed.
2 - Access the Order Bump tab.
The following information blocks are available:
-
Status: label of the current sale status - one of the possible sale statuses will be displayed;
-
Code: product identification number;
-
Product: identification of the product's producer or manufacturer;
-
Ordered At: date the sale was made;
-
Value: purchase value and payment method used by the buyer;
-
Payment Method: icon indicating the payment method used by the buyer - hover over the icon to view the description.

Tip: click on an item in the list to view the Sale Information.
Tracking
In the Tracking section, you can consult the tracking that originated the respective sale.
Section available only when the sale is associated with tracking.
Steps:
1 - Select the desired sale - a screen with the data will be displayed.
2 - Access the Tracking tab.
The following information blocks are available:
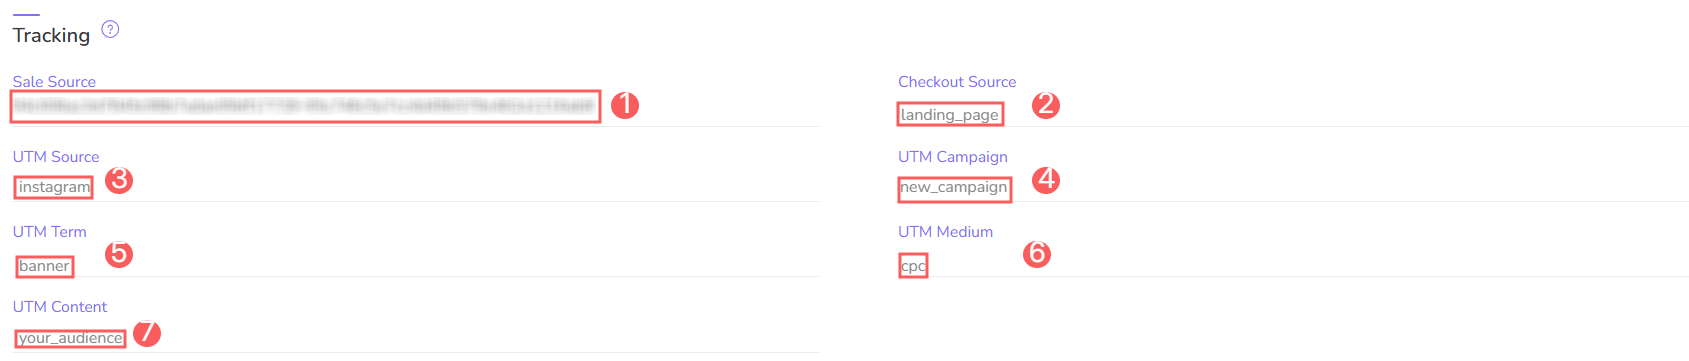
Tracking
Tracking data registered in the sale.
-
Sale Source: origin tracking identification code;
-
Checkout Source: checkout tracking identification code;
-
UTM Source: value of the UTM Source parameter passed in the checkout URL;
-
UTM Campaign: value of the UTM Campaign parameter passed in the checkout URL;
-
UTM Term: value of the UTM Term parameter passed in the checkout URL;
-
UTM Medium: value of the UTM Medium parameter passed in the checkout URL;
-
UTM Content: value of the UTM Content parameter passed in the checkout URL.
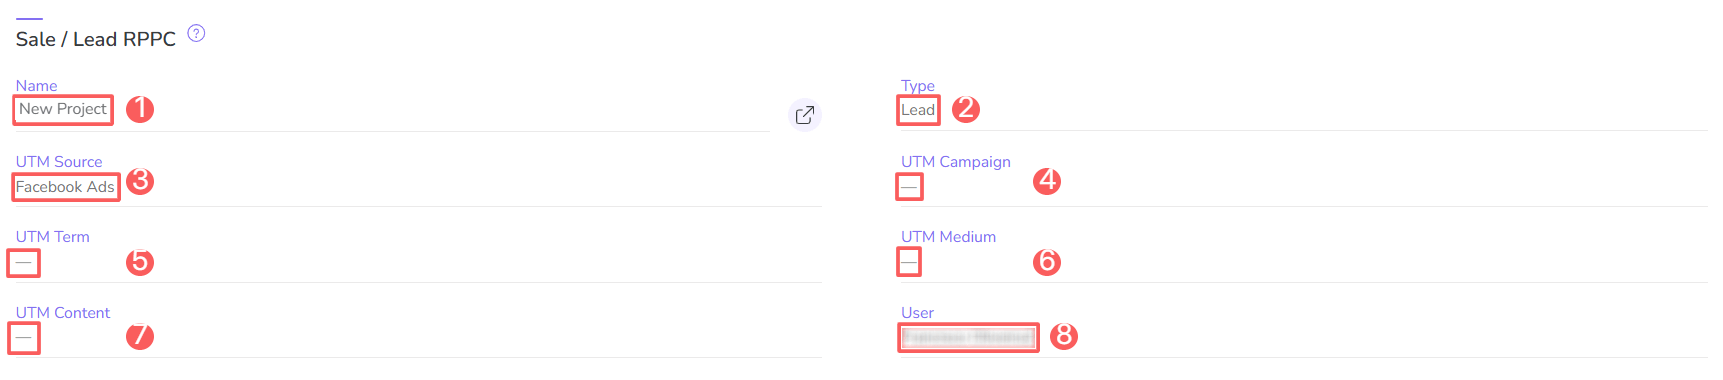
P.P.C.T. Detail
Details of the corresponding tracking (P.P.C.T.), when applicable.
-
Name: name of the P.P.C.T. (sale or lead) that generated the sale.
-
Type: tracking type (Sale P.P.C.T. or Lead P.P.C.T.).
-
Advertiser: name of the associate linked to the tracking.
-
UTM Source: value of the UTM Source parameter passed in the P.P.C.T. link;
-
UTM Campaign: value of the UTM Campaigne passed in the P.P.C.T. link;
-
UTM Terms: value of the UTM Term parameter passed in the P.P.C.T. link;
-
UTM Medium: value of the UTM Medium parameter passed in the P.P.C.T. link;
-
UTM Content: value of the UTM Content parameter passed in the P.P.C.T. link;
-
User: name of the user who owns the P.P.C.T.;
-
Name: name of the checkout P.P.C.T. that generated the sale.
Subscription
In the Subscriptions section, you can consult the details of the subscription that the respective sale is associated with.
Section available only when the sale is associated with a subscription.
Steps:
1 - Select the desired sale - a screen with the data will be displayed.
2 - Access the Subscription tab.
The following information blocks are available:
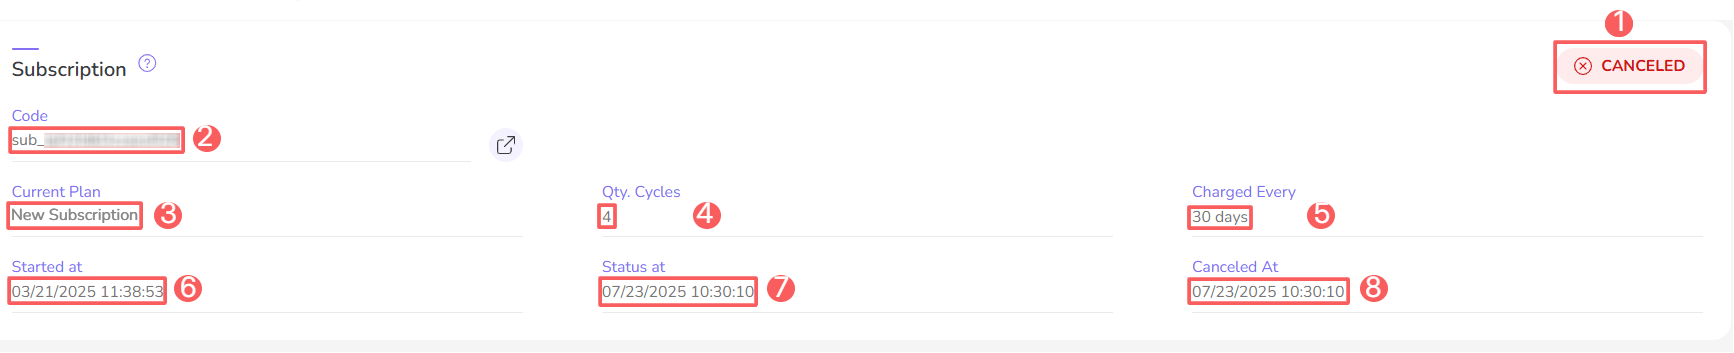
Subscription
Basic information of the subscription associated with the sale in question.
-
Status: current status of the subscription;
-
Code: subscription identification code - click on View More to see more details;
-
Current Plan: plan (offer) linked to the subscription;
-
Qty. Cycles: number of subscription cycles;
-
Charged Every: subscription billing interval;
-
Started At: start date of the new subscription cycle;
-
Status At: date of the last subscription status update;
-
Canceled At: date the subscription was canceled, when applicable.
Invoice
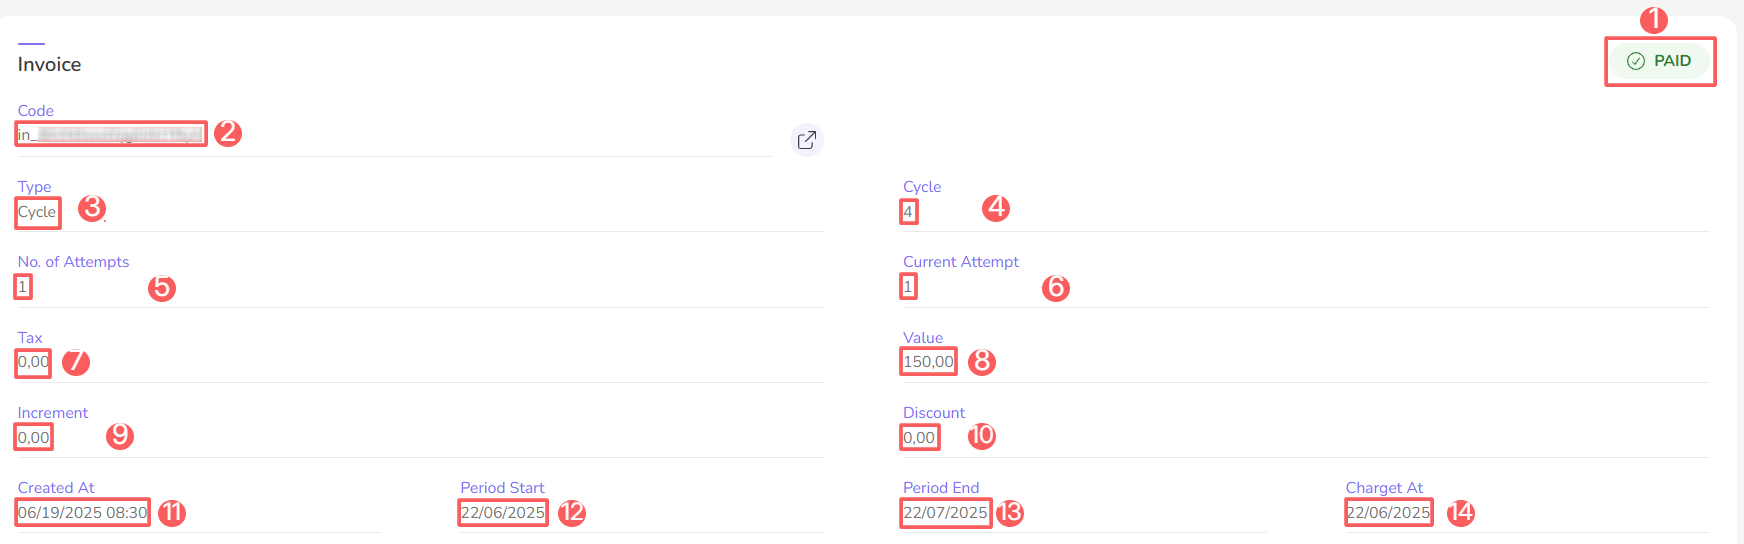
Detailed information of the subscription charge (invoice) that originated the sale in question.
-
Status: current invoice status;
-
Code: invoice identification number - click on View More to see more details;
-
Type: type of charge performed - possible values: cycle (activation/renewal) or upgrade;
-
Cycle: subscription cycle number that the invoice (charge) is associated with;
-
No. of attempts: total number of billing attempts;
-
Current attempt: current billing attempt number;
-
Tax: tax value associated with the charge;
-
Value: charge value;
-
Increment: increment value applied to this charge, when applicable;
-
Discount: discount value applied to the charge, when applicable;
-
Created At: invoice creation date (billing schedule);
-
Period Start: start date of the new billing cycle;
-
Period End: end date of the new associated billing cycle;
-
Charged At: date the charge was made.
Extras
In the Extras section, you can consult additional sale information such as warranty period, payment release date, invoice copy, transactional email copy, and related sale.
Steps:
1 - Select the desired sale - a screen with the data will be displayed.
2 - Access the Extras tab.
The following information blocks are available:
Extras
Extra information for the sale in question.
-
Unavailable Until: indicates until when the amount to be received will be blocked1 - after this date the amount will be released for withdrawal with the payment processor;
-
Warranty Until: product warranty date1 (period for refund request);
-
Expired At: expiration date2 of the payment term, when applicable;
-
Invoice: link to the proforma invoice3 generated by Guru after payment completion;
-
Email: buyer's email associated with the sale;
-
Last Transaction: date of the last sale.
(1) Displayed when applicable.
(2) Available for sales with boleto, PIX or other offline payment methods.
(3) The invoice issued by Guru is an informative document and has no tax validity. We recommend activating a Billing category integration for issuing the respective invoice.
(4) Available when the transactional emails feature is enabled in Guru Checkout.

Processing Time
Information about the processing time associated with the sale in question.
-
Start Time: start time of the sale processing;
-
End Time: end time of the sale processing;
-
Duration: duration of the sale processing.

Acquirer
Information about the Acquirer associated with the sale in question.
-
Name: name of the payment processor associated with the sale;
-
TID: transaction code of the sale within the payment processor;
-
Code: sale identification code;
-
Message: transaction message associated with the sale.

Contracts
In the Contracts section, you can check the contracts associated with the sale, viewing their identification code and signature date.
Steps:
1 - Select the desired sale - a screen with the data will be displayed.
2 - Access the Contracts tab.
The following information is available:
-
ID: envelope/document identifier from your contract platform - in the case of D4Sign, it will be the document UUID, and for DocuSign, it will be the envelope ID;
-
Signed at: date the contract was signed.

The displayed contract information depends on the contract platforms integrated with your account.
Manage Comments
You can add, edit or remove comments for a sale. This option is useful for sharing important information about the order (sale) with other team members.
Add Comment
1 - Access the desired sale data - a screen with the sale will be displayed.
2 - Click on Comments.

3 - Then, click on Add Comment - an editing screen will be displayed.
4 - Type the desired comment.
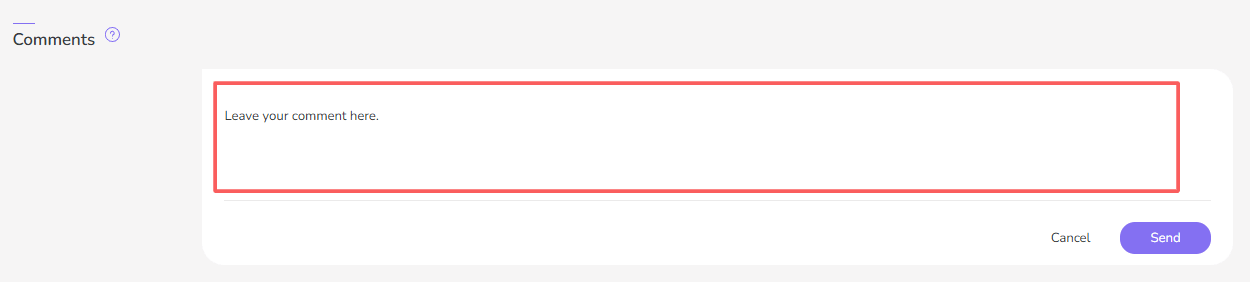
5 - Click on Send.
Update Comment
1 - In the desired comment, click on Edit (pencil icon).

2 - Edit the comment.
3 - Click on Send.
Remove Comment
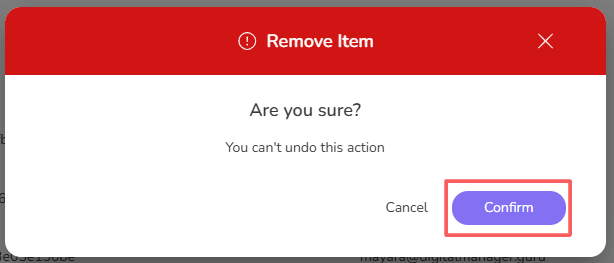
1 - In the desired comment, click on Remove (trash can icon).

2 - A confirmation window is displayed. If you wish to proceed with the removal, click on Confirm.
Audit
For data security and transparency, Guru stores a history of all events associated with the sale, identifying the type of event, user1 involved and infrastructure data1.
|
Event Type |
Applies to |
|
Information sent/received |
Integrations, webhooks active and associated, and status update. |
|
Sale modification |
Refund, reissuance of boleto, generation of new PIX code, update of buyer data, among others. |
(1) Displayed only when applicable.
Steps:
1 - Select the desired sale - a screen with the data will be displayed.
2 - Click on Audit.
3 - Activities are displayed in a timeline (from most recent to oldest).

4 - If desired, you can view the activity detail by clicking on its title.
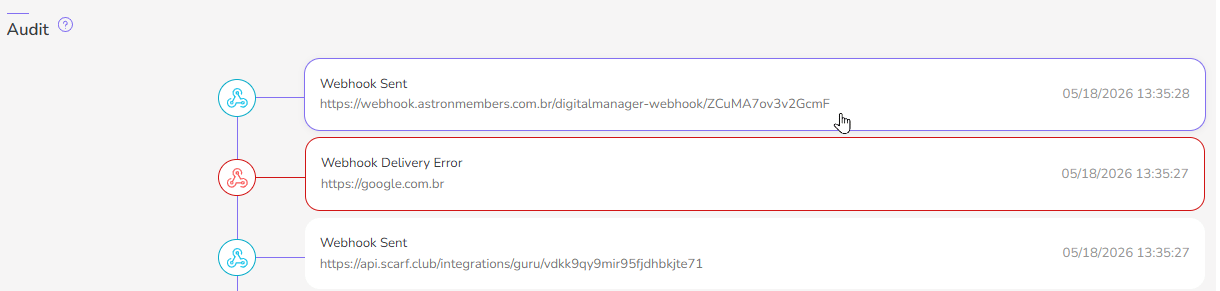
5 - Click on one of the available sections to view the data:
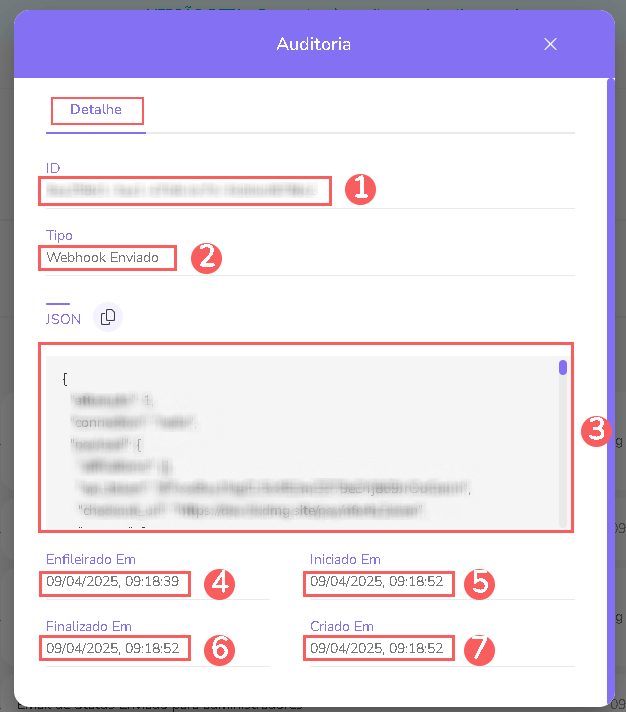
Detail
Displays detailed information about the selected event.
-
ID: activity identification code;
-
Type of change performed;
-
JSON: event data in JSON format - when applicable;
-
Queued1 at: date/time the item was added to the processing queue;
-
Started1 at: date/time processing started;
-
Finished1 at: date/time processing finished;
-
Created at: item creation date.
(1) Displayed only for events that pass through Guru's processing queue.
How to filter the Audit list
You can use the filters to view a smaller subset of existing audits. This feature is useful for finding specific audits you want to view.
By default, only records from the last 28 days will be shown, but the period can be changed in the filters, in the Period.field.
Steps:
1 - Select the desired sale - a screen with the data will be displayed.
2 - Click on the Audit tab.
3 - Under Audit, click on Filters.
4 - Fill in one or more filter options:
-
Period: searches for audits registered in the selected period - you can use the predefined time interval buttons or select the date you want to view;
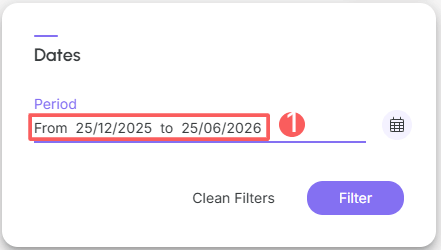
5 - Click on Filter.
You can view the number of applied filters, and when using them, you will be able to clear them without accessing the Filters icon again, making it easier to remove the selection.
Protect your data. Increase your business security.
Create and manage users determining what each collaborator can see and do within the organization.
More Resources