
The information you provide about an offer affects how the payment page (checkout) is displayed to customers, making it easier to complete the order and increasing your conversion rates.
In the offer information is where you define the product price, discount, payment methods, installment rules, shipping fees, and options for the Order Bump or for plan changes (upgrade/downgrade).
Some sections of the offer are optional, while others are displayed only if there is a corresponding active integration, such as carriers and shipping.
You enter or update offer information by creating, duplicating, or editing an offer.
On this page:
-
Payment links
-
Price and payment methods
-
Image
-
Order Bump
-
Upgrade/Downgrade
-
Sales
-
Carriers
-
Shipping
-
Audit
-
Other Settings
Before you start, you need to…
-
Be an administrator user or have permission to perform the following actions.
-
Have one or more registered products.
Payment links
In the Payment links section, you can access the available links to promote the offer and direct customers to checkout. Payment links, one-click buy (One Click Buy), and one-click subscription upgrade (One Click Upgrade) links may be displayed.
To use a link, simply copy and share it across your promotional channels.
Steps:
1 - Create, duplicate or edit an offer - an editing window will be displayed.
2 - If you are editing an existing offer, click on Detail.
3 - If you want to copy a payment link, click on the Copy button corresponding to the type of payment link or click Generate a QR Code to access the payment link.
-
Payment URL: the default payment link - URL of the main payment link;
-
URL One Click Buy: the link for one-click buy;
-
URL One Click Upgrade: the link for one-click upgrade - available only for subscriptions.
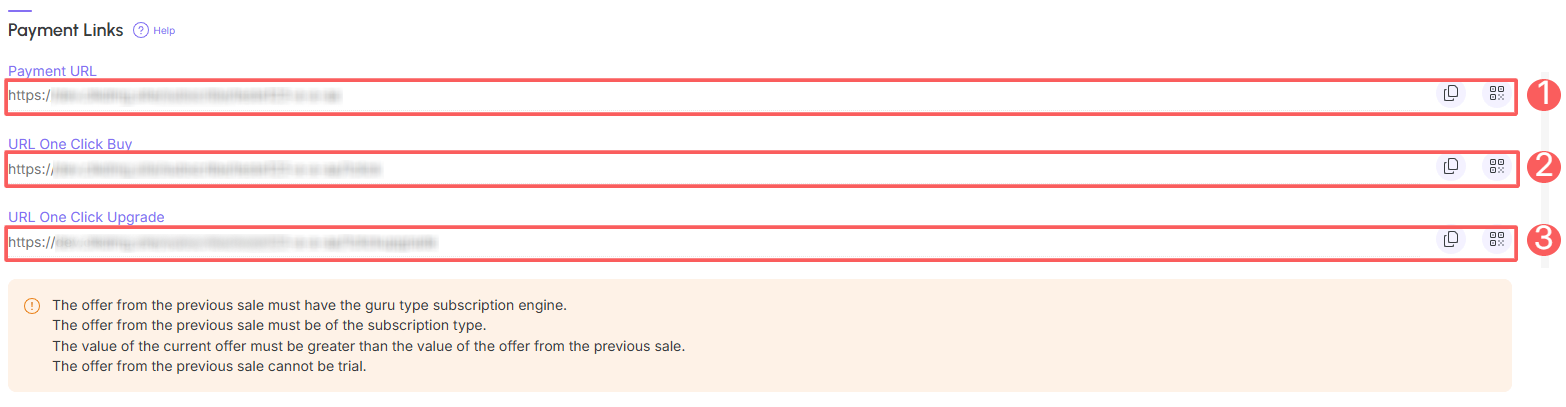
Payment links will only be available after the offer has been created.
Access the step-by-step guide on how to get available payment links.
Price and payment methods
In the Offer Detail section, you can register the information that will be displayed at checkout for your customers and other information that will be sent in the transaction to the payment processor.
Fill in Offer Information
Steps:
1 - Create, duplicate or edit an offer - an editing window will be displayed.
2 - If you are editing an existing offer, click on Detail.
3 - According to the product type, fields are available for completion:
E-ticket (single sale)
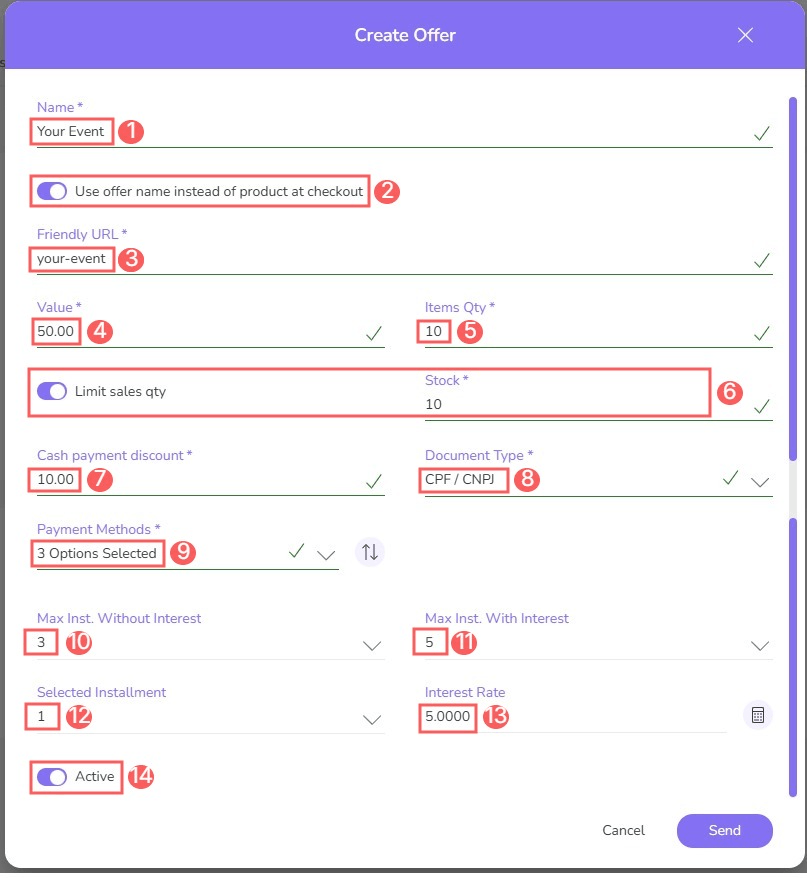
-
Name: title that helps identify the offer - if desired, you can display it at checkout;
-
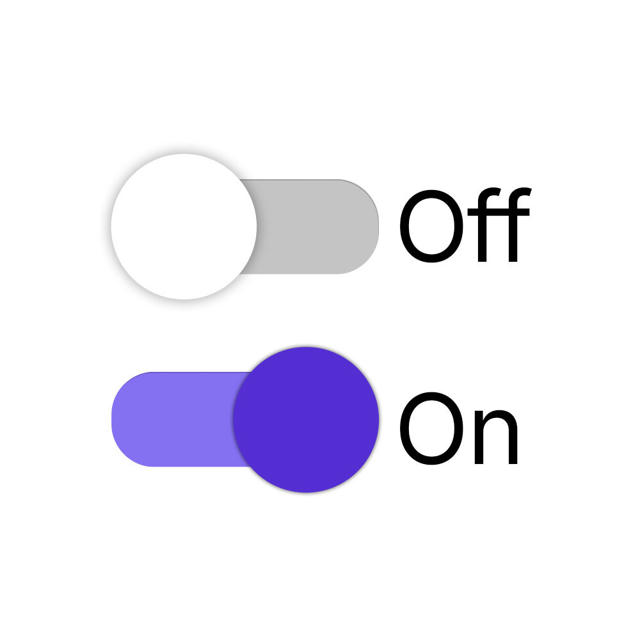
Use the offer name instead of product at checkout: when activated, displays the offer name on the checkout page instead of the product name;
-
Friendly URL: automatically generated from the offer name, it is a simple text to remember or type that will serve as the basis for generating checkout links - if desired, you can change it;
-
Value: value: Ex: if the offer has 2 units, inform the summed value of the 2 units;
-
Quantity of items(2): inform how many e-ticket units you will send to the customer;
-
Stock(3): inform how many e-ticket units you have in stock - when deactivated, the stock quantity is infinite;
-
Cash Payment Discount: fixed discount value to apply if the customer selects a cash payment method;
-
Document type(1): select the type of identification document you will accept at checkout - if you sell to companies, you can include the “company name” field in the checkout form;
-
Payment methods: select the payment methods1 that will be accepted at checkout;
-
Maximum interest-free installment(1): inform the maximum installment number for interest-free payment - Ex: for payments in up to 3 interest-free installments, inform the number 3;
-
Maximum installment with interest(1): inform the maximum installment number for payment with interest - Ex: for payments in up to 10 installments with interest, inform the number 10;
-
Selected installment(1): inform the installment that should appear selected when displaying the checkout to the customer;
-
Interest rate (1): interest rate that will apply to installments - click on the calculator icon to view the value of the installments that will be presented to the customer;
-
Active: to activate the offer, change the button to the active position - When activated, checkout links can be accessed, otherwise, it displays error 404 (access denied).
(1) The options displayed may vary depending on the payment processor associated with the product.
(2) You can allow the buyer to change the quantity of items at checkout. To learn how, click on allow changing the quantity of items.
(3) The quantity of products in stock will be deducted only if the sale is approved, payment or printed boleto. If the deadline for the printed boleto and Pix expires, the product quantity in stock will return.
Product (single sale)
-
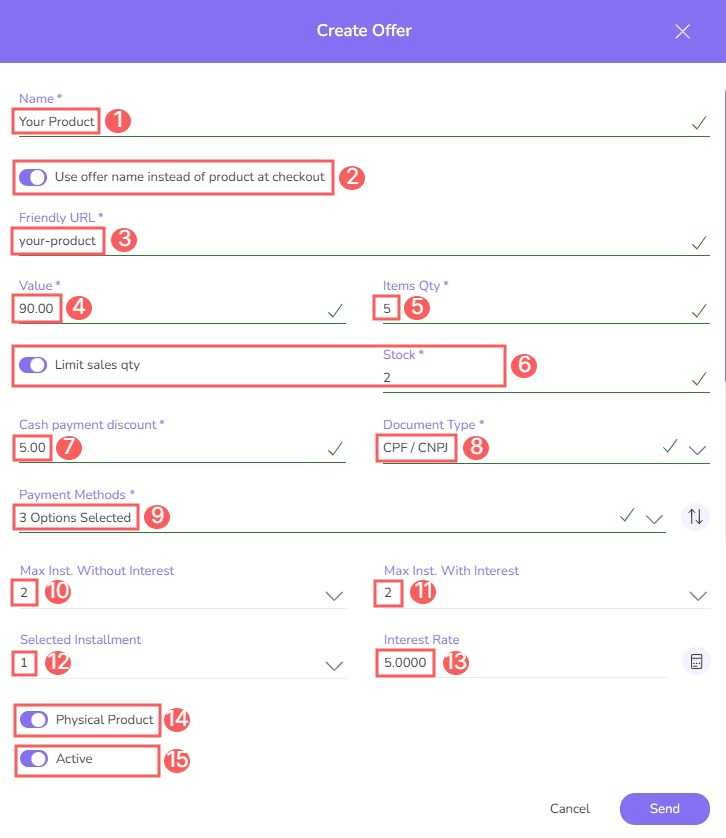
Name: title that helps identify the offer - if desired, you can display it at checkout.
-
Use offer name instead of product at checkout: when activated, displays the offer name on the checkout page instead of the product name.
-
Friendly URL: automatically generated from the offer name, it is a simple text to remember or type that will serve as the basis for generating checkout links - if desired, you can change.
-
Value to be charged (price) - Ex: if the offer has 2 units, inform the summed value of the 2 units.
-
Items Qty(2): inform how many units of the product you will send to the customer;
-
Stock(3): inform how many units of the product are in stock. When deactivated, the stock quantity is infinite;
-
Cash Payment Discount: fixed discount value to apply if the customer selects a cash payment method.
-
Document type(1): select the type of identification document you will accept at checkout - if you sell to companies, you can include the “company name” field in the checkout form.
-
Payment Methods: select the payment methods1 that will be accepted at checkout.
-
Max. Inst. Without Interest:
-
Max. Inst. With Interest:
-
Selected Installment:
-
Interest rate (1): interest rate that will apply to installments - click on the calculator icon to view the value of the installments that will be presented to the customer.
-
Physical Product(1): when it is a physical product, switch the button to the active position.
-
Active: to activate the offer, switch the button to the active position. When activated, checkout links can be accessed, otherwise, error 404 (access denied) is displayed.
(1) The options displayed may vary depending on the payment processor associated with the product.
(2) You can allow the buyer to change the quantity of items at checkout. To find out how, click on allow changing the quantity of items.
(3) The quantity of products in stock will be deducted only if the sale is approved, payment is made, or the boleto is printed. If the printed boleto and Pix deadline expires, the product quantity in stock will return.
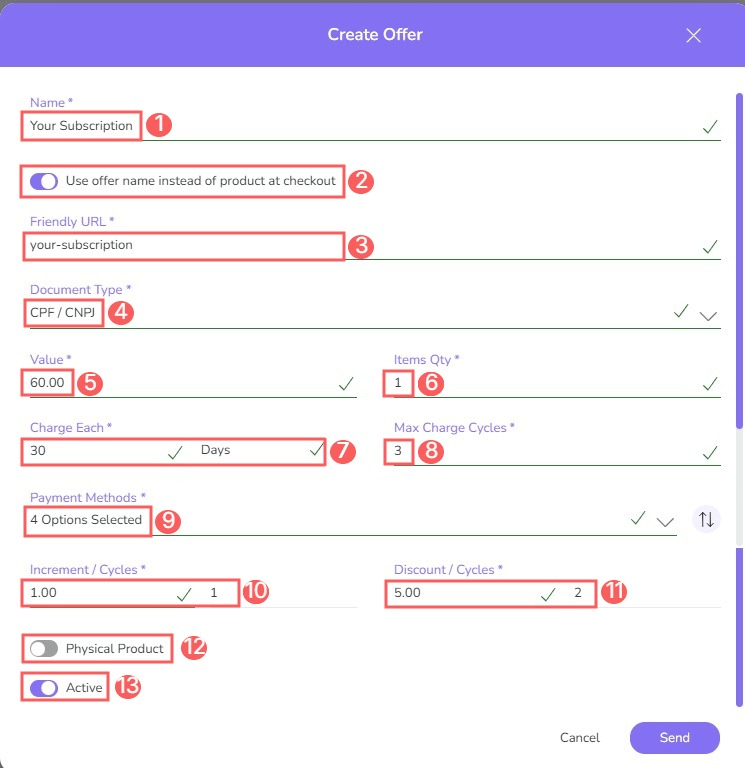
Subscription
To process Stripe Subscriptions, we ask you to follow the instructions in this link, as these are still managed by Stripe itself instead of Guru's subscription engine.
-
Name: title that helps identify the offer - if desired, you can display it at checkout;
-
Use offer name instead of product name at checkout: when activated, displays the offer name on the checkout page instead of the product name;
-
Friendly URL: automatically generated from the offer name, it is a simple text to remember or type that will serve as the basis for generating checkout links - if desired, you can change it;
-
Document type(1): select the type of identification document you will accept at checkout - if you sell to companies, you can include the “company name” field in the checkout form;
-
Value: enter the amount to be charged (price) - Ex: if the offer has 2 units, enter the sum of the values of the 2 units;
-
Items Qty(5): inform how many units of the product will be sent to the customer;
-
Charge Each: inform the interval and type of interval for charges - Ex: 3 months;
-
Max Charge Cycles: enter 0 (zero) to charge until the subscription is canceled or enter the maximum number of charges you want to make. Ex: if you enter 3, 3 billing cycles will be performed;
-
Payment Methods: select the payment methods(1) that will be accepted at checkout;
-
Increment/Cycles(4): inform the fixed surcharge amount that will be applied to the first “x” billing cycles - to apply the surcharge, you must enter a value greater than 0 in the “Cycles with surcharge” field - inform the number of cycles in which the surcharge will be applied. Ex: if you inform surcharge = 10; cycles = 3; there will be a $10 surcharge on the first 3 subscription charges;
-
Discount/Cycles (4): inform the fixed discount amount that will be applied to the first “x” billing cycles - to apply the discount, you must enter a value greater than 0 in the “Cycles with discount” field - inform the number of cycles in which the discount will be applied. Ex: if you inform discount = 10; cycles = 2; there will be a $10 discount on the first 2 subscription charges;
-
Physical Product(1): when it is a physical product, switch the button to the active position;
-
Active: to activate the offer, change the button to the active position - when activated, checkout links can be accessed, otherwise, it displays error 404 (access denied).
(1) Displayed only when the linked payment processor supports multiple currencies. The options presented may vary depending on your payment processor.
(2) Installment payment is only available when the billing interval is greater than 1 month (or 30 days).
(3) When selecting a number of installments, you must ensure that the amount charged respects the minimum installment value required by your payment processor.
(4) Only 1 rule can be applied at a time (discount or surcharge), never both rules together.
(5) You can allow the buyer to change the quantity of items at checkout. To learn how, click on allow changing the quantity of items.
In the general subscription settings, you can determine whether the subscription should (or should not) be canceled for non-payment.
4 - After completing the edit, click the Send button in the corresponding section.
Customize the order of payment methods
Steps:
1 - Create, duplicate or edit an offer - an editing window will be displayed.
2 - Click the Sort button.

3 - Drag the payment methods in the desired order.
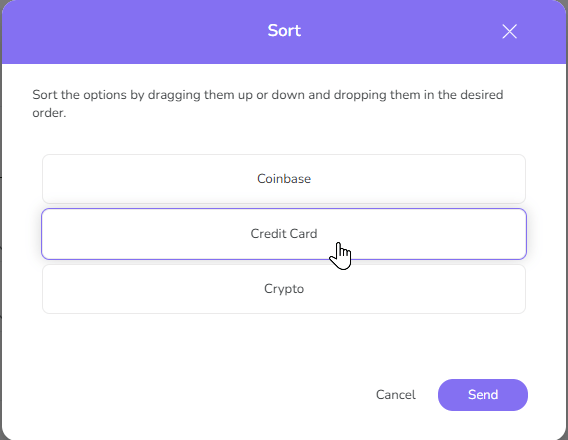
4 - Click Send.
How to check available stock
Steps:
1 - Access the list of offers - if desired, you can apply a filter.
2 - Locate the desired offer in the list.
3 - Click on the desired offer.
4 - Under Stock, the list displays the following information:
-
Available1: displays the quantity of available stock;
-
Reserved2: displays the reserved quantity of open sales.

(1) When a sale is reserved, the value will be deducted from the available stock.
(2) The status of reserved sales are awaiting payment.
Image
When an offer is created, the image registered for the product is automatically replicated to the offer. The image linked to the offer will be displayed on the checkout page.
If desired, you can change the display image in the Detail section of the respective offer or remove the image if you wish to change it.
Steps:
1 - Create, duplicate or edit an offer - an editing window will be displayed.
2 - If you are editing an existing offer, click Detail.
3 - In Image, click Upload Image.
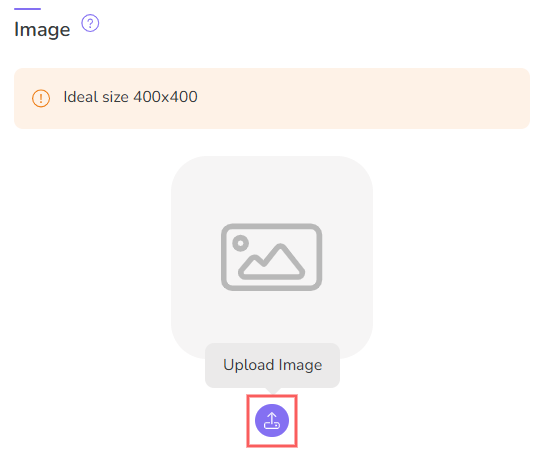
4 - Select the image you want to display for the offer.
Recommended image size: 400x400 pixels resolution.
5 - If desired, use the control buttons to adjust the image. as you make changes, you can check the final result in the displayed image.
-
Rotate left: click to rotate the image to the left;
-
Rotate right: click to rotate the image to the right;
-
Adjust Zoom: drag the selector right/left to adjust the zoom.
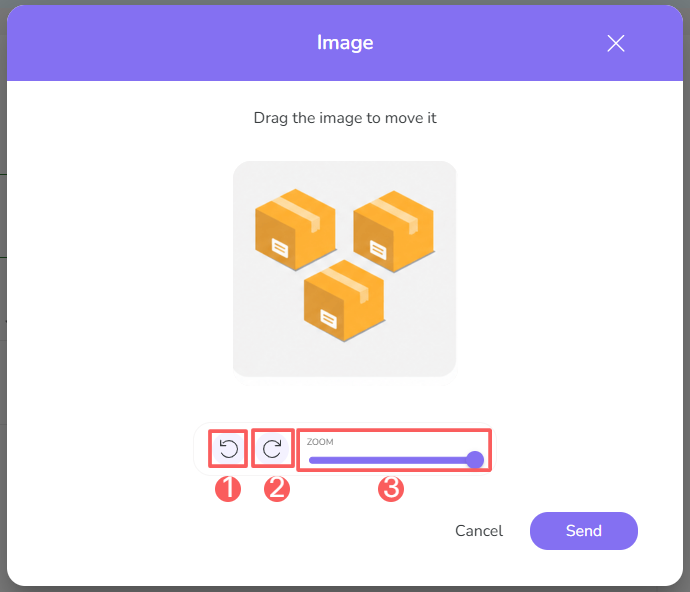
6 - After completing the changes, click Send.
Remove Image
AT any time, you can remove an image from the offer. This feature is useful when you want to replace the image of a specific offer.
Steps:
1 - Create, duplicate or edit an offer - an editing window will be displayed.
2 - If you are editing an existing offer, click Detail.
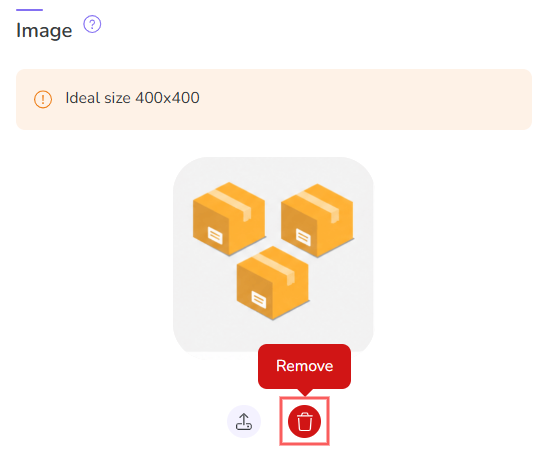
3 - In Image, click Remove.
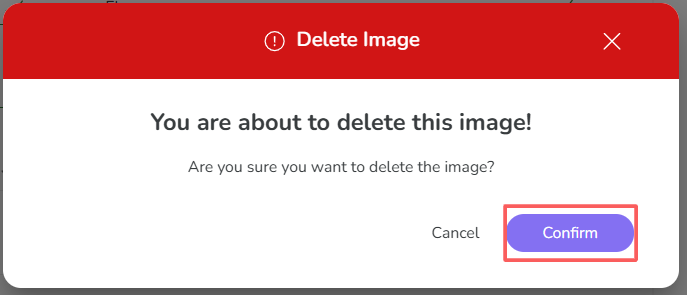
4 - A confirmation window is displayed. If you wish to proceed with removing the image, click Confirm.
Order Bump
You can display a list of complementary product(s) to present along with the offer in question.
The selected products will be displayed in the section order bump of Checkout Guru, before the payment step.
Add Product to Order Bump list
Steps:
1 - Create, duplicate or edit an offer - an editing window will be displayed.
2 - Access the tab Order Bump.
3 - In Order Bump, click on Add Order Bump.
4 - A window will be loaded with the list of available products and offers.
5 - Select:
-
Product you want to display in the order bump; and
-
Offer corresponding;
-
Description displayed at checkout*: description that will be displayed in the checkout offer.
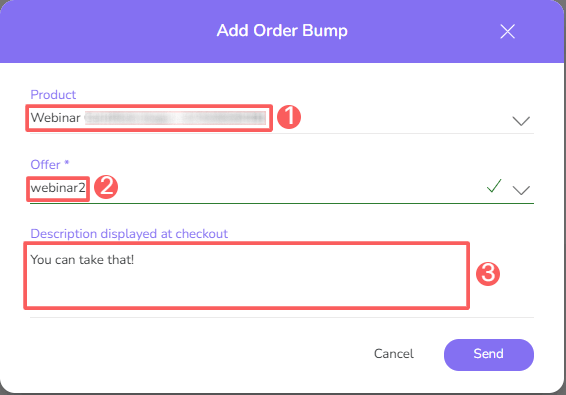
*Description displayed at checkout will only be available for version 5.
6 - Click on Send.
Repeat steps 3 to 7 to add new products to the order bump.
Customize the order of payment methods
Steps:
1 - Create, duplicate or edit an offer - an editing window will be displayed.
2 - Access the tab Order Bump.
3 - In Order Bump, click on Order.
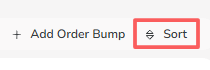
4 - A new window will be displayed. Drag the offers to order them the way you want them to appear on the Checkout.
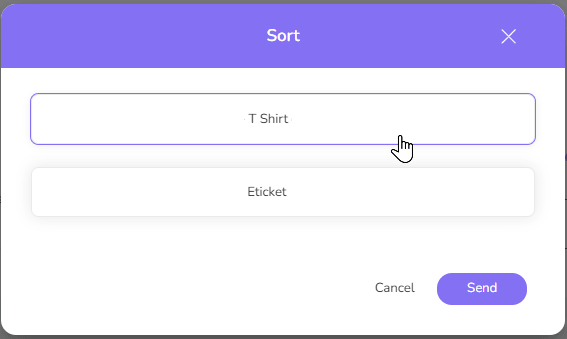
5 - Click on Send.
Remove Product from Order Bump list
Steps:
1 - Create, duplicate or edit an offer - an editing window will be displayed.
2 - Access the tab Order Bump.
3 - Hover over the desired Product and click on Remove.

4 - A confirmation window is displayed. If you wish to proceed with the removal of the item, click on Confirm.
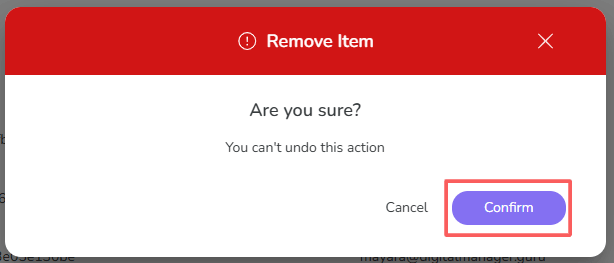
When deleting the product, it will no longer be displayed in the order bump section on the checkout page of the respective offer.
Upgrade/Downgrade
For subscription products, you can configure plan change options (upgrade and downgrade).
For example: in the Basic plan, you can allow a downgrade to the Light plan and an upgrade to the Premium.
The plan change can be done in the section Subscriptions in the admin at Guru or directly by the subscriber1 in the customer area (My Orders).
1 You can define the self-service options that will be available to the subscriber.
Add Plan Change Options
Steps:
1 - Create, duplicate or edit an offer - an editing window will be displayed.
2 - Access the tab Upgrade & Downgrade.
3 - Depending on the plan change option you want to add (Downgrade or Upgrade), click the Add corresponding button:
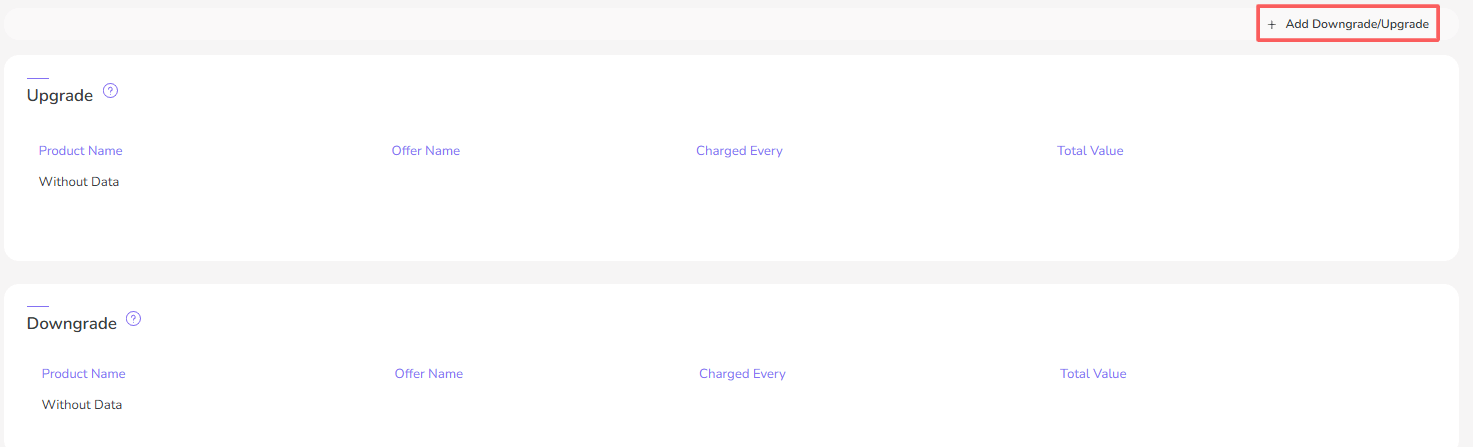
4 - A window will load with the list of available products and offers.
5 - Select:
Upgrade
-
Product: the product you want to display for the plan change;
-
Offer: the offer corresponding to the product.
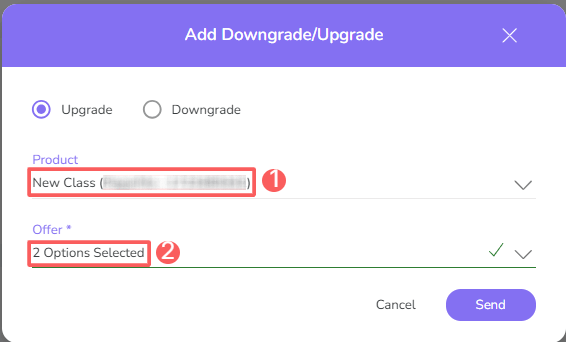
Downgrade
-
Product: the product you want to display for the plan change;
-
Offer: the offer corresponding to the product.
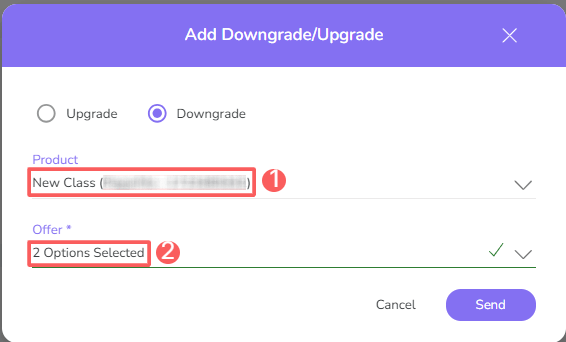
6 - Click on Send.
Repeat steps 3 to 6 to add new plan change options.
Remove Plan Change Options
Steps:
1 - Create, duplicate or edit an offer - an editing window will be displayed.
2 - Access the tab Upgrade & Downgrade.
3 - Locate the item you want to remove and click Remove.
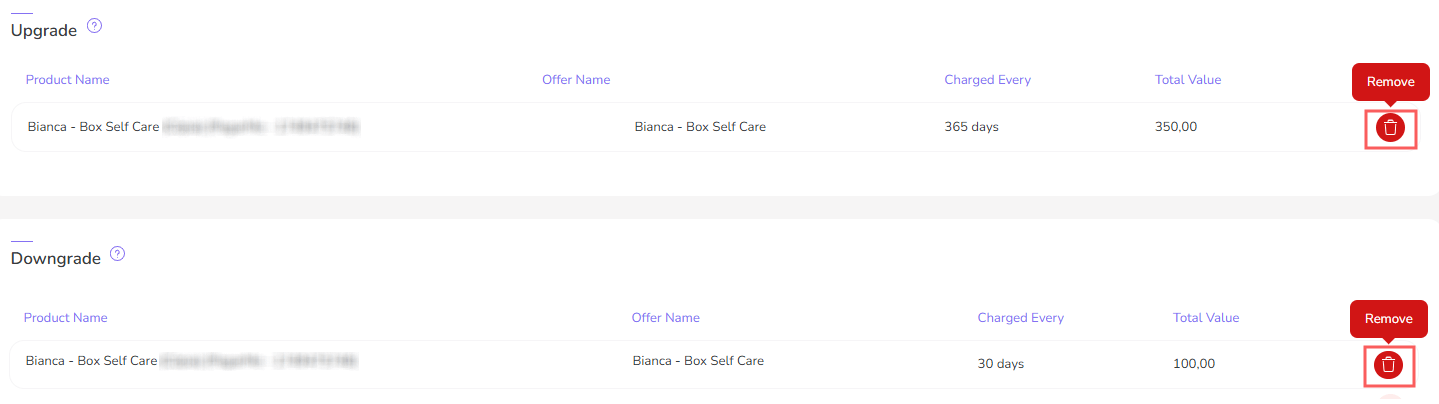
4 - A confirmation window is displayed. If you wish to proceed with the item's removal, click Confirm.
When the item is deleted, it is no longer displayed as a plan change option.
Sales
The Sales section displays the list of sales associated with the offers in question. This option is useful for easily viewing the most recent sales of the offers.
It is possible to filter the sales of the consulted offer. For more details consult this link.
The Sales section only appears visible when there is at least one sale associated with the offers in question.
Steps
1 - Create, duplicate or edit an offer - an editing window will be displayed.
2 - Click on Sales.
3 - The list displays the following information:
-
Status: sale payment status;
-
Code: sale identification code;
-
Contact: buyer's name (customer);
-
Ordered At: sale creation date/time in the system;
-
Value: total order value paid by the customer;
-
Payment Method: icon corresponding to the payment method used - hover over the icon to view the description.

You can access the sale detail by clicking on the desired item.
Export Sales of an Offer
You can export sales information to an XLS spreadsheet.
Steps:
1 - Create, duplicate or edit an offer - an editing window will be displayed.
2 - Click on Sales.
3 - In Sales, click on XLS.
4 - After a few minutes, you will receive a notification in the Guru admin with the download link. Click on the notification icon1 to view the list of notifications.
1 It may be necessary to reload the page in your browser (press CTRL+F5) for the notification icon to change color.
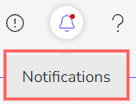
5 - Locate the corresponding notification and click Download.
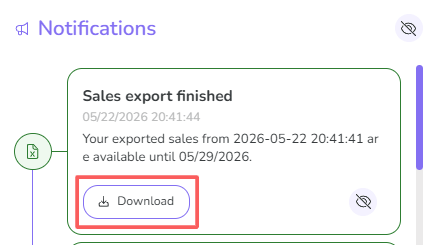
The download link is also sent by email.
Carriers
To add shipping charges at checkout, you need to configure the carrier. This configuration allows you to offer calculated rates1 at checkout and/or synchronize the order with the carrier for issuing shipping labels1 .
1 Consult the integration resources available for each carrier.
To view and configure this section, you need to activate the integration with a carrier.
Steps:
1 - Create, duplicate or edit an offer - an editing window will be displayed.
2 - Access the Carriers tab.
3 - According to the carrier you will use to send the product, follow the steps below:
Correios
Shipping data is pre-loaded based on what is informed in the correios integration settings.
If you wish to make any changes, the following fields are available for completion:
-
Name of the Sender;
-
Email of the Sender;
-
Mobile Phone of the Sender;
-
Document identification Sender;
-
ZIP code of origin: inform the ZIP code of the address from which the shipment will depart - it can be the ZIP code of the store or the warehouse where the product stock is located;
-
Street: inform the street from which the shipment will depart - it can be the Street of the store or the warehouse where the product stock is located;
-
Number: inform the street number from which the shipment will depart - it can be the Number of the store or the warehouse where the product stock is located;
-
Complement: inform the complement of where the shipment will depart - it can be the Complement of the store or the warehouse where the product stock is located;
-
District/Neighborhood: inform the district/neighborhood from which the shipment will depart - it can be the District/Neighborhood of the store or the warehouse where the product stock is located;
-
City: inform the city from which the shipment will depart - it can be the City of the store or the warehouse where the product stock is located;
-
State: inform the State from which the shipment will depart - it can be the State of the store or the warehouse where the product stock is located;
-
Country: inform the Country from which the shipment will depart - it can be the Country of the store or the warehouse where the product stock is located;
-
Services: inform the delivery services you wish to use;
-
Active: switch to the on position to activate actions with Correios. When activated, the Shipping section becomes available to perform settings related to the shipping strategy.
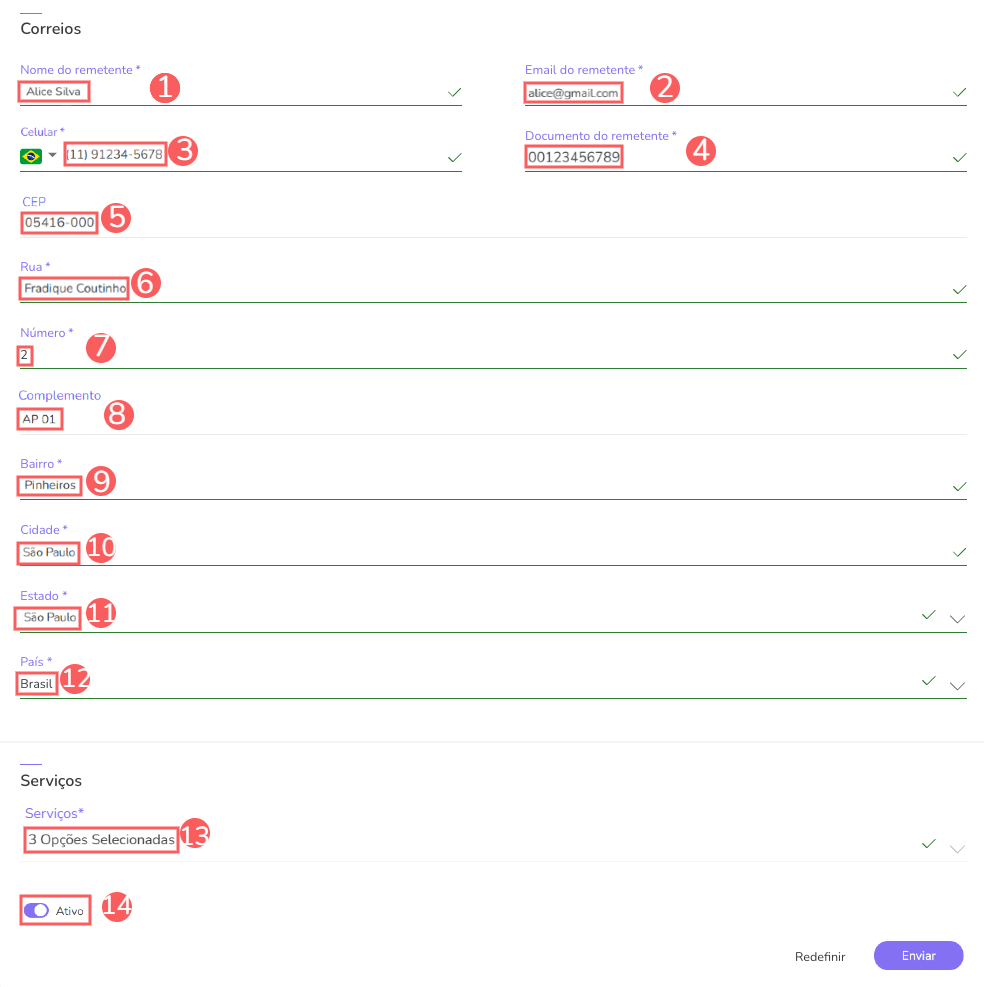
After completing the changes, click on Send.
Frenet
Inform:
-
ZIP code of origin: inform the ZIP code of the address from which the shipment will depart - it can be the ZIP code of the store or the warehouse where the product stock is located.
-
Insurance Value: inform the value you wish to charge the customer for loss or damage insurance. If you do not inform a value, the carrier may charge a value (tabled by the same) for reimbursement.
-
Create Order: switch to the on position if you want the order to be created automatically when the order arrives at Frenet.
-
Active: switch to the on position to activate actions with Frenet. When activated, the Shipping section becomes available to perform configurations related to the shipping strategy.
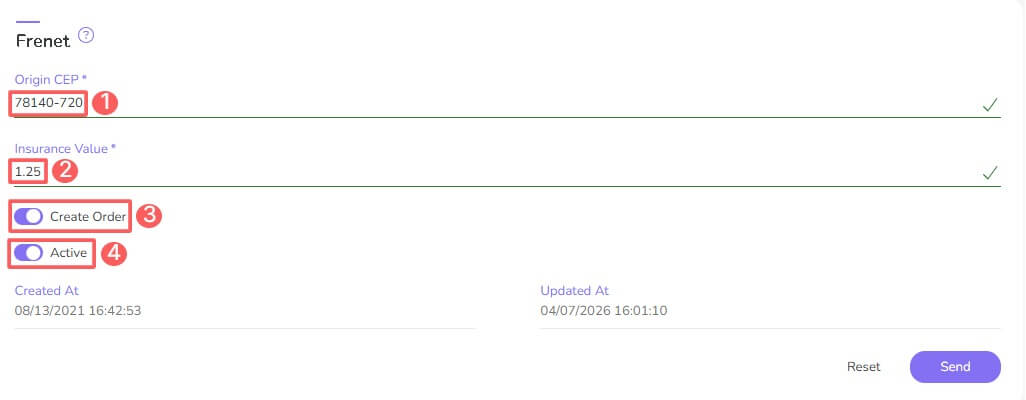
When you finish the changes, click on Send.
Intelipost
Inform:
-
Source: the ZIP code of the address from which the shipment will depart - it can be the store's ZIP code or the warehouse/stockroom where the product is stored;
-
Sender Document: document of the shipment's origin - the data of the person posting/sender;
-
Volume type: the order's volume type - you can choose box, envelope, bag, tube, and pallet;
-
HazardousProduct: switch to the on position if you want to define if the product is dangerous;
-
Hazardous Volume Codes: the dangerous product volume codes - this field will appear when the dangerous product option is activated;
-
Create Order1: switch to the on position if you want to create the order;
-
Active: switch to the on position to activate actions with Intelipost. When activated, the Shipping section becomes available to perform configurations related to the shipping strategy.
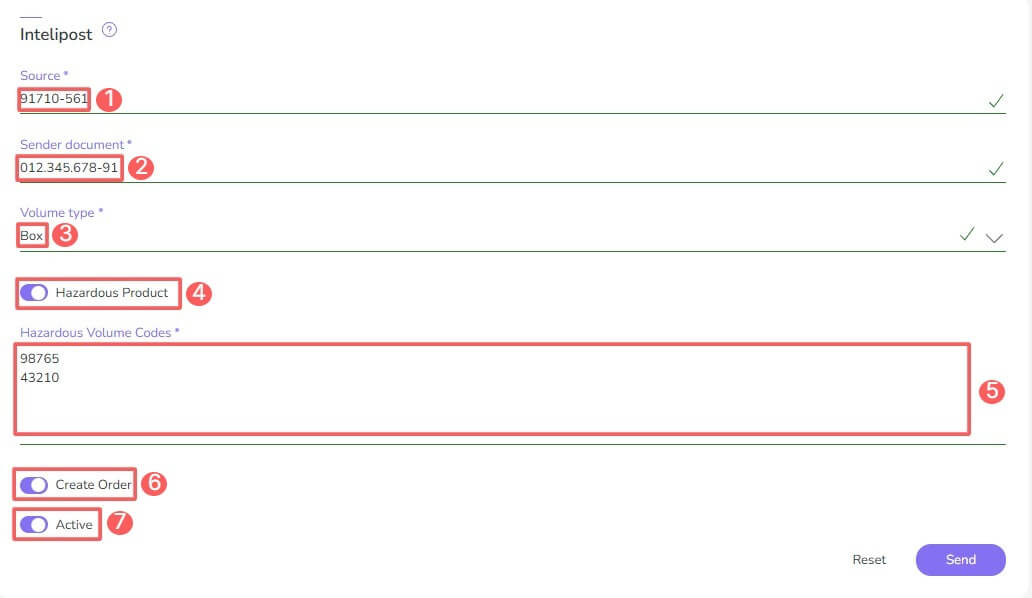
Attention1: it is essential that each order has the invoice or content declaration; for this, you will need to access your Intelipost account to manually add this data and finalize the order shipment.
After completing the edit, click Send.
Melhor Envio
Shipping data is pre-loaded based on what is informed in the melhor Envio integration settings.
If you wish to make any changes, the following fields are available for completion:
-
Sender's Name ;
-
Sender's Email ;
-
Sender's Cell Phone ;
-
Sender's Identification Document ;
-
Origin: select the origin of the shipment - the origins registered in your Melhor Envio account will be displayed;
-
Insurance Value: inform the value you wish to charge the customer for insurance against loss or misplacement. If no value is informed, the carrier may charge a value (tabled by them) for reimbursement;
-
Shipping Type: select the shipping type you will choose - you can choose "Fastest" or "Fastest";
-
Companies: select one or more logistics and delivery companies you will use - you can choose more than one option;
-
Create label automatically: switch to the on position if you want the label to be created automatically when the order arrives at Melhor Envio;
-
Cancel label automatically: switch to the on position if you want the label to be canceled automatically if the sale is refunded;
-
Delivery receipt: switch to the on position if you want to activate the delivery receipt service for the respective delivery;
-
Active: switch to the on position to activate actions with Melhor Envio. When activated, the Shipping section becomes available to perform configurations related to the shipping strategy.
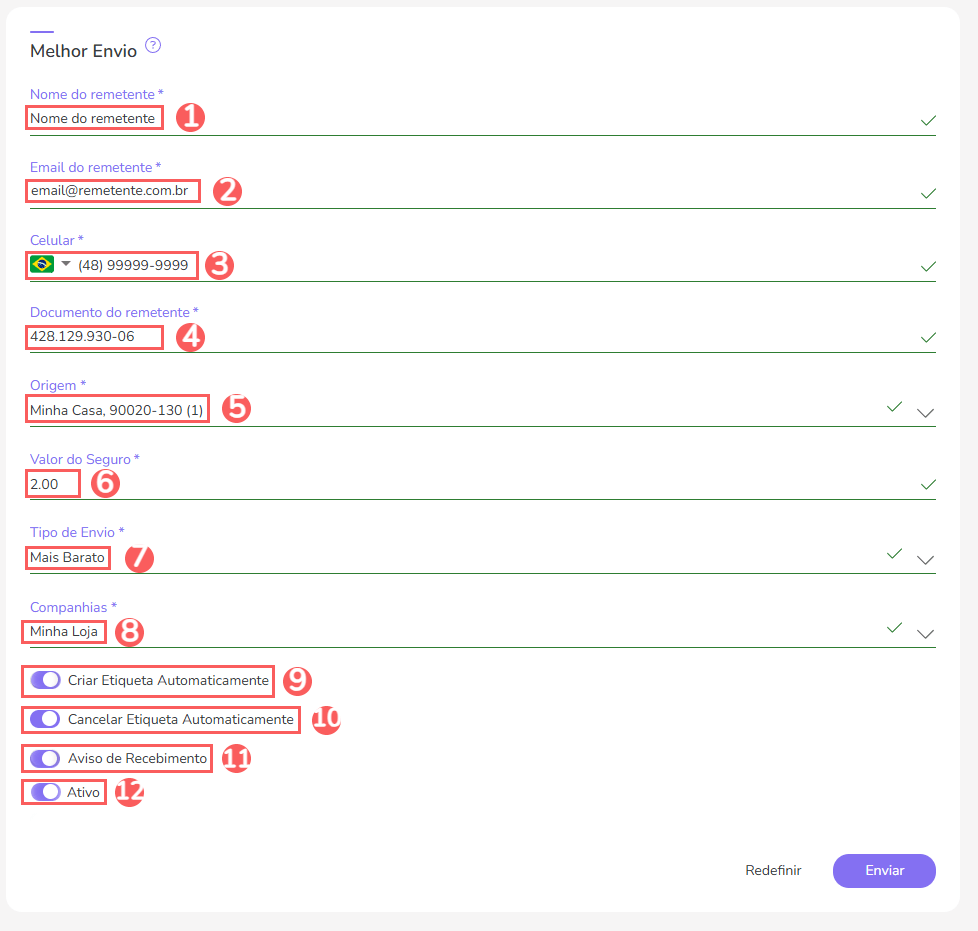
After completing the changes, click Send.
ShipStation
Inform:
-
ZIP code of origin: inform the ZIP code of the address from where the shipment will depart - it can be the store's ZIP code or the warehouse/storage where the product stock is located;
-
Active: switch to the on position to activate actions with Ship: Station. When activated, the Ship: Station section becomes available to perform configurations related to the shipping strategy.
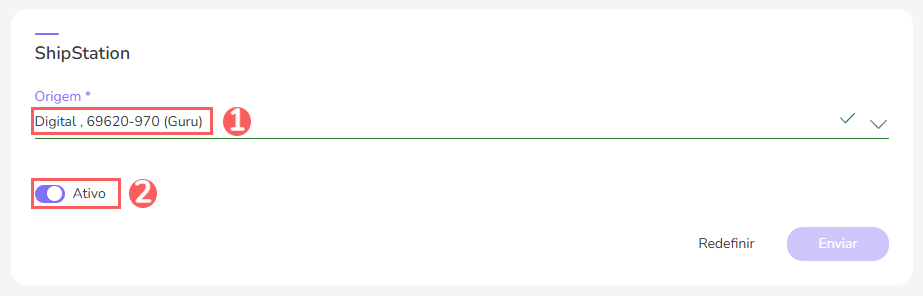

When you finish the changes, click on Send.
When this section is properly configured and the "active" option is on, the Shipping section becomes available for you to perform configurations related to the shipping strategy.
Shipping
You can apply free, fixed, or dynamic shipping to the offer.
When you choose to use dynamic shipping, the rate is calculated with the integrated carrier and applied during checkout based on the destination ZIP code and selected strategy.
In Guru, you must perform 2 shipping configurations, one for:
-
Standard Checkout: the defined rules will be applied to the standard checkout - flow where the buyer fills in all their data and payment information; and another for
-
One Click Checkout: the defined rules will be applied when the offer is a post-purchase upsell - link “Buy with 1-Click”.
Available Strategies
For standard checkout, dynamic shipping has 3 available strategies: cheaper, faster or customer choice. When the customer choice option is configured, the checkout displays an additional window for the customer to select the desired shipping option.
Thecustomer choice strategy option is only available for single product offers, i.e., single sale products.
For one-click checkout, there are 2 options available: fixed or percentual based on the previous order's shipping.
The Shipping section is only displayed when the carrier section has a complete and active configuration.
To apply free shipping, you must perform the Fixed Shipping configurations by entering 0 (zero) in the corresponding field for the amount to be charged. You can also hide shipping information at checkout.
Shipping must be configured by unit quantity.
Configuration
Steps:
1 - Create, duplicate or edit an offer - an editing window will be displayed.
2 - Click on the Shipping tab.
3 - According to the desired shipping strategy, fill in the following fields:
Fixed Shipping
Standard Checkout
-
Shipment: check this option
Fixedto apply a fixed shipping rate; -
Name: description displayed for shipping - ex.: Standard;
-
Value(1): shipping value that will be applied - if you want to apply free shipping, enter 0 (zero).
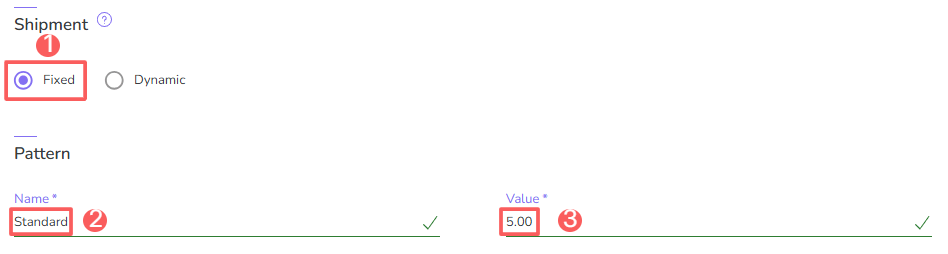
(1) Shipment must be configured by unit quantity.
One Click Checkout
-
Name: shipping description - ex.: Standard;
-
Strategy: shipping strategy you want to apply:
fixed valueorpercentualbased on the previous order's shipping; -
Value (1): shipping value that will be applied - the value entered will be combined with the strategy selected. Ex: if you enter strategy = percentage; value = 10; the shipping to be charged will be 10% of the previous order's shipping.

(1) Shipment must be configured by unit quantity.
Package dimensions
-
Height (CM): package height (in centimeters);
-
Width (CM): package width (in centimeters);
-
Length (CM): package length (in centimeters);
-
Weight (KG): package weight (in kilograms).

Dynamic Shipping
Standard Checkout
-
Shipping: check this option
Dynamicto apply dynamic shipping; -
Carrier: select the carrier you will use for shipments - the carriers activated in the “Carriers” section of the respective offer will be listed;
-
Companies: select the logistics/delivery company(ies) you want to use - the companies available for the selected carrier will be listed;
-
Strategy: select the shipping strategy you want to apply:
mais barato,mais rápidoorcustomer choice.

One Click Checkout
-
Carrier: select the carrier you will use for shipments - the carriers activated in the “Carriers” section of the respective offer will be listed;
-
Companies: select the logistics/delivery company(ies) you want to use for shipments - the companies available for the selected carrier will be listed;
-
Strategy: : select the shipping strategy you want to apply:
valor fixoorpercentualbased on the previous order's shipping; -
Value: enter the shipping value that will be applied - the informed value will be combined with the selected strategy. Ex: if you enter strategy = percentage; value = 10; the shipping to be charged will be 10% of the previous order's shipping.

Package dimensions
-
Height (CM): enter the package height (in centimeters);
-
Width (CM): enter the package width (in centimeters);
-
Length (CM): enter the package length (in centimeters);
-
Weight (KG): enter the package weight (in kilograms).

4 - When you finish editing, click Send.
Audit
As a security measure, Guru stores a history of all operations performed in the offer registration, identifying user, date/time of operation, and other details.
Steps:
1 - Select the desired offer - a screen with the data will be displayed.
2 - Click on the Audit tab.
3 - Activities are displayed in a timeline (from most recent to oldest).

4 - If desired, you can view the activity details by clicking on its title.

5 - Click on one of the available sections to view the data:
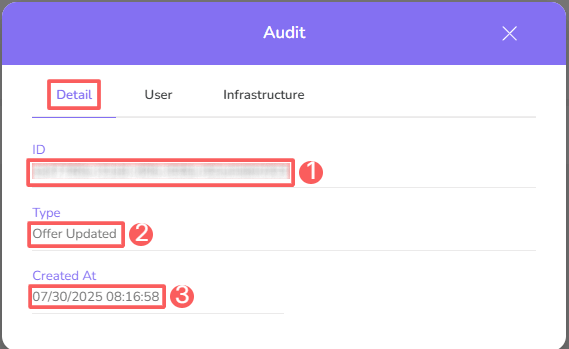
Detail
Displays detailed information about the activity in question.
-
ID: activity identification code.
-
Type: displays the type of change made;
-
Created at: item creation date.
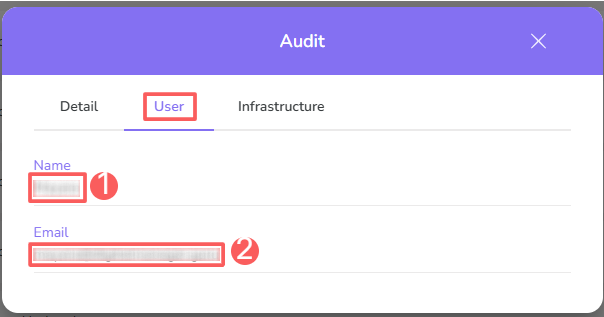
User
Displays information about the user who performed the action.
-
Name: name of the related user.
-
Email: email of the related user.
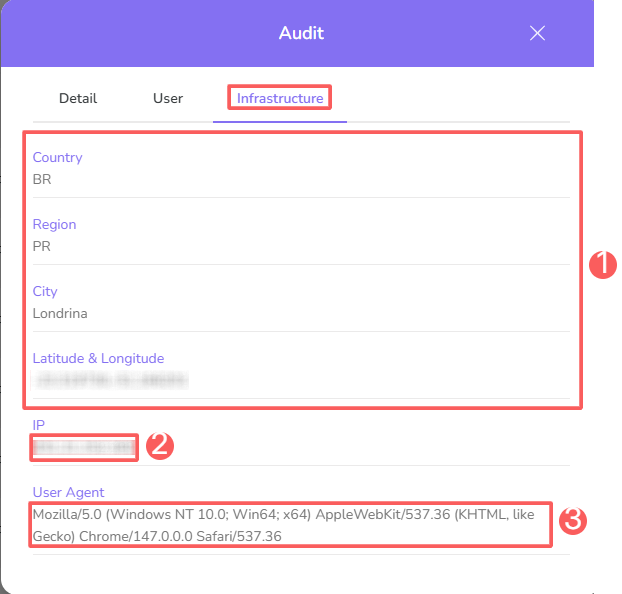
Infrastructure
Displays infrastructure information (country, IP, user agent…) of the related activity.
-
Country, Region, City, Latitude & Longitude: location of the device that performed the activity.
-
IP: device IP address.
-
User Agent: identification of the user agent that performed the operation.
How to filter the Audit list
You can use the filters to view a smaller subset of existing audits. This feature is useful for finding specific audits you want to view.
By default, only records from the last 28 days will be shown, but the period can be changed in the filters, in the Period.field.
Steps:
1 - Select the desired offer - a screen with the data will be displayed.
2 - Click on the Audit tab.
3 - Under Audit, click on Filters.
4 - Fill in one or more filter options:
-
Period: searches for audits registered in the selected period - you can use the predefined time interval buttons or select the date you want to view;
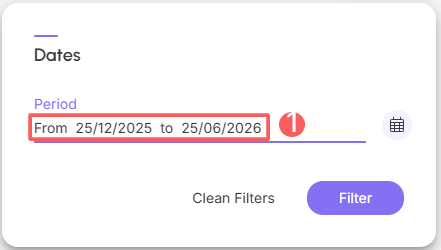
5 - Click on Filter.
You can view the number of applied filters, and when using them, you will be able to clear them without accessing the Filters icon again, making it easier to remove the selection.
Protect your data. Increase your business security.
Create and manage users determining what each collaborator can see and do within the organization.
Other settings
Checkout
By default, the offer automatically assumes the Checkout settings applied at the product level.
If desired, you can customize the Guru Checkout specifically for an offer.
Steps:
1 - Create, duplicate or edit an offer - an editing window will be displayed.
2 - Click on the Checkout tab.
3 - Access the displayed tabs and perform the desired customization.
To learn more about the available customization options, consult the links indicated above.
Subscription
When it comes to a subscription product, the offer by default assumes the subscription rules applied at the product level.
If desired, you can customize the subscription rules specifically for an offer.
Steps:
1 - Create, duplicate or edit an offer - an editing window will be displayed.
2 - Click on the Subscription tab.
3 - On the displayed screen, customize the subscription rules.
To learn more about the available customization options, consult the link indicated above.
More Resources