
You can enable conversion event tracking in major advertisers and analytics.
Tracking conversion events on platforms like Facebook helps optimize ad targeting, reduce cost per action, and measure results.
In Guru, this setting can be applied at 3 levels:
-
Global Level: applies to the checkout of all registered products - default setting;
-
Product Level: applies to the product in question - overrides the definitions of item 1;
-
Offer Level: applies to the product offer in question - overrides the definitions of items 1 and 2.
In this tutorial, whenever possible, you will be guided to perform the configuration at a global level (recommended). To configure at other levels, access the Checkout tab in the product or offer registration.
Attention: this configuration involves platforms external to Guru. In case of doubts, request assistance from the platform. Our support only assists with configurations made within our admin.
On this page, you will learn how to configure conversion event tracking for:
-
Facebook
-
Google Ads
-
Google Tag Manager
-
Propeller Ads
Before you start, you need…
-
Be an administrator user or have permission to perform the following actions.
Facebook
Conversion event tracking for the Facebook pixel can be done in two ways:
-
via Facebook API (recommended)- performed by the Guru server through the Facebook Conversions API (CAPI). This option helps bypass i. OS14 restrictions.
-
via Browser - performed through the user's browser during checkout completion.
You must choose only 1 of the indicated methods to avoid event duplication in the pixel.
According to the actions performed at checkout, the following events are sent to the Pixel:
|
Checkout Action |
Event |
|---|---|
|
The customer opens the checkout |
Add to Cart (AddToCart) |
|
The customer fills in the contact details |
Initiate Checkout (InitiateCheckout) |
|
The customer clicks the Pay button |
Add Payment Information (AddPaymentInfo) |
|
The payment is approved |
Purchase (Purchase) |
|
The customer starts the trial period (only for subscriptions) |
Start Trial Period (StartTrial) |
Pixel tracking via Facebook API
To track conversion events via Facebook API, you must select the pixel that will receive the events for each conversion type.
Steps
1 - Add the pixel and its Facebook API credentials
Integrate pixel via Facebook API
2 - Select the pixel to receive the event for each conversion type
Sales Conversion
Steps:
1 - According to the configuration level you wish to apply:
1.1 - Global Level: access Settings » Checkout.
1.2 - Product Level: access Products » (desired product) » Checkout.
1.3 - Offer Level: access Products » (desired product) » Offers » (desired offer) » Checkout.
2 - Click on the pixels tab.
3 - In Facebook Pixel(s) via API, select the desired pixel (you can select more than one).

4 - Click on Send.
ATTENTION: leave the field Facebook Pixel(s) empty to avoid duplication in event tracking.
Subscription Conversion
If you have subscription products, you can enable event tracking for sales (subscription activation) and renewals. To activate these events, follow the steps below:
Steps:
1 - Go to Settings » Subscriptions.
2 - Activate the option Track Facebook Event on Each Renewal and click on Send.

3 - Go to Settings » Checkout.
4 - Click on the pixels tab.
5 - In Facebook Pixel(s) via API, select the desired pixel (you can select more than one).

6 - Click on Send.
ATTENTION: leave the “facebook Pixel(s)” field empty to avoid duplication in event tracking.
Lead Registration
If you use lead tracking, you can enable the “registration (lead")" on the Facebook pixel. To activate this event, follow the steps below:
Steps:
1 - In the side menu, go to RPPC > captures.
2 - Click on the CAPTURE RPPC desired.
3 - In Facebook Pixel(s) To Mark Event select the desired pixel (you can select more than one).

4 - Click on Update.
5 - Repeat steps 2 to 4 for each Capture RPPC for which you want to activate event tagging.
Pixel Tagging via Browser
To tag conversion events via browser, you must inform the pixel identifier that will receive the conversion events in sale.
Steps:
1 - According to the configuration level you want to apply:
1.1 - Global Level: go to Settings » Checkout.
1.2 - Product Level: go to Products » (desired product) » Checkout.
1.3 - Offer Level: go to Products » (desired product) » Offers » (desired offer) » Checkout.
2 - Click on Pixels.
3 - Inform the ID of the Facebook Pixel. You can insert more than one, separating them by commas.

4 - Click on Send.
Google Ads
If you advertise through Google Ads, you can enable conversion event tracking.
Steps:
1 - According to the configuration level you want to apply:
1.1 - Global Level: access Settings » Checkout.
1.2 - Product Level: access Products » (desired product) » Checkout.
1.3 - Offer Level: access Products » (desired product) » Offers » (desired offer) » Checkout.
2 - Click on Pixels.
3 - In Pixels, enter:
-
Google Ads Conversion ID: the Google Ads conversion ID;
-
Google Ads Conversion Label: the Google Ads conversion label.

Enter the Google Ads Conversion ID and Conversion Label for Google Ads.
4 - Click on Send.
Google Tag Manager
You can send conversion events to Google Tag Manager where you can centralize the triggering of conversion events for all your advertisers through tags.
To configure tags in Google Tag Manager, consult our tutorial playlist:
If you wish to integrate advertisers such as Google Ads/Facebook you should do so only via GTM and remove the IDs of these advertisers from the Checkout settings. This should be done to avoid duplication of the same pixel's tracking.
Attention: We recommend centralizing everything in GTM.
To inform the Tag Manager ID in Guru, follow the steps below:
Steps:
1 - According to the configuration level you want to apply:
1.1 - Global Level: access Settings » Checkout.
1.2 - Product Level: access Products » (desired product) » Checkout.
1.3 - Offer Level: access Products » (desired product) » Offers » (desired offer) » Checkout.
2 - Click on Pixels.
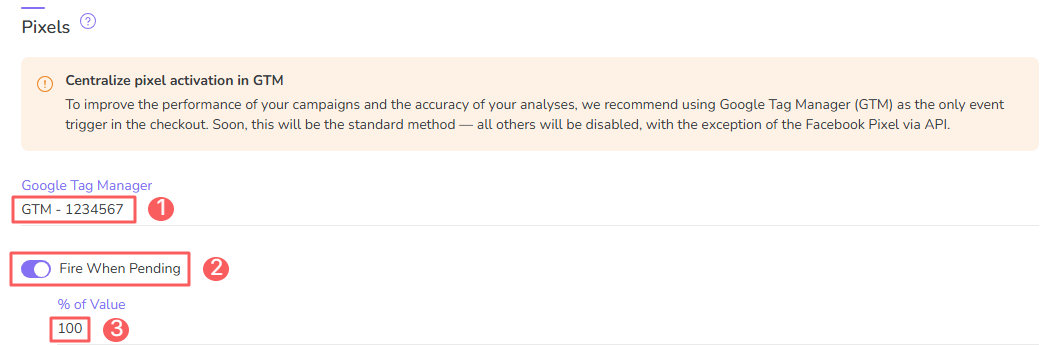
3 - Then, inform:
-
Google Tag Manager: the container ID of Google Tag Manager;
-
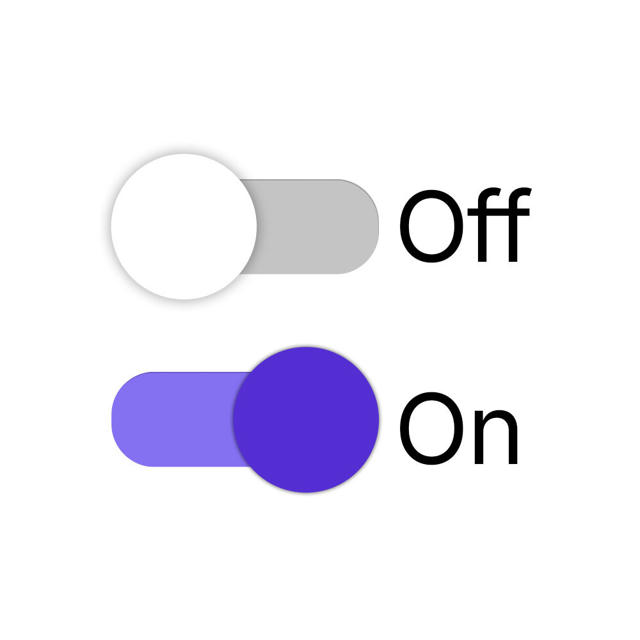
Change the button to the on position if you want to Mark Sale Conversion Even When Pending;
-
% of Value: percentage of the financial value of the transaction (sales revenue).
4 - Click on Send.
Guru triggers events for Google Tag Manager as the buyer interacts with the Checkout.
It will be triggered again if the data is changed.
The triggered events are the following:
|
Event |
Customer action |
|---|---|
|
|
The event is triggered when the page is loaded. |
|
|
The event is triggered when contact data is filled in. |
|
|
The event is triggered when address data is filled in. |
|
|
The event is triggered when “Pay” is clicked. |
|
|
The event is triggered when the purchase is approved. |
|
|
The event is triggered when the free trial period starts (trial). |
|
|
The event is triggered when the bank slip is printed. |
|
|
The event is triggered when the payment is pending. |
|
|
The event is triggered when the purchase is denied. |
The parameters sent are the following:
|
Parameter |
Description |
|---|---|
|
What phase of the checkout the buyer is in. |
|
|
Buyer's contact details. |
|
|
|
Buyer's encrypted email ("legacy"). |
|
|
Buyer's encrypted email. |
|
|
Buyer's name. |
|
|
BUYER's contact number. |
|
|
BUYER's address ZIP code or postal code. |
|
|
Currency used in the purchase. |
|
|
Checkout event - e.g.: add to cart. |
|
Information related to the ecommerce used. |
|
|
Encrypted information about the buyer's location and access. |
|
|
Product information (name, quantities, price, and ID). |
|
|
|
PAYMENT method used in the sale. |
|
|
Quantity of products. |
|
|
Product value (unit). |
|
|
Product identification code. |
|
|
Product name. |
|
|
Total product value = product value x product quantity. |
|
|
Product type. |
|
|
Shipping value. |
|
|
Product value plus shipping value. |
|
|
Tax value. |
|
|
Total value to be paid by the buyer. |
|
|
TRANSACTION identification code. |
|
Unhashed data related to the buyer's contact, address, and location. |
Access the parameter representations by clicking on the links above:
The data informed within the object properties is fictitious.
Propeller Ads
If you advertise through Propeller Ads, you can enable the tagging of sales conversion events.
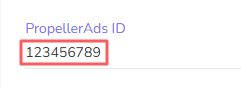
To send conversion events, you will need to obtain the campaign ID. To do this, access your Propeller Ads account, click on Campaigns, and copy the desired campaign ID.
To inform the campaign ID in Guru, follow the steps below:
Steps:
1 - According to the configuration level you wish to apply:
1.1 - Global Level: access Settings » Checkout.
1.2 - Product Level: access Products » (desired product) » Checkout.
1.3 - Offer Level: access Products » (desired product) » Offers » (desired offer) » Checkout.
2 - Click on Pixels.
3 - Enter the campaign ID in Propeller Ads.
4 - Click on Send.
More Resources