
In this article, we will show you how to use a Capture P.P.C.T. connected to Webinar. Jam. This will allow you to track your webinar conversions.
You need to understand how our tracking works before starting this step-by-step guide. If you still don't know how Guru's P.P.C.T.s work, consult this material.
On this page:
-
Step 1: Get Destination URL
-
Step 2: Configure redirection in the Webinar form
-
Step 3: Add the direct link to the Live Room on your Thank You page (optional)
Before you start, you need to:
-
Have a personalized thank you page.
-
Have a Capture P.P.C.T. created pointing to your thank you page.
-
Have P.P.C.T.s created and configured according to your sales structure.
-
Be an administrator user or have permission to perform the following actions.
Step 1: Get Destination URL
In this step, you must obtain the action URL of the Capture P.P.C.T. which you will use as a base to set up the redirection URL for the WebinarJam form.
Steps:
1 - Access the Guru admin with your username and password.
2 - In the side menu, go to P.P.C.T., and then click on Captures.
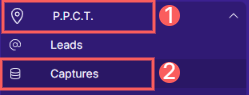
3 - Select the P.P.C.T. you want to Connect.
4 - In Detail, click to copy the Form Code.

5 - Paste the Form Code into a Text Editor of your choice (e.g., notepad).
6 - Copy the Value of the action, which is between quotes.
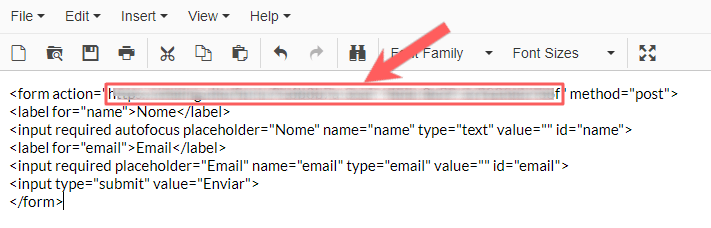
Step 2: Configure redirection in the Webinar form
In this step, you will activate the sending of data captured by the Webinar to Guru (capture P.P.C.T.).
Steps:
1 - Access WebinarJam with your username and password.
2 - Select the type of webinar you want.
3 - Click on Edit for the desired webinar.
Steps 2.6 and 2.8 may not appear depending on the type of webinar you choose.
4 - Select Full configuration (complete configuration) and click Next.
5 - Select one of the webinar scheduling types and click Next.
6 - Click on Thank You and then on Edit in the Default vs Custom confirmation page line.
7 - Select the option Your own custom page and paste the URL copied in step 1.5 into Your post-registration confirmation page.
8 - Click on Confirm.
Step 3: Add the direct link to the Live Room on your Thank You page (optional)
In this step, you will add the direct link for the customer to watch the webinar to your thank you page. This step is optional, as your customer will receive an email with the registration confirmation and the link to watch.
However, we recommend placing the link to watch the webinar on the thank you page, as it makes it easier for the customer to access the webinar room and increases conversion.
Attention: The links on the thank you pages automatically generated by Webinar: Jam are dynamic, so follow the step-by-step guide to get the correct link to use on the thank you page.
Steps:
1 - Access the list of webinars.
2 - Click on Your links for the webinar you selected in step 2.
3 - Click on Direct link to live room and copy the URL in Direct link to live room.
4 - Access the editing of your thank you page1. Edit the button or element that will contain the link to the webinar room and paste the link copied in the previous step.
1 The editing screen of your page may appear different depending on the tool you use.
5 - Save the changes to the page.
Your Capture P.P.C.T. is associated with Webinar. Jam. Whenever there is a registration for the webinar, the contact will be registered in Guru and the conversions of that lead will be tracked.
Tip: you can add an event with a Webinar: Jam offer to a Sales P.P.C.T. to sell products through the webinar chat. Consult this material to learn how to place the Sales P.P.C.T. link in the webinarjam offer.
More Resources