
In Guru, you can configure subaccounts so that they use the same tools available in the administrator's account. It is possible to create a new subaccount or link an existing account to your main account directly through the administrative panel.
This feature is useful when you want to add subaccounts and existing accounts to your administrator account and have them configured with the same functionalities as the main account. In addition, you have total control over permissions, being able to restrict which payment processors will be visible and available for each subaccount.
On this page:
-
Add a subaccount
-
Associate an already created subaccount
-
Update a subaccount
-
Default Restrictions
-
Impersonate the subaccount
Before you start, you need…
-
Be an administrator or have permission to perform the following actions.
Add a subaccount
You can add a subaccount so that the added subaccount has the same benefits as the standard account.
Steps:
1 - Access the guru admin with your username and password.
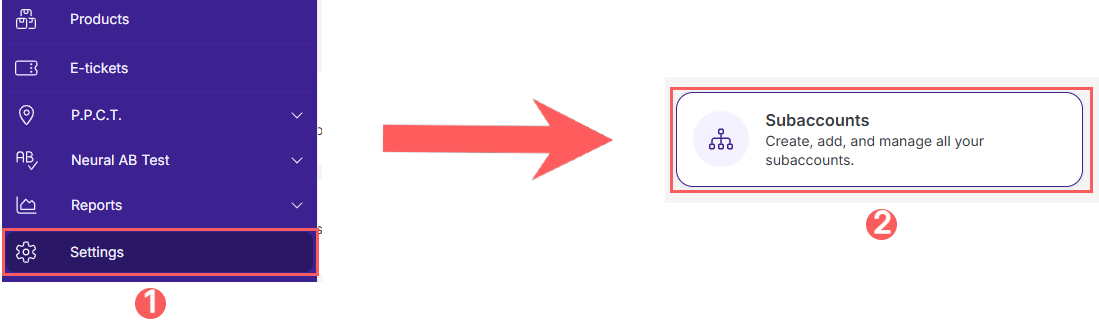
2 - In the side menu, click on Settings and then, Subaccounts.
3 - Click on Add Subaccount.
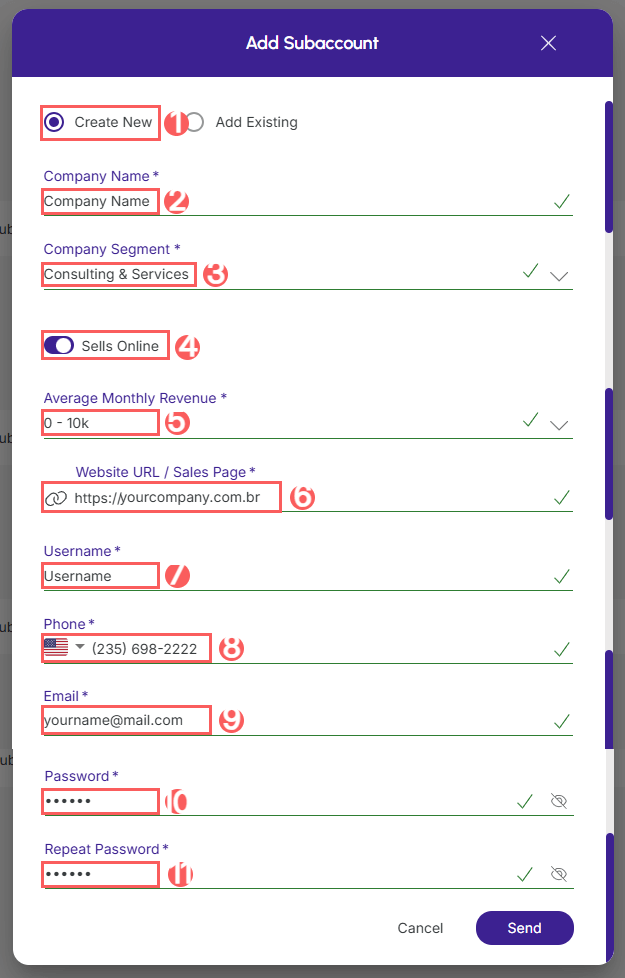
4 - In Create New, enter the following data:
-
Create new: select the create new option;
-
Company name: your company's name;
-
Company Segment: your company's area of activity;
-
Sells Online: activate this option if you make online sales - if this option is not activated, the options for filling in the average monthly revenue and website URL will not appear;
-
Average Monthly Revenue: select your company's average monthly revenue;
-
Website URL / Sales Page: your company's website or Instagram - if you don't operate with a website;
-
Username: full name for subaccount registration;
-
Phone1: valid contact number; valid contact number;
-
Email: valid subaccount contact email - the email provided will be used to log in to Guru;
-
Password: enter the subaccount password;
-
Repeat password: confirm the subaccount password confirm the subaccount password - the password provided will be used to log in to Guru;
(1) It is important to enter a valid email and phone contact, as Guru will validate two-factor authentication.
.jpg?cb=8837a4ea6a4e7db37d2e094edac9e7bf)
5 - Click on Send.
When adding a subaccount, credits will be shared between the standard account and existing.subaccounts.
Associate an already created subaccount
You can add an existing account, that is, you can invite existing accounts to be subaccounts of the main account.
This feature is useful if you already have one or more accounts and want to link that account to a main account.
Important: to invite an existing account to become a subaccount, it must be on the trial plan.
Steps:
1 - Access the guru admin with your username and password.
2 - In the side menu, click on Settings and then, Subaccounts.
3 - Click on Add Subaccount.
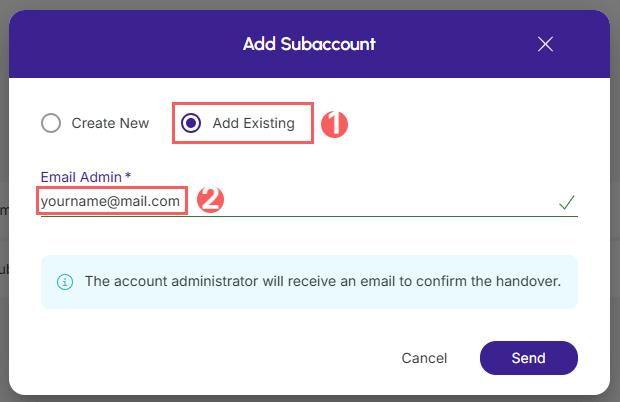
4 - In Add Subaccount, enter the following data:
-
Add Existing: select the add existing option;
-
Email Admin: the email of the existing account's admin.
5 - Click on Send.
When adding a subaccount, credits will be shared between the standard account and existing.subaccounts.
Default Restrictions
You can limit access to payment processors in two ways: for all subaccounts at once or by defining specific rules for each of them (to do this you must access the desired subaccount and click on the Restrictions tab).
This feature is useful if you want to manage the visibility of payment processors for your subaccounts.
Steps:
1 - Access the guru admin with your username and password.
2 - In the side menu, click on Settings and then, Subaccounts.
3 - Click on Default Restrictions.
4 - In Default processor restrictions, select:
-
Limit visible processors: if you want to limit subaccount access to payment processors;
-
Allowed processors: select the payment processors you want to limit subaccount access to.
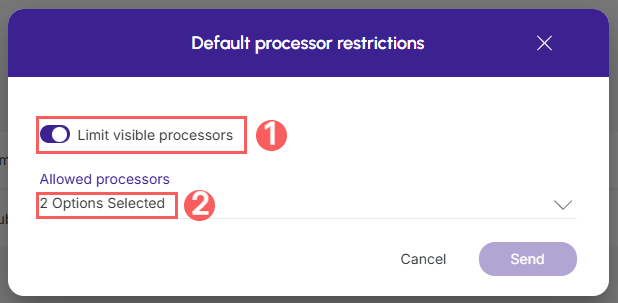
5 - Click on Send.
The configuration can be applied globally to all subaccounts or individually to each one.
Update a subaccount
After creating subaccounts, you can edit them, such as name, email, document, contact, and address details.
Steps:
1 - Access the guru admin with your username and password.
2 - In the side menu, click on Settings and then, Subaccounts.
3 - In the list of your Subaccounts, select the Subaccount you want to update.

4 - Then, fill in the Subaccount Information.
Impersonate the subaccount
After creating a subaccount, you must impersonate the created subaccount so that you can configure the information, such as activating your subaccount's integrations, adding products, creating offers, and customizing according to your needs.
Steps:
1 - Access the guru admin with your username and password.
2 - In the side menu, click on Settings and then, Subaccounts.
3 - In the list of your Subaccounts, click on Impersonate.

Done! You will be directed to the Account Impersonation and from that moment you can configure your subaccount, activate payment integrations, then, register your first product and offer and, finally, generate the checkout link to start selling.