
In this step, you will customize your Checkout Guru environment to start operating at full capacity!
We start with the configuration of your Checkout Guru, adjusting the general settings to reflect your brand's identity and don't forget to connect your own domain for an even more professional experience.
Next, it's time to activate the basic integrations that will ensure the complete flow of your sales.
Basic Integrations
You need to activate up to 3 types of integrations to start selling:
-
Payment: gateway or processor that will transact Checkout Guru payments;
-
Billing: tool that will issue the invoice (bill);
-
Carrier1: tool that will perform freight quotation and/or issue shipping labels.
(1) Optional integration.
To strengthen the security of your Guru account, you must activate Two-Factor Authentication (2FA) only once. With it active, each new login will require a random code generated by an authenticator.
At Guru, 2FA is mandatory and can be done via email (default option) or by app (recommended option).
On this page:
-
Customize the environment and checkout
-
Checkout Guru
-
Subscription Engine
-
Own Domain
-
-
Integrate Payment Processor
-
Integrate Invoice Issuance
-
Integrate Product Delivery
-
members Area
-
Carriers
-
-
Register Products and Offers
-
Register Products
-
Add offer to product
-
-
Checkout Link Disclosure Strategies
-
How to obtain and use the Checkout Link
-
Before you start, you need to…
-
Be an administrator or have permission to perform the following actions.
-
Have the production account credentials in the payment processor you intend to use.
Customize the checkout environment
In this step, you will customize your environment starting with the configuration of the general appearance and behavior of Checkout Guru.
After configuring the appearance of Checkout Guru, making it match your brand, you can define the behavior of the Subscription Engine (if you intend to make recurring charges), and then, add the Custom Domain, to bring more security and brand recognition to your customers.
Important: actions performed in this step will be automatically reflected for all products and respective checkout links that will be configured in the next step.
Checkout Guru
Access the Checkout option to customize the appearance, content, and behavior of Checkout Guru, such as automatic email sending, pixel tracking, and redirect pages.
Access and learn how to Customize your Checkout Guru.
Subscription Engine
Access the Subscriptionsoption, to define the behavior of the subscription engine such as charge retries, self-service options for the customer portal and free trial period.
Access to configure the subscription engine.
(*) This step is only necessary if you intend to make recurring charges.
Custom Domain
Access the Custom Domain option to add domains that will be used to customize the prefix of checkout links and tracking.
Access and learn how to configure a custom domain.
(*) This step is optional. If you do not configure a custom domain, checkout links will work normally using the default domain (clkdmg.site) that Guru provides.
(1) During the testing period, only 1 user, 1 payment integration (marketplace) and 1 active webhook are allowed. These limits may vary depending on the contracted plan. Consult the operational limits of each plan to learn more.
Integrate the Payment Processor
In this step, you will integrate the payment processor, ensuring that all payment options are active and optimized, and taking advantage of the various integrations that Guru offers.
Steps:
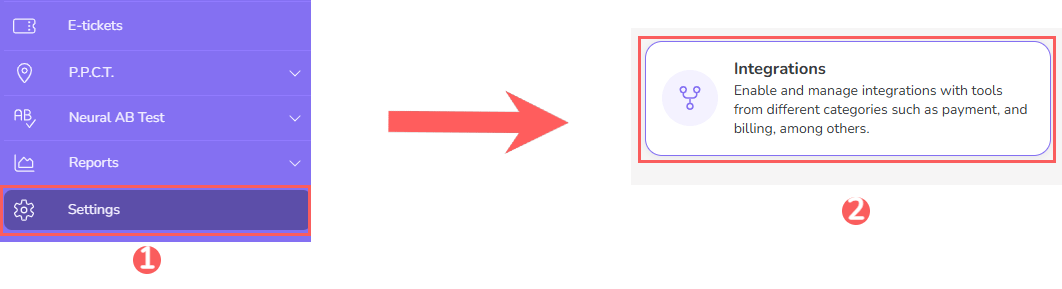
1 - In the left sidebar menu, click on Settings, and then on Integrations.
2 - Then, click on Guru Checkout and choose the processor you intend to use to process your customers' payments.
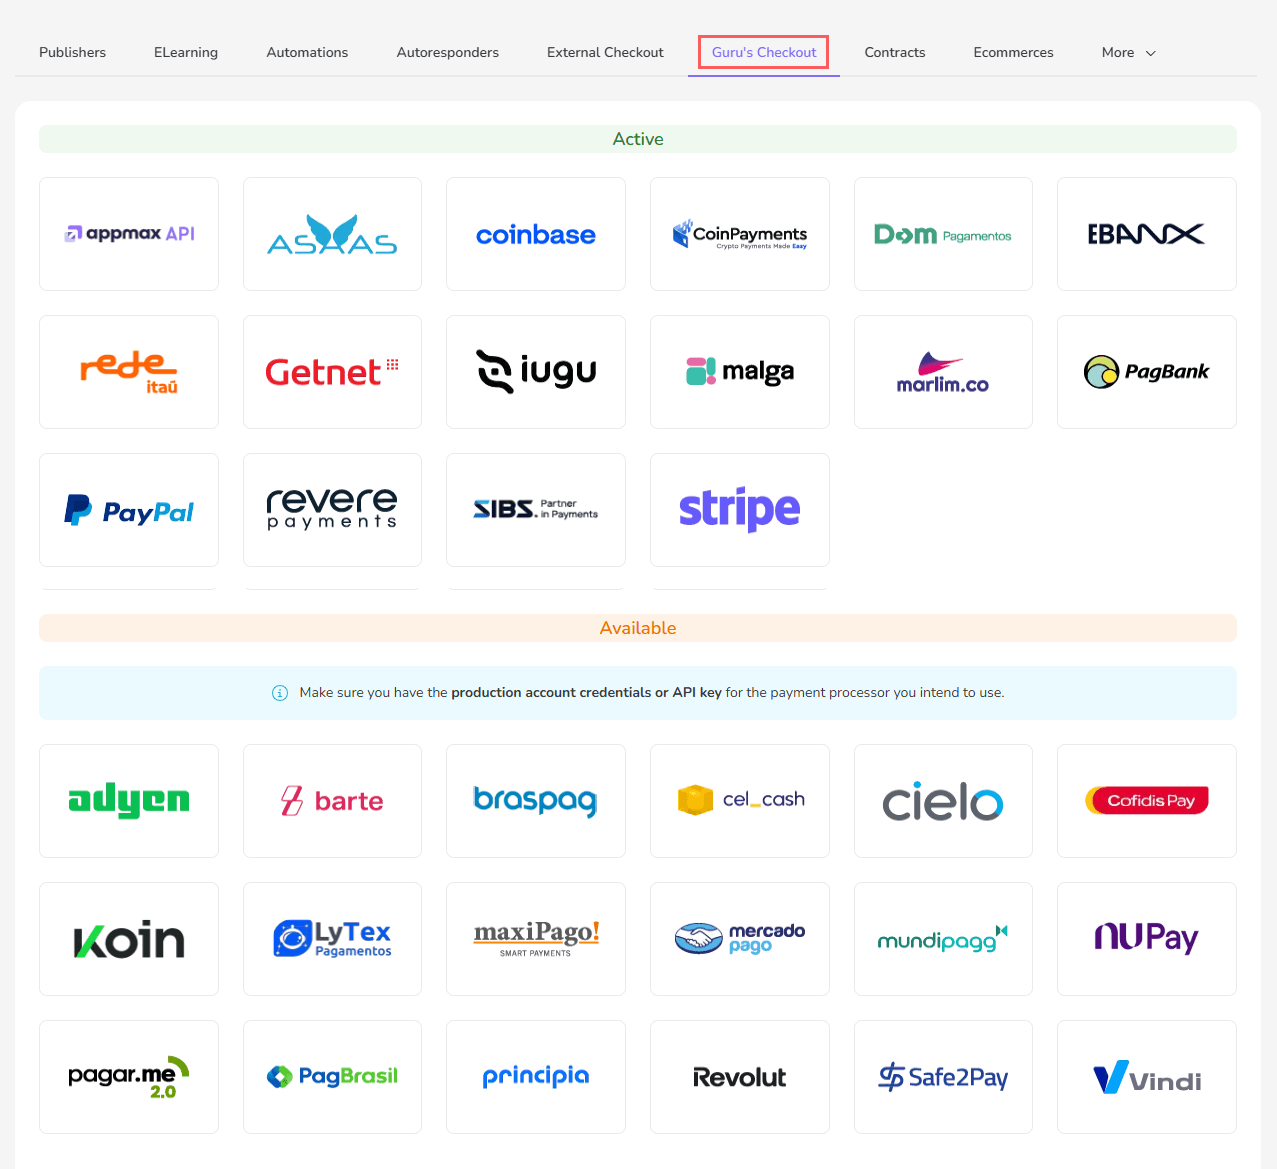
3 - To activate the integration, click on the desired option and enter the credentials of your production account in the selected payment processor.
Access now and see the complete step-by-step guide on how to Activate integration with a payment processor.
Integrate Invoice Issuance
In this step, you must connect your platform to an invoice issuance system (automation), to connect your ERP, financial control system, or invoice issuance, to automatically send the order as soon as payment is approved in Guru.
Steps:
1 - In the left sidebar menu, click on Settings, and then on Integrations.
2 - Then, click on More, Accounting and choose the ERP you intend to use to issue invoices for your customers.
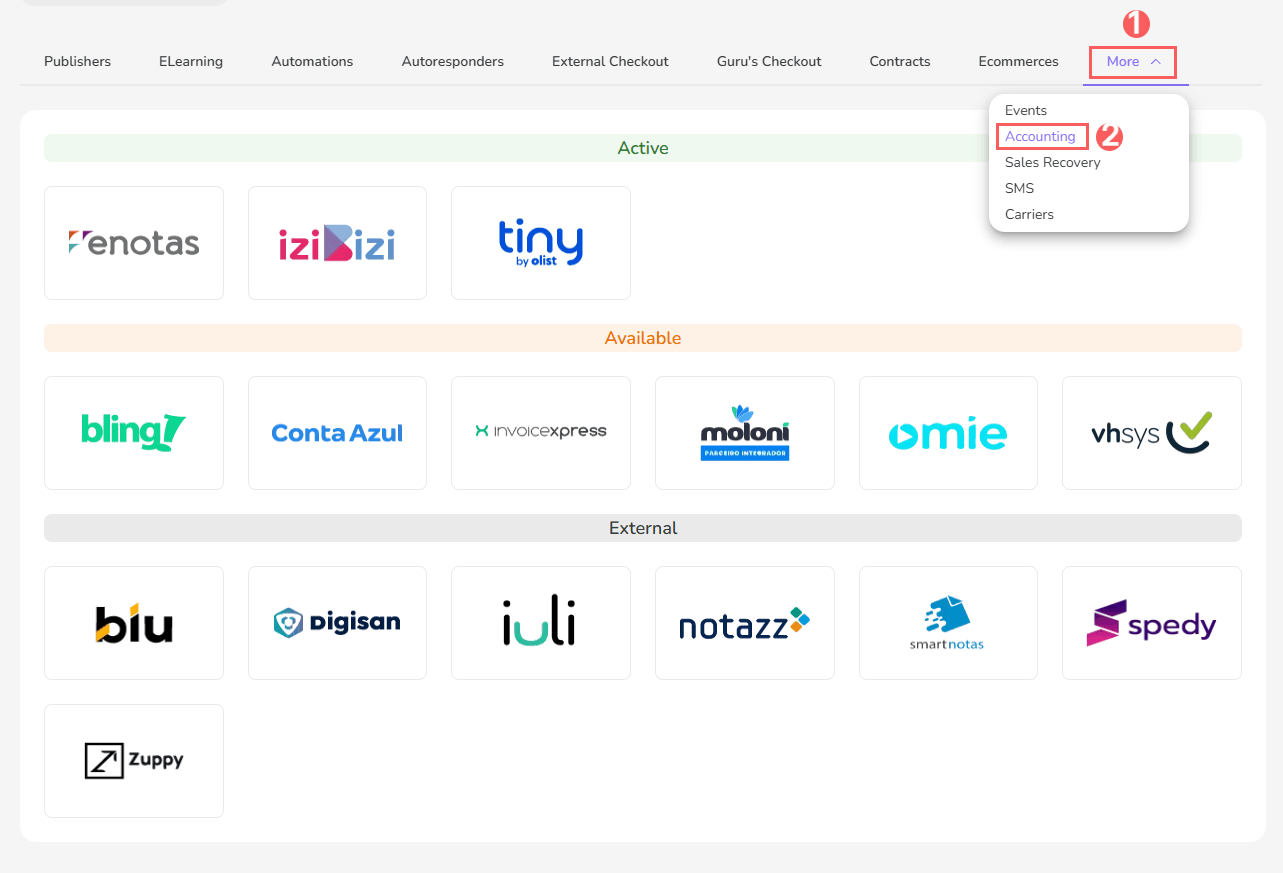
3 - To activate an integration, simply click on the desired option and follow the instructions1 indicated.
Access now and see the step-by-step guide on how to Activate integration with a billing or invoice issuance system.
(1) You will need the login and access password or the API key to activate the integration. Consult the documentation of the desired tool in the link above to learn more.
Integrate Product Delivery
In this section, you will configure the delivery of your product, whether digital or physical. For digital products, configure your membership area to automatically release access to content. For physical products, customize delivery by integrating with carriers or freight systems for automatic calculation.
Membership Area
The Membership Area is where you configure and manage access to your digital product, ensuring automatic content release for your customers.
Steps:
1 - In the left sidebar menu, click on Settings, and then on Integrations.
2 - Next, click on membership Area and choose the membership area you want to use to automatically release your courses.
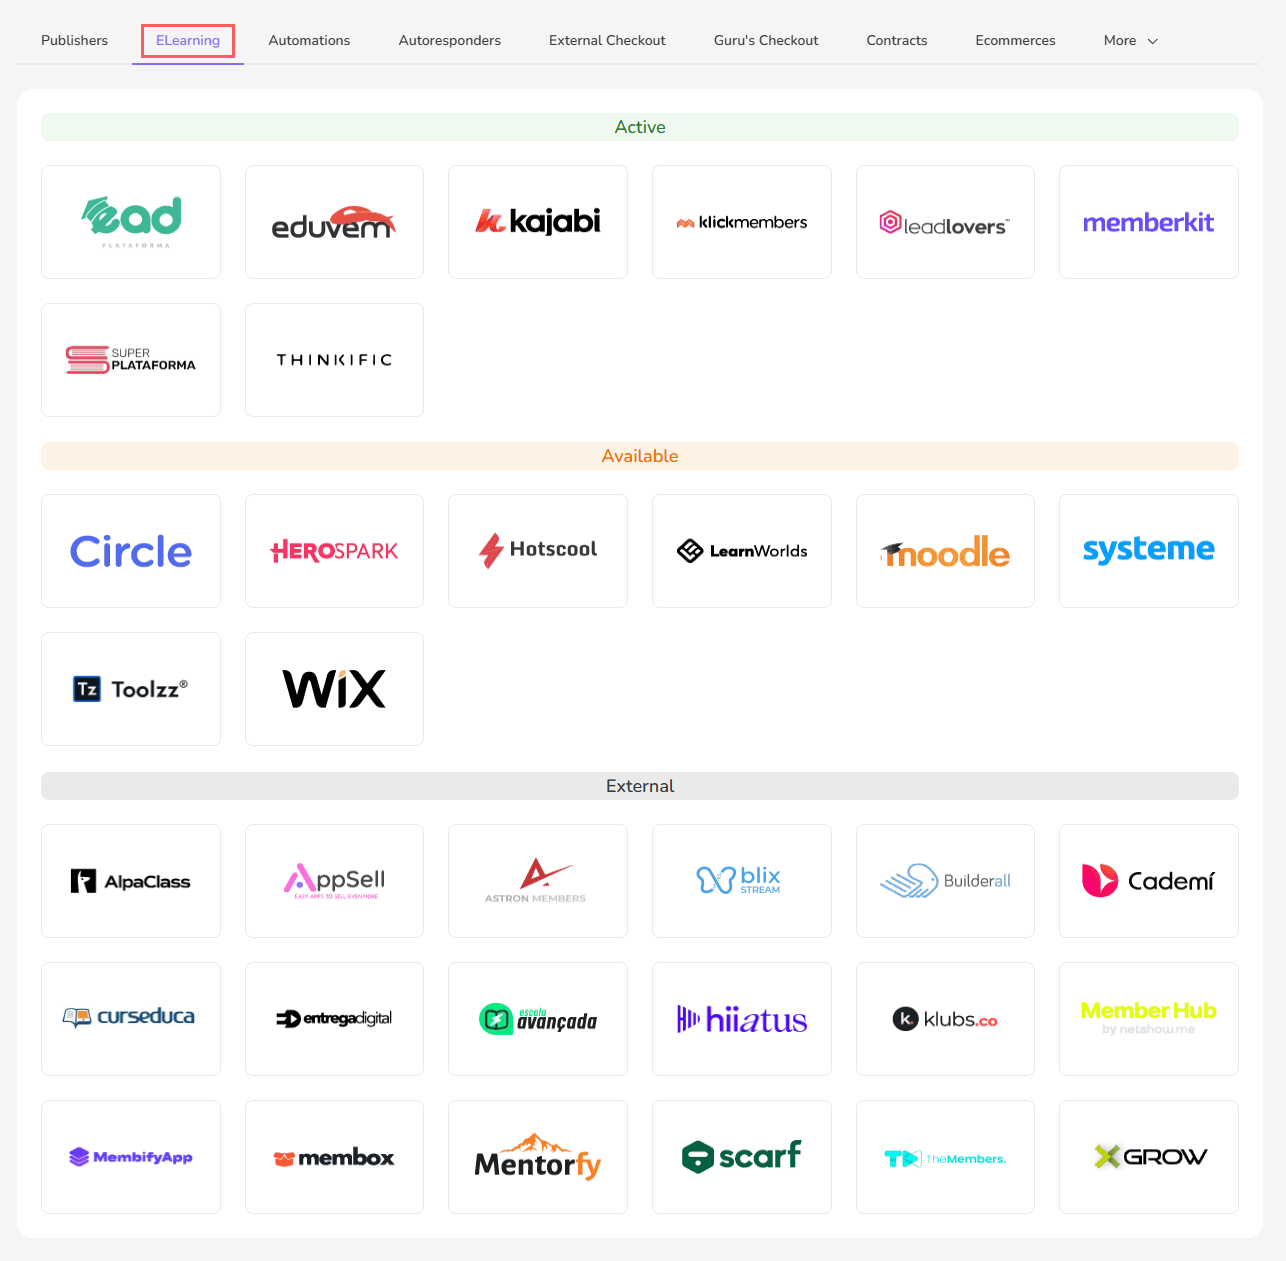
3 - To activate an integration, simply click on the desired option and follow the instructions1 indicated.
Access now and see the step-by-step guide on how to Activate integration with a membership area.
(1) You will need the login and access password or the API key to activate the integration. Consult the desired tool's documentation at the link above to learn more.
Carrier
The Carriers section in Guru is where you configure the delivery of physical products. By integrating with carriers or freight systems, you enable automatic freight calculation, optimizing the shipping process.
Steps:
1 - In the left sidebar menu, click on Settings, and then on Integrations.
2 - Access the Carriers option to connect a freight management system and display freight quotes in Guru Checkout or send the order for label issuance.
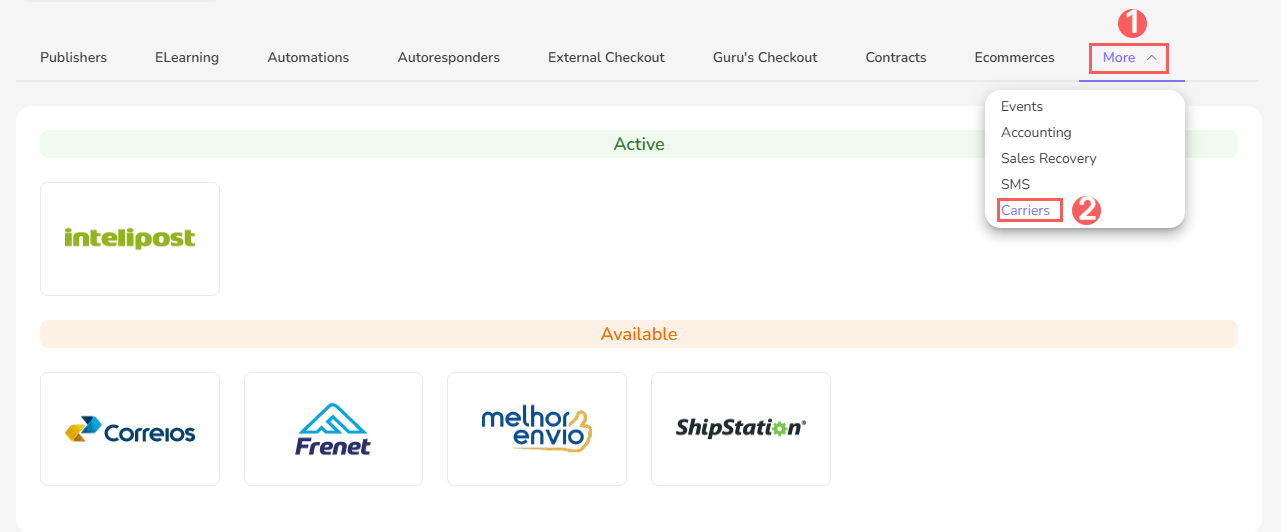
If you intend to use a carrier, click on the desired option and follow the instructions1 indicated.
Access now and see the step-by-step guide on how to Activate integration with a carrier.
(1) You will need the login and access password or the API key to activate the integration. Consult the desired tool's documentation at the link above to learn more.
Register Products and Offers
In this step, we will focus on how you can organize and optimize the sale of your products, starting with the registration of all types of products (whether physical products, subscriptions, or e-tickets), the creation of varied offers (such as combos, upsells, downsells, and order bumps), and efficient inventory management for your physical products.
Once the basic integrations are activated, you must register products and offers to generate checkout links.
Register product
Access the Products menu to register a product in Guru. When adding a product, you must link the payment processor1 (in the marketplace field) and select the type according to the desired sales modality: produto for one-off sales or assinatura for recurring charges.
Registering products (step-by-step)
When registering the product, you must also perform the billing settings2 to correctly send the order to the invoice issuance tool.
Alternatively, you can import products from the e-commerce platform. Activate an integration in Settings » Integrations » Ecommerces to use this feature.
(1) Payment processors activated in Settings » Integrations » Checkout Guru will be displayed.
(2) Setting available only when an option is activated in Settings » Integrations » Billing.
Add offer to product
When registering the product, you must add an offer to define components such as: price, discount, payment methods, installment options, shipping, and others. You can also add complementary product(s) for order bump, configure discounts and also define intervals1 and cycles1 for recurring charges as well as options for plan upgrade1/downgrade1 .
Add offer to product (step-by-step)
If it is a physical product, when registering the offer you must also activate the use of the carrier2 and then define the shipping settings.
According to your sales strategy, your product may have one or more registered offers. Consult the best practices guide to know when to add a product or an offer.
(1) Settings available only for subscription / recurring billing products.
(2) Setting available only when an option is activated in Settings » Integrations » Carrier
Checkout Link Disclosure Strategies
At this stage, to boost your sales, it is crucial to intelligently disclose your checkout link. This involves using personalized and trackable links, integrating with marketing tools like Facebook Pixel and Google Analytics, and applying strategies adapted for each sales channel.
How to obtain and use the Checkout Link
Upon completing your offer registration, the checkout link is automatically generated. To access the checkout link, simply copy the link available in the offer and send it directly to your customers or publish it on a sales page.
To ensure everything works perfectly, consider:
We recommend making a test purchase to validate that everything is working as expected.