
With Neural Sales A/B Test Tracking, you can view the details of each tracking, such as the number of clicks, average sales value, and number of sales. Additionally, you can add a tracking with the desired configuration.
Requires a Forms P.P.C.T. (tracked form) on each page and a Checkout P.P.C.T. (or Checkout A/B Test) on the thank you page offer (if applicable). If desired, capture pages can share the same form.
Access Sales Tracking to view the information.
On this page:
-
Trackings
-
Add Neural Sales A/B Test trackings
-
Trackings
In the Trackings section, you can add a new Neural Sales A/B Test tracking and check all existing test information.
Steps:
1 - Select the Neural Sales A/B Test list - a screen with the data will be displayed.
2 - In Trackings, the list displays the following information:
-
Name: displays the name of the tracking source for the period;
-
Field: select the field in the marketplace - if you are using Guru Checkout: recommended to select “src“ and/or External Checkout: select a compatible field;
-
Clicks: displays the number of tracked clicks for the period;
-
Checkouts: displays the number of checkouts performed for the period;
-
Sales: displays the number of sales made for the period;
-
Valid: displays the number of valid sales for the period;
-
Average Value: displays the average value of valid sales for the period;
-
Score: displays the tracking score for the period;
-
Promotion URL: displays the promotion URL of your Neural Sales A/B Test;
-
Deactivate: when active, the promotion URL will no longer be available - there will be no more redirection to the payment URL informed in the button.

Add Neural Sales A/B Test trackings
In this section, you will add Neural Sales A/B Test trackings.
Steps:
1 - Select the Neural Sales A/B Test list - a screen with the data will be displayed.
2 - In Trackings, click on Add Tracking.
3 - In Create New Tracking, enter the following data:
-
Name: name or title to identify the tracking;
-
Forms URL: destination page URL that will be displayed;
-
Marketplace Field: select the field in the marketplace - if you are using Guru Checkout: recommended to select “src“ and/or External Checkout: select a compatible field.
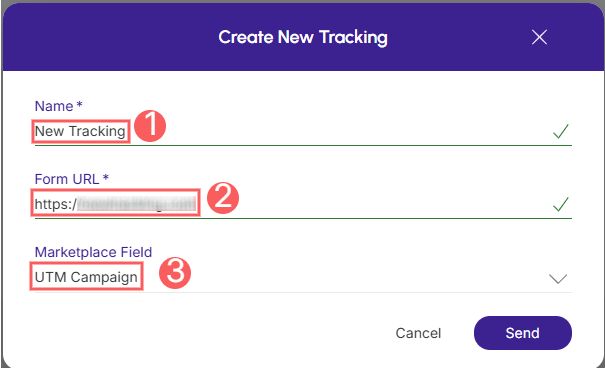
4 - Click on Send.