
It is possible to hide or display some fields on the checkout page according to your needs or sales strategy.
For example:
-
If you need to ensure the buyer's email is correct, you can require double email entry. When this option is enabled, the buyer must fill in two email fields during checkout.
-
If you sell to companies in Brazil, you can display the Company Name field and also accept CNPJ as an identification document.
-
If you sell a digital product and do not need the buyer's address, you can hide the address fields and simplify the purchase process.
The form options can be applied at 3 levels:
-
Global Level: applies to the checkout of all registered products - default setting;
-
Product Level: applies to the product in question - overrides the definitions of item 1;
-
Offer Level: applies to the product offer in question - overrides the definitions of items 1 and 2.
In this tutorial, whenever possible, you will be guided to perform the configuration at a global level (recommended). To configure at other levels, access the Checkout tab in the product or offer registration in question.
On this page:
-
Double filling of e-mail
-
Require double address entry
-
Include Company Name field
-
Company Name Required
-
Hide address fields (purchase without address)
-
Hide Document field (if allowed)
-
Allow changing the quantity of items
-
Configure the item increment unit in the offer
-
Allow Discount Coupon
-
Define accepted document types
-
Disable checkout for some countries
-
Display payment method horizontally
-
Display selected shipping details
-
Hide simulated value
-
Allow indexing
-
Self-attribution in the Invoice
Before you start, you need to…
-
Be a user administrator or have permission to perform the following actions.
Double filling of e-mail
To ensure your customer enters the email correctly, you can enable double email entry.
Steps:
1 - According to the configuration level you want to apply:
1.1 - Global Level: access Settings » Checkout.
1.2 - Product Level: access Products » (desired product) » Checkout.
1.3 - Offer Level: access Products » (desired product) » Offers » (desired offer) » Checkout.
2 - In Appearance, activate the option Double filling of e-mail.

3 - Click on Send.
Require double address entry
To ensure your customer enters the address correctly, you can enable double address entry.
Steps:
1 - According to the configuration level you want to apply:
1.1 - Global Level: access Settings » Checkout.
1.2 - Product Level: access Products » (desired product) » Checkout.
1.3 - Offer Level: access Products » (desired product) » Offers » (desired offer) » Checkout.
2 - In Appearance, activate the option Request address confirmation.

3 - Click on Send.
Add Company Name field
If you sell to companies, you can display the Company Name field - optional completion.
Steps:
1 - According to the configuration level you want to apply:
1.1 - Global Level: access Settings » Checkout.
1.2 - Product Level: access Products » (Click on the desired product) » Checkout.
1.3 - Offer Level: access the tab Offers » (Click on the desired offer) » Checkout.
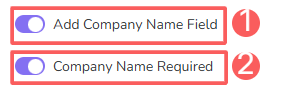
2 - In Appearance, activate the option Add Company Name Field.

3 - Click on Send.
Company Name Required
If you sell to companies, you can require the Company Name field to be Mandatory - optional completion.
This field will only be available if the "Include Company Name Field" field is selected.
Steps:
1 - According to the configuration level you want to apply:
1.1 - Global Level: access Settings » Checkout.
1.2 - Product Level: access Products » (Click on the desired product) » Checkout.
1.3 - Offer Level: access the tab Offers » (Click on the desired offer) » Checkout.
2 - In Appearance, activate the option Add Company Name Field, and then activate the option Company Name Required.
3 - Click on Send.
Hide address fields (purchase without address)
If you sell a digital product or do not need to collect the buyer's address, you can hide the address fields at checkout. With this option activated, the checkout skips the address step and only requires personal data and payment information from the buyer.
Purchase without address is only available for payment processors that support this feature. Before activating this option at checkout, you must follow the procedures indicated in Settings » Integrations » Checkout Guru » (processor name), "Sale without Address" tab. Otherwise, the payment processor will disapprove all your sales.
Unlike the other form options, the “purchase without address” option is only performed at the product level1 or offer level2.
Steps:
1 - According to the configuration level you wish to apply:
1.1 - Product Level: access Products » (desired product) » Checkout.
1.2 - Offer Level: access Products » (desired product) » Offers » (desired offer) » Checkout.
2 - In Appearance, activate the option Purchase Without Address.

3 - Click on Send.
When activating the Purchase without Address, the option Recaptcha is automatically activated. The Recaptcha is only displayed in cases where there is suspicion of bots or other types of robots.
(1) The applied configuration takes effect on all product offers.
(2) The applied configuration takes effect only on the offer in question.
Hide the Document field (if allowed)
If you want to hide the Document field in the Checkout, you must enable this option.
This functionality is only available for sales to some countries.
Steps:
1 - According to the configuration level you wish to apply:
1.1 - Global Level: access Settings » Checkout.
1.2 - Product Level: access Products » (Click on the desired product) » Checkout.
1.3 - Offer Level: access the tab Offers » (Click on the desired offer) » Checkout.
2 - In Appearance, activate the option Hide document if possible.

3 - Click on Send.
Allow changing the quantity of items
If you want to allow your customer to change the quantity of items for physical products, you must enable this option in the Checkout.
Attention
The change in the quantity of items is individual, meaning it only applies to the offer being configured.
For example:
-
If you have an offer with 1 item, another with 2, another with 3 and so on, just edit the offer with 1 item, configure the quantities and use only that offer link.
-
If you have different pricing strategies according to quantities, you will have to use different offers, such as, for example, offer 1 - 1 item at $20 | offer 2 - 2 items at $35 | offer 3 - 3 items at $50.
Steps:
1 - According to the configuration level you wish to apply:
1.1 - Global Level: access Settings » Checkout.
1.2 - Product Level: access Products » (Click on the desired product) » Checkout.
1.3 - Offer Level: access the tab Offers » (Click on the desired offer) » Checkout..
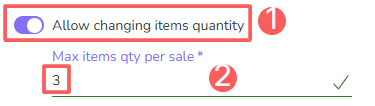
2 - In Appearance, activate the option Allow changing the quantity of items.
-
Allow changing items quantity: when activated, allows the buyer to change the quantity of items;
-
Max items quantity per sale: inform the quantity of items you want for sales.
3 - Click on Send.
Configure the item increment unit in the offer
By activating the customization of the quantity of items in Checkout Guru, you can also configure the item increment unit in the offer. This means you can determine the intervals that the buyer can adjust the quantity of items in the checkout, for example, if the increment is 2, the customer can select 2, 4, 6, etc.
Attention
When changing the increment unit, remember that the value must allow that, from the minimum quantity defined in the offer, the increments exactly reach the maximum quantity of items per sale, that is, the increment unit must be compatible with the values defined for the minimum and maximum quantity of the offer.
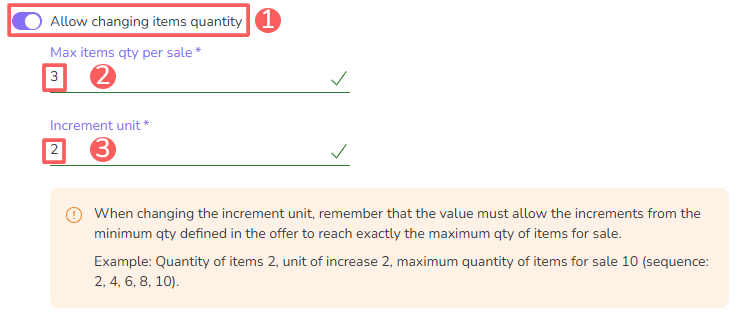
Example: Qty. of items 2, increment unit 2, max qty. items per sale 10 (sequence: 2, 4, 6, 8, 10).
Steps:
1 - According to the configuration level you wish to apply:
1.1 - Offer Level: access Products » (desired product) » Offers » (desired offer) » Checkout.
2 - In Appearance, activate the option Allow changing the quantity of items.
-
Allow changing the quantity of items: when activated, allows the buyer to change the quantity of items;
-
Max quantity of items per sale: inform the quantity of items you want for sales;
-
Increment unit: inform the increment unit compatible with the values defined for the minimum and maximum quantity of the offer.
3 - Click on Send.
The customization of the increment unit is only available at the offer level.
Allow discount coupon
If you want to offer discounts at checkout through Coupons, you must enable this option in the Checkout.
Steps:
1 - According to the configuration level you wish to apply:
1.1 - Global Level: access Settings » Checkout.
1.2 - Product Level: access Products » (Click on the desired product) » Checkout.
1.3 - Offer Level: access the tab Offers » (Click on the desired offer) » Checkout.
2 - In Appearance, activate the option Coupon Allowed.

3 - Click on Send.
After activating this option, you must create discount coupons by accessing Settings » Coupons.
Define accepted document types
Depending on the type of customer your company serves, individual or legal entity (company), and the payment processor used, you can define which types of documents will be accepted at checkout.
Examples:
-
If you sell to both individuals and businesses, you can allow both personal and business identification numbers. In this case, customers will be able to choose the appropriate document type during checkout.
-
If you sell only to individuals, you can restrict the accepted document type to personal identification only.
-
If you sell only to companies, you can restrict the accepted document type to business identification only.
-
If you sell to customers in different countries, other types of documents may be accepted. You can also define whether providing a document is required or optional.
Unlike the other form options, this configuration is performed at the offer level and only takes effect for it. To define the accepted document types, access Manage Product Offer.
Disable checkout for some countries
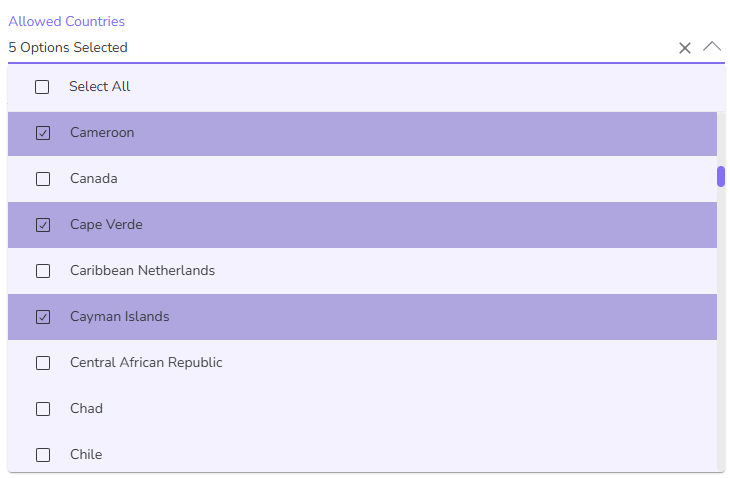
If you use a payment processor with support for international sales, you can limit the list of countries where you want to make the checkout available. This feature is useful to avoid sales in markets outside your area of operation.
For example, you can determine that the checkout is available only for Brazil, Portugal, and Chile. With this configuration, Checkout Guru displays only these 3 countries for selection, instead of all available options.
Unlike the other form options, this configuration is performed at the offer level and only takes effect for it.
(*) Country selection at checkout is only available for payment processors that support international sales.
Steps:
1 - Access the offer registration of the desired product.
2 - Click on Checkout.
3 - In Allowed countries, select the allowed countries for checkout - you can select more than one.
4 - Click on Send.
Display payment method horizontally
If you want to display the payment method horizontally, you must enable this option.
Steps:
1 - According to the configuration level you wish to apply:
1.1 - Global Level: access Settings » Checkout.
1.2 - Product Level: access Products » (Click on the desired product) » Checkout.
1.3 - Offer Level: access the tab Offers » (Click on the desired offer) » Checkout.
2 - In Appearance, enable the option Display payment methods horizontally.

3 - Click on Send.
Display selected shipping details
If you want to display details of the selected shipping, such as the delivery time (in days) of the shipping service in the purchase detail, you must enable this option.
Steps:
1 - According to the configuration level you want to apply:
1.1 - Global Level: access Settings » Checkout.
1.2 - Product Level: access Products » (Click on the desired product) » Checkout.
1.3 - Offer Level: access the tab Offers » (Click on the desired offer) » Checkout.
2 - In Appearance, enable the option Display selected shipping details.

3 - Click on Send.
Hide simulated value
If you want to hide the simulated value in Checkout, you must enable this option.
If this option is enabled, it will not display the simulated value in the checkout when the buyer converts the values to the currency of the selected country.
Steps:
1 - According to the configuration level you want to apply:
1.1 - Global Level: go to Settings » Checkout.
1.2 - Product Level: go to Products » (Click on the desired product) » Checkout.
1.3 - Offer Level: go to the tab Offers » (Click on the desired offer) » Checkout.
2 - In Appearance, enable the option Hide simulated value.

3 - Click on Send.
Allow indexing
If you want to allow the indexing of the Checkout link in search browsers, you must enable this option.
Steps:
1 - According to the configuration level you want to apply:
1.1 - Global Level: go to Settings » Checkout.
1.2 - Product Level: access Products » (Click on the desired product) » Checkout.
1.3 - Offer Level: access the tab Offers » (Click on the desired offer) » Checkout.
2 - In Appearance, activate the option Allow indexing.

3 - Click on Send.
Self-attribution in the Invoice
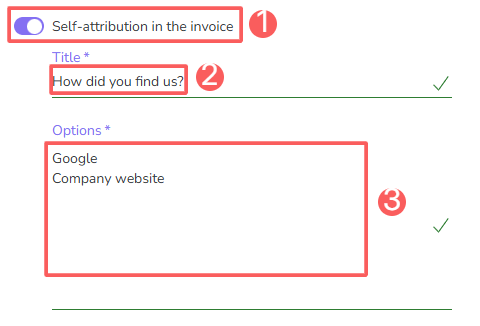
If you want to define self-attribution options on the invoice, you must enable this option. By enabling this option, you allow the buyer themselves to inform, at the time of purchase, where they learned about your product or service. This feature is useful for collecting data about the origin of your customers, allowing you to optimize your strategies and facilitate decision-making based on the information obtained.
Steps:
1 - According to the configuration level you wish to apply:
1.1 - Global Level: access Settings » Checkout.
1.2 - Product Level: access Products » (Click on the desired product) » Checkout.
1.3 - Offer Level: access the tab Offers » (Click on the desired offer) » Checkout.
2 - In Appearance, activate the option Self-attribution in the invoice.
-
Self-attribution in the invoice: when activated, allows the buyer to inform where they learned about the product/service;
-
Title: enter the text of the question the buyer will see on the invoice;
-
Options: define the responses the buyer can select - define the line item assignment options.
3 - Click on Send.
More Resources