
You can define the content you want to display at checkout, such as company name, logo, store policies, service channels, and texts for the Order Bump section.
Content settings can be configured at three levels:p
-
Global Level: applies to the checkout of all registered products - default setting;
-
Product Level: applies to the product in question - overrides the definitions of item 1;
-
Offer Level: applies to the product offer in question - overrides the definitions of items 1 and 2.
In this tutorial, whenever possible, you will be guided to configure at a Global Level (recommended). To configure at other levels, access the Checkout tab in the registration of the product or offer in question.
On this page:
-
Display company name at checkout
-
Display service channels at checkout
-
Add a logo to the checkout page
-
Add a Favicon to the checkout page
-
Add store policies
-
Checkout Language
-
Customize the Order Bump section
-
Customize invoice description
-
Activate automatic currency conversion
-
Show price with tax included
-
Audit
Before you start, you need to…
-
Be an administrator user or have permission to perform the following actions.
Display company name at checkout
You can display your company or brand name at the top of the checkout page.
Steps:
1 - According to the configuration level you want to apply:
1.1 - Global Level: access Settings » Checkout.
1.2 - Product Level: access Products » (desired product) » Checkout.
1.3 - Offer Level: access Products » (desired product) » Offers » (desired offer) » Checkout.
2 - Click on Content.
3 - In Content, enter the Store Name.

4 - Click on Send.
Display service channels at checkout
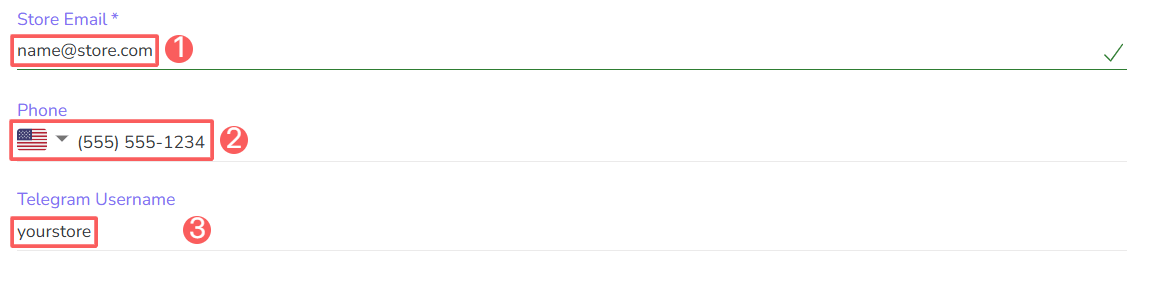
it is possible to display up to 3 service channels of your company (Whatsapp, email and Telegram) on the payment page so that customers can get in touch in case of questions.
For each service channel informed, a corresponding icon is displayed on the checkout page.
Steps:
1 - According to the configuration level you want to apply:
1.1 - Global Level: access Settings » Checkout.
1.2 - Product Level: access Products » (desired product) » Checkout.
1.3 - Offer Level: access Products » (desired product) » Offers » (desired offer) » Checkout.
2 - Click on Content.
3 - In Content, enter the following data:
-
Store Email: your store's email;
-
WhatsApp Number: your store's cell phone number;
-
Telegram username: your Telegram username.
4 - Click on Send.
Add a logo to the Checkout page
You can add your company logo to display on Checkout Guru. In the desktopversion, the logo will be displayed in the top left. For usability reasons, the logo is not displayed in the mobile.version.
Steps:
1 - According to the configuration level you want to apply:
1.1 - Global Level: access Settings » Checkout.
1.2 - Product Level: access Products » (desired product) » Checkout.
1.3 - Offer Level: access Products » (desired product) » Offers » (desired offer) » Checkout.
2 - Click on Content.
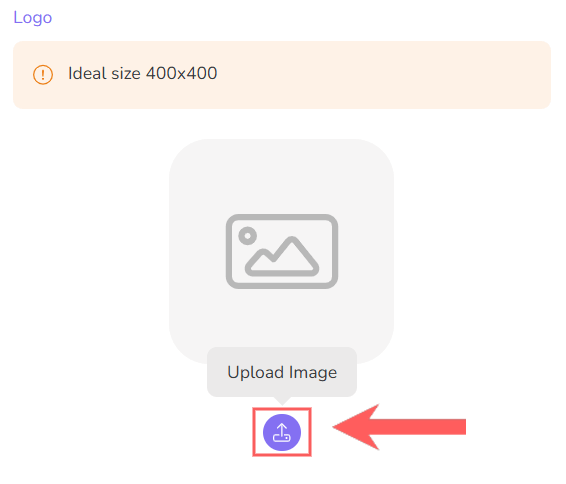
3 - In Logo, click the add button and select your logo image.
Recommended image size: 400x400 pixels resolution.
4 - If necessary, use the editor to adjust the image and click Send.
Add a Favicon
You can change the Favicon, the icon that appears in the browser tab, of your checkout page.
Steps:
1 - According to the configuration level you want to apply:
1.1 - Global Level: access Settings » Checkout.
1.2 - Product Level: access Products » (desired product) » Checkout.
1.3 - Offer Level: access Products » (desired product) » Offers » (desired offer) » Checkout.
2 - Click on Content.
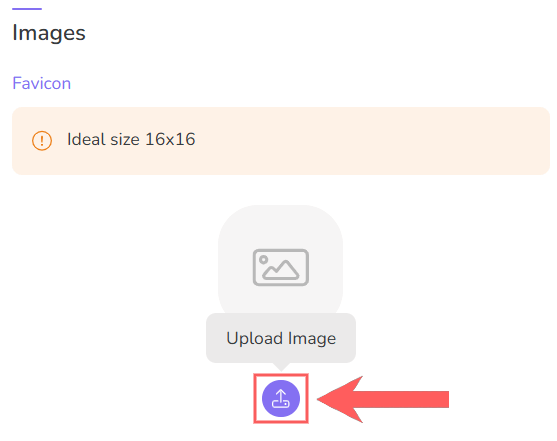
3 - In Favicon, click the add button and select the desired image.
Recommended size: 16x16 pixels resolution.
4 - If necessary, use the editor to adjust the image and click Send.
Add store policies
You can add the following policies to your payment page:
-
Terms of Use
-
Privacy Policy
-
Legal Notice
When you add store policies, links to the terms of use and privacy policies are displayed in the footer of the checkout pages. While the legal notice text is displayed above the "Buy" button.
Steps:
1 - According to the configuration level you want to apply:
1.1 - Global Level: access Settings » Checkout.
1.2 - Product Level: access Products » (desired product) » Checkout.
1.3 - Offer Level: access Products » (desired product) » Offers » (desired offer) » Checkout.
2 - Click on Content.
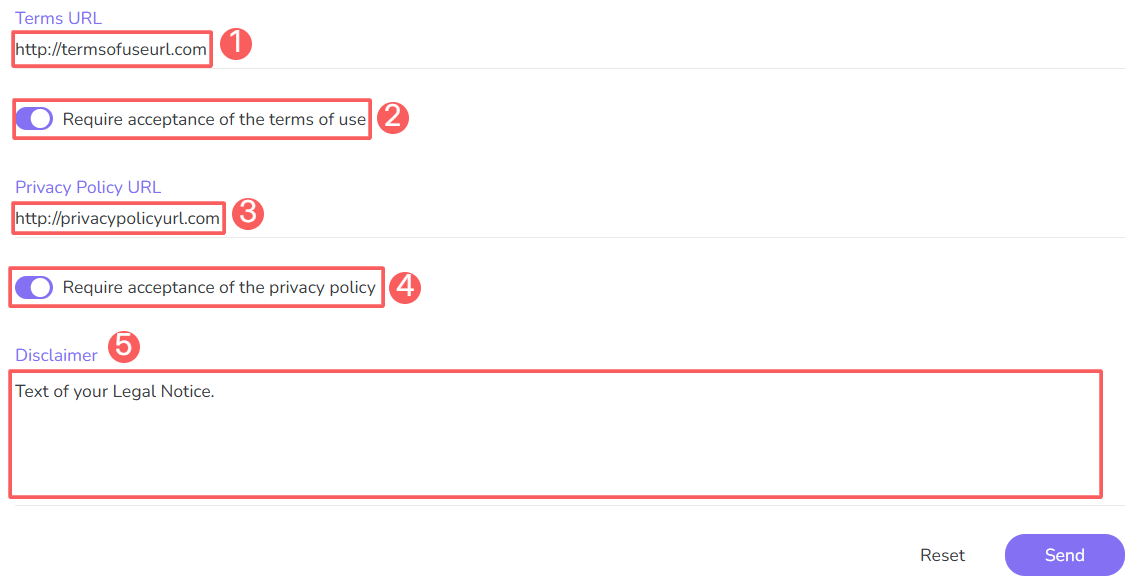
3 - In Content, enter:
-
Terms URL: the URL of your Terms of Use page;
-
Require acceptance of terms of use: when activated, requires acceptance of the terms of use;
-
Privacy Policy URL: the URL of your Privacy Policy page;
-
Require acceptance of the privacy policy: when activated, requires acceptance of the terms of the privacy policy;
-
Disclaimer: the text of the Legal Notice.
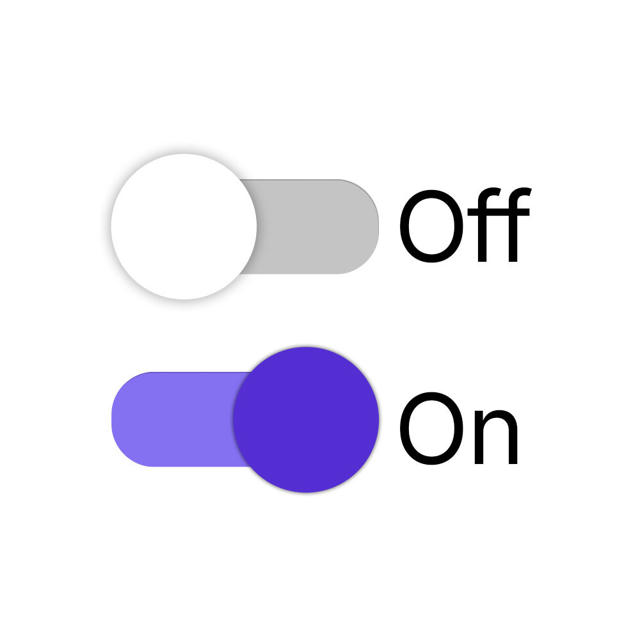
4 - Click on Send.
Checkout Language
Checkout Guru is translated into English, Portuguese, Spanish, German, French, Polish and Italian. The checkout language is automatically defined according to the user's browser language. However, the user can change the checkout country which, consequently, changes its language.
In addition to translation, address fields, tax data, display currency, and local payment methods change according to the selected country.

Country selection is only available for payment processors that support international sales. Consult the processors with this feature, as well as countries, currencies, and local payment methods available in Checkout Guru.
Some payment processors allow International Sales, and allow customers in Brazil to sell to Europe, making the currency exchange, and others charge in the currency of the country of origin, depending on the specifications of each processor, these being:
|
Payment Processors |
Note* |
|---|---|
|
Adyen |
Charges in the account currency, including payments with cards issued abroad. |
|
Asaas |
Charges in Brazilian real for cards issued abroad. |
|
Cel_cash |
Charges in the account currency, including payments with cards issued abroad. |
|
CoinPayments |
Charges in the account currency, including payments with cards issued abroad. |
|
Ebanx |
Charges in local currency and performs a currency exchange operation to the seller's account currency. |
|
Iugu |
Charges in Brazilian real on cards issued abroad. |
|
Malga |
Processes the transaction in Brazilian reais (BRL), regardless of the customer's original card currency. |
|
maxiPago |
Charges in the account currency, including payments with cards issued abroad. |
|
Mercado Pago |
Charges in Brazilian real on cards issued abroad. |
|
PagBank (formerly PagSeguro) |
Charges in Brazilian real on cards issued abroad. |
|
PagBrasil |
Charges in local currency and performs a currency exchange operation to the seller's account currency. |
|
Paypal |
Charges in the account currency, including payments with cards issued abroad. |
|
Revere Payments |
Process the charges in USD for cards issued abroad. |
|
Revolut |
Charges in the account currency, including payments with cards issued abroad. |
|
Safe2Pay |
Charges in the account currency, including payments with cards issued abroad. |
|
SIBS |
Charges in the account currency, including payments with cards issued abroad. |
|
Stone |
Charges in Brazilian real on cards issued abroad. |
|
Stripe |
Charges in the account currency, including payments with cards issued abroad. |
(*) Access the documentation for information about the payment processor.
You can disable checkout for certain countries. Access Disable checkout for some countries and learn how to limit this feature.
Customize the Order Bump
You can define the general content of the Order Bump section, such as title, description, and behavior rules.
This section is displayed at checkout when you add one or more products as order bump to the main product offer.
Steps:
1 - According to the configuration level you wish to apply:
1.1 - Global Level: access Settings » Checkout.
1.2 - Product Level: access Products » (desired product) » Checkout.
1.3 - Offer Level: access Products » (desired product) » Offers » (desired offer) » Checkout.
2 - Click on Order Bump.
3 - In Order Bump, enter:
-
Title: title to be displayed in the section;
-
Description: text displayed before the product presentation - maximum of 255 characters;
-
Maximum order bump offers to choose: limits the quantity of products the user can buy;
-
Add value of selected items to the total: when activated, sums the value of selected products to the total order;
-
Show only on credit card: when activated, the order bump section is displayed only when “credit card” is selected as the payment method;
-
Show Order Bump Offers Installments1 : when activated, the order bump section displays installments in the offers - (available only for customers in Brazil);
-
Highlight installments2 : when activated, displays only the value of the selected installment in the Order Bump - (available only for customers in Brazil);
-
Display total amount with interest: when activated, the order bump section displays the total value with interest;
-
Show Order Bump offers before payments: when activated, the order bump section is displayed before payment methods.
(1) When activating the display of installments in the offers, only the installment value itself will appear (available only for customers in Brazil).
(2) This option will only appear if the installment option for offers is active. And when activating this option, only the installment value will be displayed (available only for customers in Brazil).
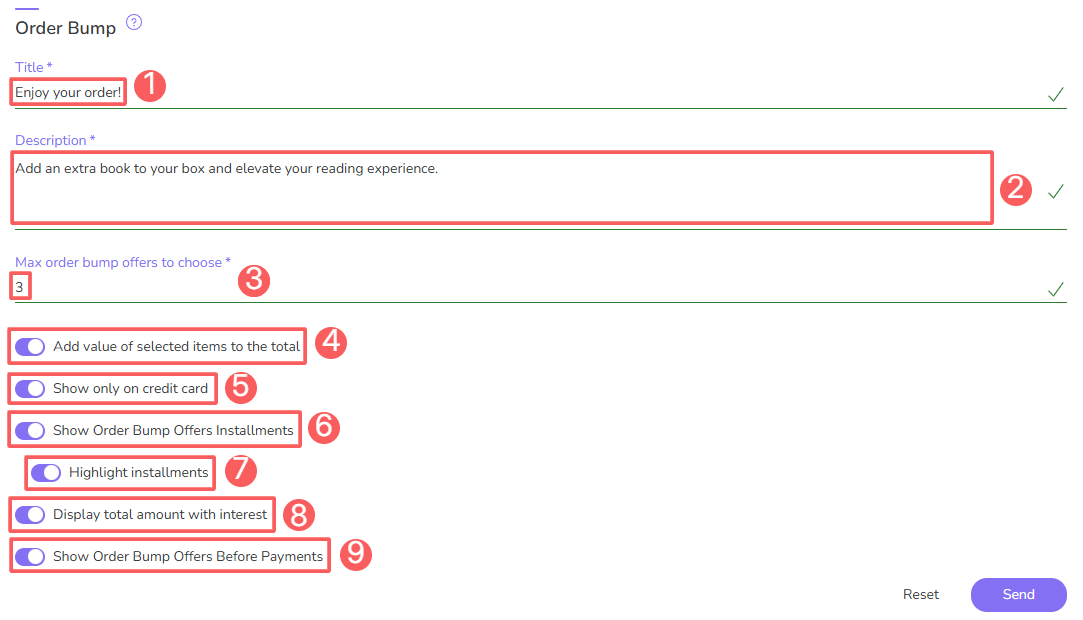
4 - Click on Send.
Customize the description on the invoice
You can customize the description that should appear on your customer's credit card invoice. With this setting, it is possible to change the product name that appears on the invoice for each different product or offer.
This setting is available in the product settings linked to PagarMe, Mundipagg, and MercadoPago.
Steps:
1 - In the side menu, access Products.
2 - In your Products list, select the Product you want to update.
3 - Access the offer list in the desired product registration.
4 - According to the configuration level you wish to apply:
1.1 - Product Level: access the Checkout tab.
1.2 - Offer Level: access Offers » (desired offer) » Checkout.
5 - Click on the Content tab.
6 - In Disclaimer, enter the text that should appear on the customer's invoice - Suggestion: store name or product name.
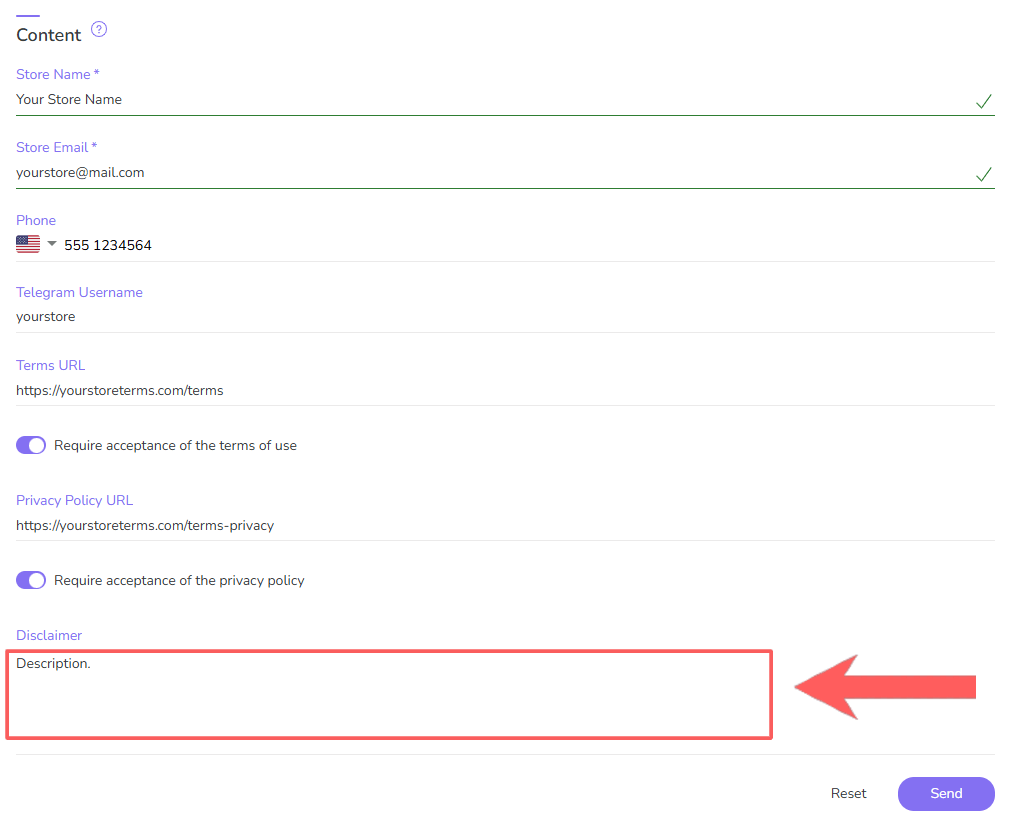
7 - Click on Send.
Activate automatic currency conversion
You can automate currency conversion to the buyer's currency if they are in a different country.
Steps:
1 - According to the configuration level you wish to apply:
1.1 - Global Level: access Settings » Checkout.
1.2 - Product Level: access Products » (desired product) » Checkout.
1.3 - Offer Level: access Products » (desired product) » Offers » (desired offer) » Checkout.
2 - Click on Appearance.
3 - Convert values to the currency of the selected country: when activated, the value is automatically converted to the buyer's country currency.

4 - Click on Send.
Show price with tax included
It is possible to display the tax applied to the final sales value for European countries. You can access the list of integrations available in Guru.
This setting is available in the product settings linked to SIBS and Stripe.
Steps:
1 - According to the configuration level you wish to apply:
1.1 - Product Level: access Products » (desired product) » Checkout.
1.2 - Offer Level: access Products » (desired product) » Offers » (desired offer) » Checkout.
2 - Click on Checkout.
3 - Has Tax Included: when activated, shows the price with tax included for sales in Europe.

4 - Click on Send.
Consult Audit
As a security measure, Guru stores a history of all operations performed in the product registration, identifying user, date/time of operation, and other details.
Steps:
1 - In the side menu, click on Settings, and then Checkout.
2 - Click on Audit.
3 - Activities are displayed in a timeline (from most recent to oldest).

4 - If desired, you can view the activity detail by clicking on its title.

5 - Click on one of the available sections to view the data:
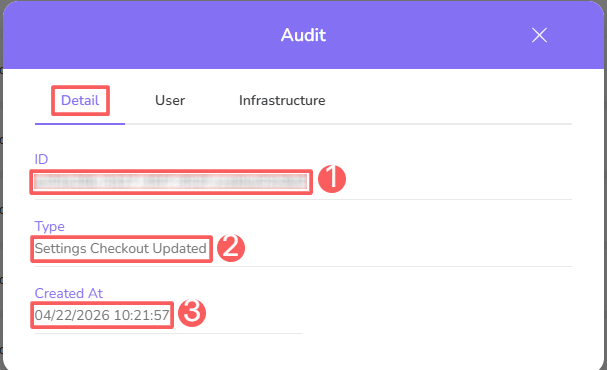
Detail
Displays the detailed information of the activity in question.
-
ID: identification number (ID) of the update;
-
Type of change made;
-
Created at: activity registration date.
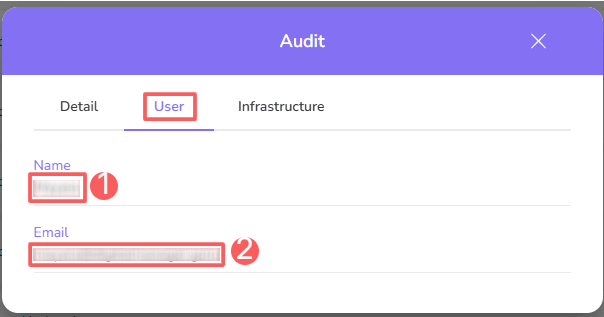
User
Displays the information of the user who performed the action.
-
Name: name of the user who performed the operation;
-
Email: email of the user who performed the operation.
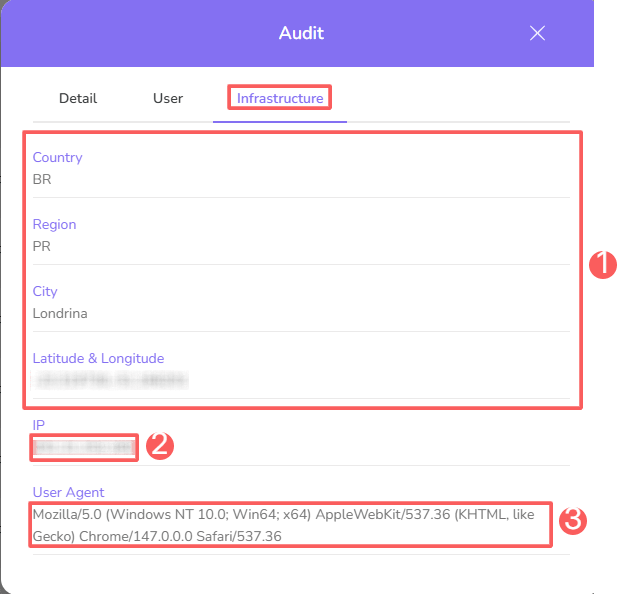
Infrastructure
Displays the infrastructure information (country, IP, user agent…) of the related activity.
-
Country, Region, City, Latitude & Longitude: location of the device that performed the activity.
-
IP: device IP address.
-
User Agent: identification of the user agent that performed the operation.
How to filter the Audit list
You can use the filters to view a smaller subset of existing audits. This feature is useful for finding specific audits you want to view.
By default, only records from the last 28 days will be shown, but the period can be changed in the filters, in the Period.field.
Steps:
1 - In the side menu, click on Settings, and then Checkout.
2 - Click on the Audit tab.
3 - Under Audit, click on Filters.
4 - Fill in one or more filter options:
-
Period: searches for audits registered in the selected period - you can use the predefined time interval buttons or select the date you want to view;
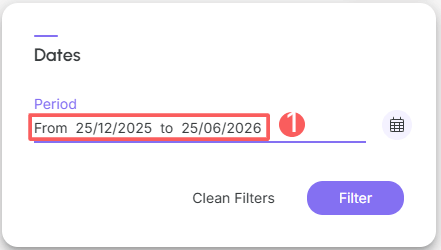
5 - Click on Filter.
You can view the number of applied filters, and when using them, you will be able to clear them without accessing the Filters icon again, making it easier to remove the selection.
Protect your data. Increase your business security.
Create and manage users determining what each collaborator can see and do within the organization.